Code 2: Data and Variables

Code 2

Data and Variables

Learning Objectives:

In this module, you will...

  • Learn about data and different data types
  • Learn how to use variables and databases
  • Learn to organize data into lists
  • Create a to-do list app that connects to a database

This unit contains a lot of information, and it is okay if you don’t understand it all right now. The best way to understand coding concepts is by working through the Code Challenges to see them in action! You can always refer back to this unit anytime you get stuck building your final app.

Data

At some point in your life, you’ve probably heard the word data. Data can mean a lot of things, but in computer science, data is the information that your app needs in order to work. To better understand this, let’s think about some apps and some of the information that they need in order to work.

WhatsApp logo

WhatsApp

This social app can message and call contacts. The data it needs is:

  • Your username
  • Your friends' usernames
  • Messages you want to send
  • The time
  • Your location

Angry Birds logo

Angry Birds

In this game app you shoot birds at pigs to defeat them. The data it needs is:

  • Your score
  • How many points each object is worth
  • What levels you've completed
  • How many birds you get in each level

Technovation logo

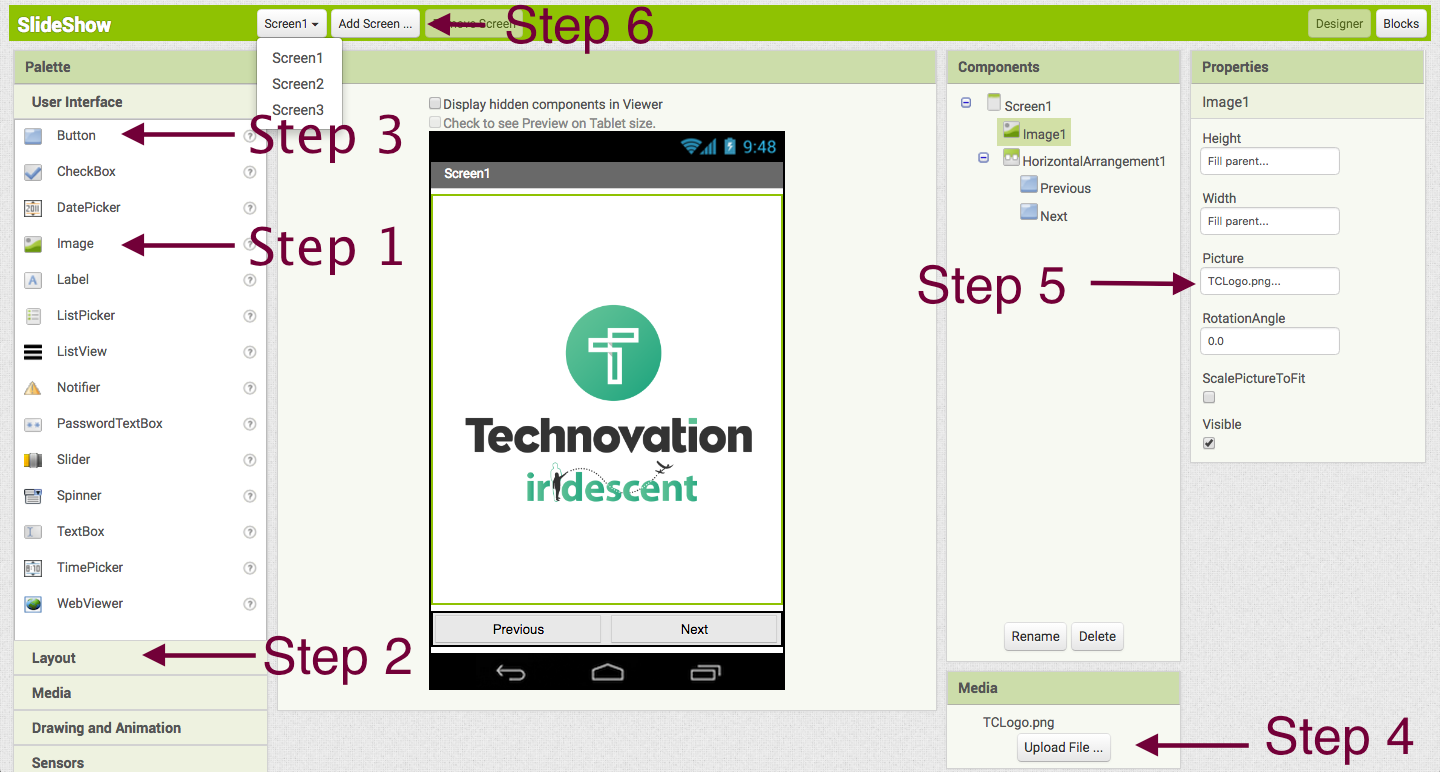
Slideshow Challenge App

This is the app you made in the Code 1 Challenge. The data it needs is:

  • Your favorite images

The programmer needs to set up ways for the app to get all the information it needs. Remember, computers can’t do anything on their own without instructions. Here are a few ways that apps in App Inventor can get data to use:

  1. The programmer put the information in:
    • In your slideshow app, you (the programmer) entered in your favorite images.
    • In Angry Birds, the programmer entered in how many birds the player gets on each level.
  2. The user enters the information:
    • In WhatsApp, the user needs to tell the app what she wants to send and who she wants to send it to.
  3. The app connects to another place to get information:
    • WhatsApp connects to your phone to get the time so it knows what time you sent a message.

Sometimes an app will save information the user put in. For example, WhatsApp saves message history which allows you to see the last message you sent to a friend. To do this in, the programmer uses a database, which you will learn about in this lesson.  You will learn more about how to connect to other places to get information later.

Thought Exercise

If you were using an app that helps you find the nearest grocery store, what data do you think the app needs to have?

Data Types

As you saw in the section above, data can be a lot of things! To make it easier for computers to understand what to do with the data they are given, data is put into categories. This is known as a data type. Programming languages revolve around three major data types: numbers, strings, and booleans. App Inventor also lets you use more complex data types such as colors and images. You don’t need to do anything with data types you'll learn about in this section but it will be good to keep them in mind as you code more.

Numbers

A number data type is just what you think it is! In App Inventor,  you can use numbers by clicking on going to Math in blocks.

You will use Math blocks whenever you need to use numbers. Here are some examples of when you might use a number data type in your app.

  • Calculating a player’s score in a game
  • Counting how many times a user has tried to log in
  • Counting how many times you want your app to do something
  • Checking to see if your user is a certain age

To learn more about all the things you can do with math blocks check out MIT’s website: Math blocks

Strings

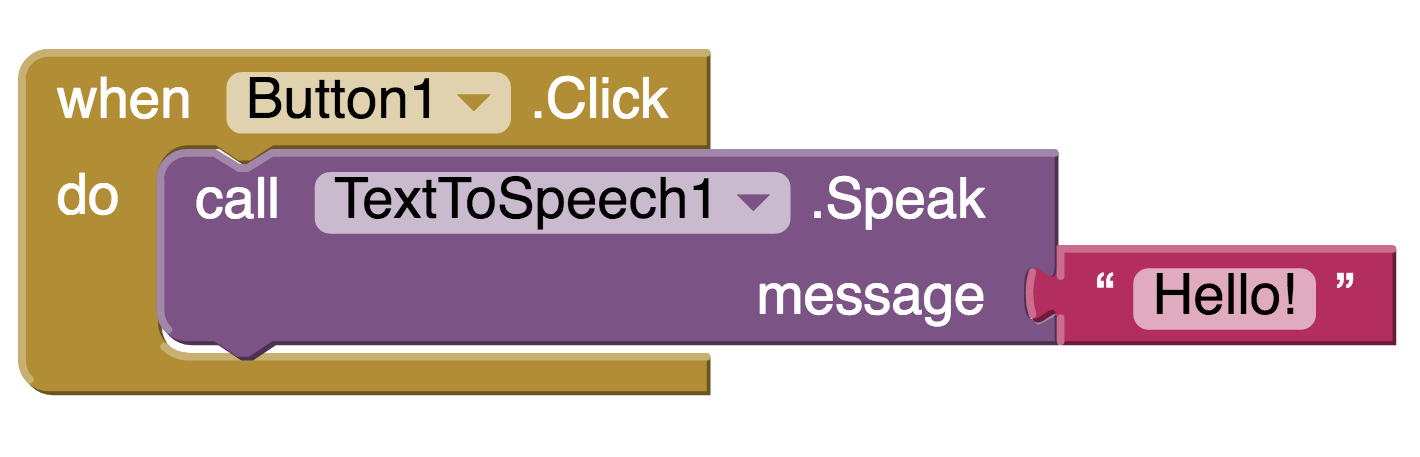
A string data type is text. In App Inventor, you can create a string by going to Text in Blocks. Here are some the text blocks you can use.

You should use a string anytime you want to add a text field to your code.  Here are some examples of when you might use a string data type in your app.

  • Allowing the the user to enter a password or username
  • Having the app speak words to the user
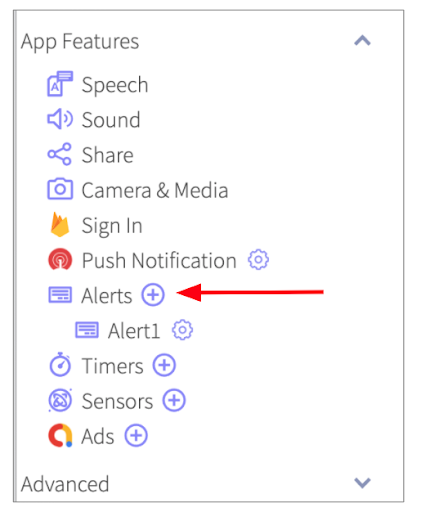
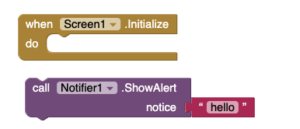
  • Showing a message or an alert to the user
  • Programming the app to open a new screen by giving it the screen name

Before moving on check out MIT’s website to see all the things you can do with text: Text blocks
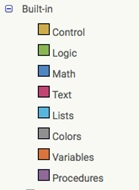
Booleans

A boolean can be one of two values: true or false. True basically means “yes” and false basically means “no”. To get a boolean, go to logic in the built in functions and grab one of these blocks:

For now, there is not much to do with booleans other than keep them in mind. Booleans and logic will be covered in more detail in Code 3: Logic, Loops and Conditionals.

Variables

One of the most important concepts in coding is a variable. A variable is a name for a piece of data that can change in value. An easy way to remember this is that a variable can vary, or change in value. There’s lots of information that is important to you every day that changes value. Here are some examples:

  • Your age
  • Your height
  • Your location
  • Today’s date

To better understand variables and how to use them in App Inventor, let’s walk through an example. Imagine you are creating a game where the user can earn and lose points. You want to have a score for the player to see in a text box. At the start of the game, the player has zero points so you added a block like this to the game.

The player sees zero in the textbox that contains her score. However, the player’s score will change as she plays the game. Each time she gains or loses points you have to update the text box. When she gets more points, you add a block like this.

That works, but now what about the next time the player earns 10 points?  You’ll have to update the text again to say 20. Then what if the player loses points? You will have to change her score to 15. What if she gains points again? This can get confusing really fast.

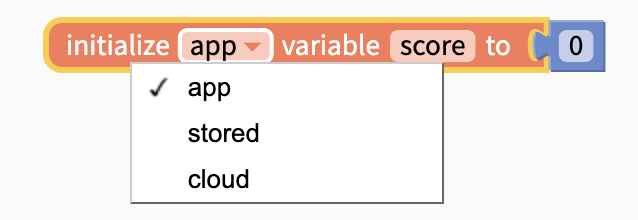
In scenarios like this, you can create a variable to keep track of the player’s score. You can create a variable called score that always has the value of the player’s current score. As she plays the game, you can add and subtract points from score and you won’t need to worry about keeping track of what the her current score actually is. Here’s how it would work in App Inventor. First you would grab this block from the variables section.

This block tells the app that there will be a variable and asks you to give the variable a name and a value. Here’s what the block would look like for a game where the player's score started at zero.

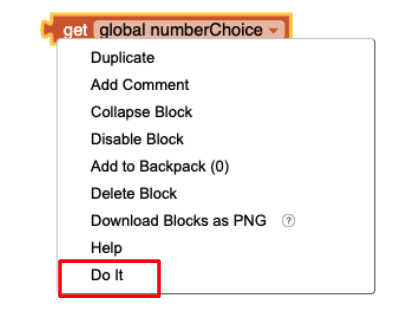
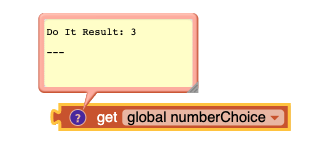
With this block, you are telling the app that there will be a piece of data called score and that it will change value as the game is played. Every time the app starts up, it is going to create a variable called score and set it zero. Now you can do what’s called “set” and “get” your score variable. “Get” will allow you to see what the value of the score is. Here’s how you would tell your app to display the score in a textbox.

“Set” allows you assign a new value for your user’s score. Every time the player earns points you can tell the app to do this.

This tells your app to change the value of the score to whatever it is now and add ten to it. If the current score is zero, the new score would be 10. If the current score is 25, the new score would be 35. Now you don’t have to worry about reassigning the score every time your player gains or loses points. The app will just take the current score and add 10 to it.

It is okay if you are still confused about variables! They are really hard to understand and the best way to understand them is by using them. You will use them in the coding challenge at the end of this unit and again over the next few coding units.

Thought Exercise

Pick one of your favorite apps and identify at least three spots where you think the app creators used variables.

Local and Global Variables

You may have noticed in the section above that the variable block said “global”. There are two types of variables, local variables and global variables. When you create variables, you’ll have to think about whether you want to use the variable at multiple places in your code, such as the score variable from above, or if you want to use it in just one place.  

Global variables can be used anywhere. Like you saw above, the score variable needed to be used multiple times. You had to use it when the player earned points, when the player lost points, and to display it in the textbox. It could also be used for a high-score table. You can never reuse a name when using a global variable. If you did, your app won’t know which variable to use. Luckily App Inventor won’t allow you to create two variables with the same name.  If you’re in doubt of which variable type to use, use global.

Local variables can only be used at one spot in your code. If you need a variable to keep track of something in just one place, use a local variable. The local variable will only be able to be used inside the “local variable” block and App Inventor won’t let you use it outside of it. Unlike global variables, you can reuse the names of local variables.

In the coding challenge, you’ll see examples of when to use global variables and when to use local variables. To learn more about global and local variables visit MIT’s website: Global and Local Variables.

Lists

There’s so much information out there in the world, it can get really confusing! Luckily we have ways of organizing data so that we can easily find it and use it. Can you think of any examples of how you organize information and objects in your life? Here are some examples of things you might do to organize things:

  • Put a friend’s phone numbers in a contact list
  • Put pencils in a pencil box
  • Put clothes in a closet

Programmers uses lists to organize data in their programs.  Lists can hold multiple pieces of data and they’re easy to get data from. You may have made a to-do list or a grocery list before, and lists in programming are very similar. In App Inventor, you can go to blocks and select “lists”. List look like this:

makealist 
itemlist

number-list

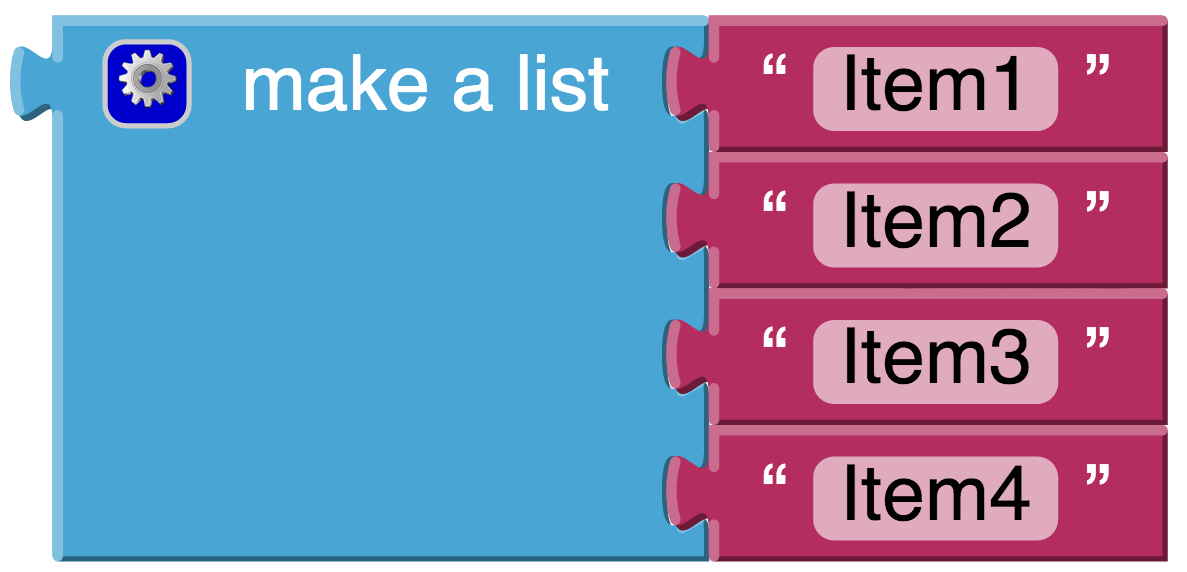
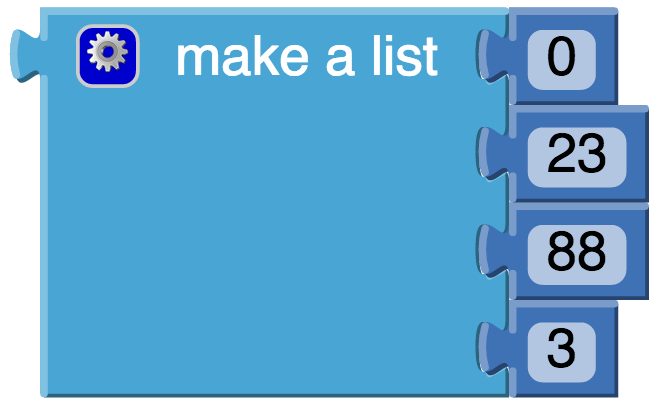
Lists are really useful for holding a lot of information. Each thing in a list has an index, which is a number that tells you where it is in the list. The first item in a list will have an index of 1, the second item in a list will have an index of 2 and so on. Here's an example:

fruit list

Here is how your app sees this information:

List Name: Fruits

  • Apples (Index = 1)
  • Bananas (Index = 2)
  • Oranges (Index = 3)

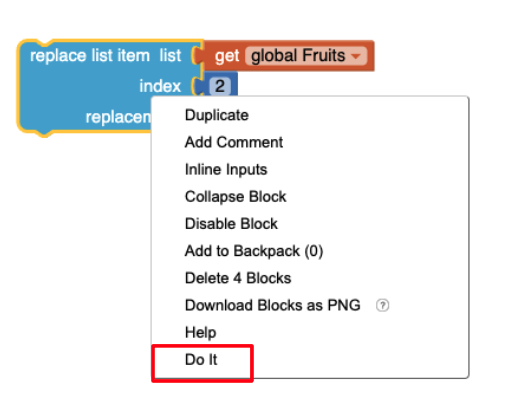
You can get one thing from a list instead of using the whole list. If you wanted to just put the string “bananas” into a textbox instead of the entire list, you would need to tell your app to look at index 2 in this list. Here’s how you would put “bananas” into a textbox using App Inventor, from the list shown above:

You can also add, remove, and replace things in lists. Let’s say you forgot to add “kiwis” and “grapes” to your fruit list. You could add them like this:

add to list

Now your app will see your list like this:

List Name: Fruits

  • Apples (Index = 1)
  • Bananas (Index = 2)
  • Oranges (Index = 3)
  • Kiwis (Index = 4)
  • Grapes (Index = 5)

You should use lists anytime you have multiple pieces of information that you want to include under the same variable name. For example, if you wanted to display the top ten high scores for a game, you could make ten variables with names like HighScore1, HighScore2, HighScore3 and so on until you get to HighScore10.

The easier way to do this would be to make a list called HighScores that contains the ten high scores and then display them by using their indexes. Using a list would also allow you to replace and add more high scores more easily and would save you a lot of time!

highscore1
arrow
highscore2

Check out MIT’s website for more information on lists.

Note: In many programming languages, lists are called arrays. and indexes start at 0, not at 1. Make sure to check the rules when learning a new programming language!

Databases

Variables are great for storing information while your user is using your app, but what if you wanted to store information between the times when your user opens and closes her app? You can do this with a database. Databases can store information for later use, even when the app is closed! You can think of databases as a place to store information you can recall later. Here are some examples of databases you may use every day:

  • Contact list - you store your friend’s phone numbers so you can use them later
  • Messaging app - most messaging apps automatically store old messages so you can reread them later
  • Notebook - you write things down and read them later

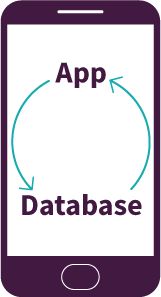
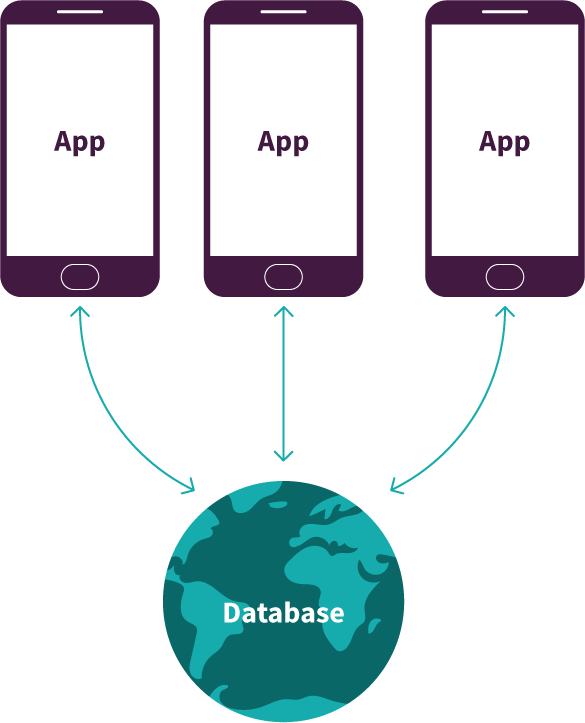
In App Inventor, the component TinyDB allows you to save data on your user’s phone that will be there each time she logs into your app. It is important to know that TinyDB only allows you to store data locally. This means that two users cannot share data with the same TinyDB. When a user stores data into TinyDB, it will only be available on her phone, and no one else's. You will learn how to share information between phones in Code 4: Using Mobile Features & Connecting to the Web.

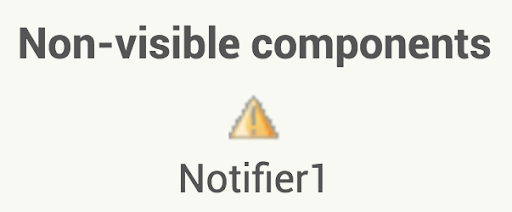
To use TinyDB, drag it onto your screen in the designer side of App Inventor. You can find it under the storage menu. It will appear as a non visible component and will look like this:

TinyDB

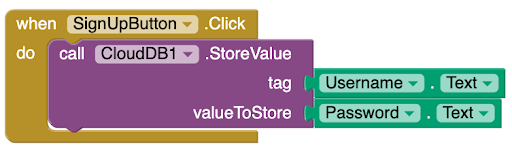
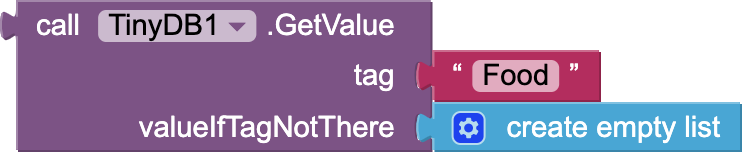
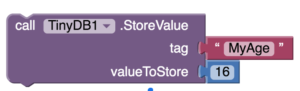
You can talk to your TinyDB by making calls to it. When you make a call, you can store things and get things from it. The way you store data in TinyDB is by giving it a tag. The tag is a name that you will use to retrieve the data. It is a lot like a variable name. If you use the same tag name to store data twice, the database will overwrite, or erase, the old data with the new data. This can be useful if you need to update what’s in your database but you should be careful never to repeat tag names otherwise! Here’s a few examples of how to make calls to TinyDB:

TinyDB store global fruits
screen-shot-2016-09-23-at-3-24-29-pm

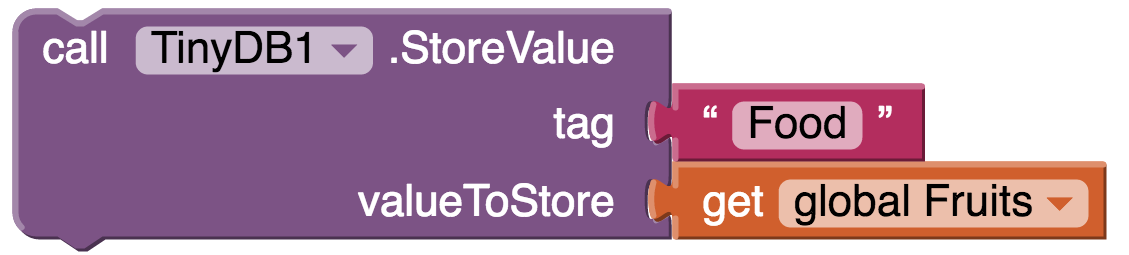
The first block shows how to store values in TinyDB. In this case we stored our fruits list from earlier with the tag “Food”. The second block shows how to retrieve the fruits list from the database.  The tag needs to be typed exactly as it was when the data was stored, including all capital letters. 

To better understand this, let’s walk through an example. Let’s say you needed to store three things in a database for later use. One is our Fruits lists from the last section, one of them is your age, and the other is a list of your favorite things to do. You make three to calls to the database like this:

TinyDB store global fruits
Tiny DB my age
TinyDB store favorites list

You now have three entries in you database, and this what they look like:

Tag Name: “Food”

Data:

  • “Apples” (index = 1)
  • “Bananas” (index =2)
  • “Oranges” (index = 3)

Tag Name: “My Age”

Data:

  • 16

Tag Name: “Favorite”

Data:

  • “Learn how to Code” (index = 1)
  • “Visit Family” (index = 2)
  • “Listen to Music” (index =3)

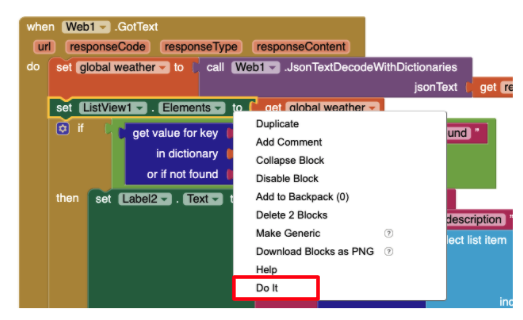
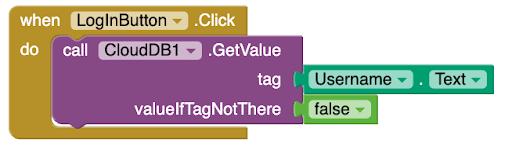
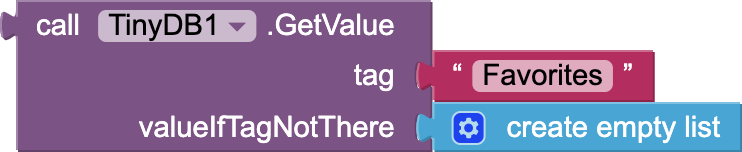
Now, when you want to retrieve your favorite things to do, so you make a call like this:

TinyDB favorites value not tagged

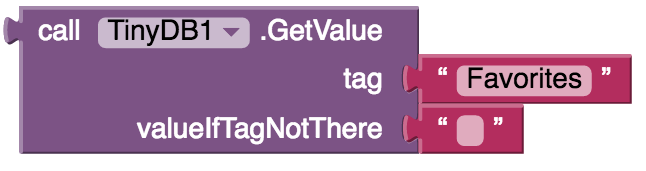
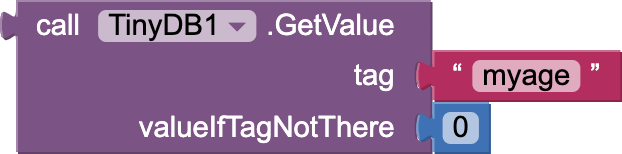
When you use this block you will get “Learn how to Code Visit Family Listen to Music”. Now let's say you want to retrieve your age, so you make a call like this:

TinyDB my age value tag if not there

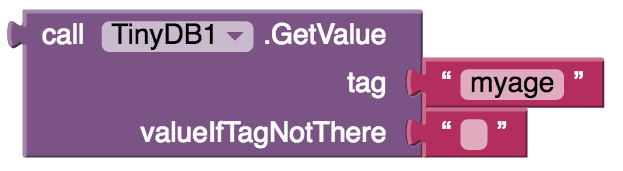
When you use this block you just get a blank string: “ ”. This is because the tag “myage” does not exist in your database! However, the tag “MyAge” does exists. Since your database did not recognize the tag, it defaulted to show you the block next to "valueIfTagNotThere", which is a blank string. You can make this string say anything you want. You can even make it be an error message to your user.

If you create an app with multiple screens (like your slideshow app), components and variables will not be able to talk to each other between each screen. You will need to use a TinyDB in order to transfer information from one screen of your app to another. Visit this page for more information: MIT Screens.

Congratulations on completing all of the content in this unit! It was a lot of information, so it’s okay if you don’t understand everything right now. You can always refer back to this unit when you are building your app. The Code Challenge is meant to incorporate everything you’ve learned so far, so give it a try!

Code 2 Challenge: Make a To-Do List

Description: Make a to-do list that allows users to enter in and remove items. Your app should remember the items each time your user opens the app. You may want to learn how to use a ListView before trying the challenge!

Try your hardest to do this challenge on your own before you read the instructions. Remember, these instructions are just one way the challenge can be solved! You can also download our example app in the Google Play Store. Happy coding!

Reflect

In this lesson, we covered a lot! You learned about all different data types and different ways to store and organize them. Here are some reflection questions for you to discuss with your mentor:

Q1: How does the information you learned in this lesson change the way you see apps you use every day?

Q2: What are some things from this lesson that you think will be useful in creating your app?

In this section you learned the following keywords:

  • Data - Information that your app uses
  • Data Type - The way data is categorized
  • Number - A data type that is a number
  • String - A data type that is text
  • Boolean - A data type that is true or false
  • Variable -  A name for a piece of data that can change
  • Global Variable - A variable that can be used at any point in your code
  • Local Variable - A variable that is only used in a certain section of code
  • List - A way of organizing multiple pieces of data
  • List Index - A number that represents where data is in a list
  • Database - A place to store and organize information

Additional Resources

Here are some additional resources on databases. You can use these now or if you need help when building your app!

Code Challenge 1: Make a Slideshow

Code Challenge 1 კოდირების  გამოწვევა

Make a Slideshow სლაიდ-შოის შექმნა

Designing your screen-ეკრანის დიზაინი

ამ აპლიკაციისთვის ქმნით სლაიდ შოუს, რომელიც მომხმარებელს საშუალებას აძლევს დაათვალიეროს  სხვადასხვა სურათები.როდესაც ეკრანის დიზაინს ახდენთ,დებთ სურათს და ამაგრებთ  ღილაკებს რათა მომხმარებელმა დააჭიროს  და გადავიდეს სხვა სურათზე.ეკრანის დიზაინის დროს პირველრიგში ამას აკეთებთ.

  1. დაამაგრეთ სურათი ეკრანზე.
    • მოარგეთ ეკრანს (შეგიძლიათ შეცვალოთ სიგრძე და სიგანე)
    • ჩვენ სურათთვის  ვირჩევთ “fill parent”-ს. როდესაც ამას ირჩევთ ,ეს ნიშნავს, რომ თანახმა ხართ ის სივრცე რაშიც სურათი იმყოფება მთლიანად შეივსოს. სურათი ეკრანის შიგნითაა ,მაგრამ ღილაკები რომლებიც მასზე უნდა დაამაგროთ არიან ჰორიზონტალურ  მდგომარეობაში მყოფ კონტეინერში.მენიუში განლაგების მიხედვით შეგიძლიათ იხილოთ ,თუ რა სად არის.
  2. ეკრანზე ,სურათის ქვემოთ დაამატეთ ჰორიზონტალური სამაგრი.
  3. გადააადგილეთ  ორი ღილაკი ჰორიზონტალურ მდგომარეობაში
    • კომპონენტთა მენიუში დააჭირეთ ღილაკებს.
      • ღილაკებს დააწერეთ ტექსტები ‘Previous’(წინა) and ‘Next’(შემდეგი).
      • ღილაკებისთვის სახელების შეცვლაც  შეგიძლიათ,რაც დაგეხმარებათ იმის გახსენებაში თუ რომელი ღილაკი რისთვისაა განუთვნილი(რისი გაკეთება ევალებათ).ამის გაკეთება “rename”-ზე  ხელის დაჭერით შეგიძლიათ ,რომელიც კომპონენტების ქვეშ არის მოთვსებული.
  4. ატვირთეთ სურათი ,რომელიც სლაი-შოუში გინდათ რომ გამოიყენოთ.
  5. აირჩიეთ სურათი რომელიც სლაი-შოუში პირველი გამოჩნდება.
    • დააწირეთ “Image1”-ს   “Components” menu -ში   და  შემდეგ “Picture” -ს   properties menu-ში.
  6. სლაიდ -შოუში დაამატეთ არანაკლებ ორი გვერდი(ეკრანი).ჩვენს სლაიდ-შოუში გამოვიყენეთ სამი გვერდი(ეკრანი) ,მაგრამ იმდენი გვედრის დამატება შეგიძლიათ რამდენიც თქვენ გსურთ.
    • ამ ეტაპზე ამ დამატებულ გვერდებთან დკავშირებით არაფრის გაკეთება არ არის საჭირო,მაგრამ როგორც კი ბლოკების კოდირებას მოახდენთ,მათ ღილაკებსა და სურათებს დაუმატებთ,როგორც ეს  ამ გვერდისთვის(ეკრანისთვის) გააკეთეთ.

designer

Programming the blocks- ბლოკების პროგრამირება

განმარტება:ახლა უკვე როცა ეკრანი მომართეთ ,საჭიროა მას რამე გააკეთებინოთ.როდესაც მომხმარებელი აჭერს ღილაკს,გსურთ რომ თქვენმა აპლიკაციამ შეასრულოს საქმე ,ამ შემთხვევაში გახსნას შემდეგი გვერდი (ეკრანი) ზედ განთავსებული  სურათით.ამისათვის კი უნდა გამოიყენოთ, ღილაკების ღონისძიებების დამმუშავებელი(button event handlers).

  1. დააჭირეთ ღილაკს რომელსაც  ‘Previous’ -ი დაარქვით  და იხილავთ ყველა ბლოკს რომლების გამოყენებაც შეგიძლიათ.კურსორით ხელი ჩასჭიდეთ when button.click -ის ბლოკს და გადაიტანეთ   თქვენს სამუშაო სივრცეში.
  2. დააჭირეთ   ‘control’-ს და მოძებნეთ  open another screen screenName block-ი.
  3. აიღეთ  ცარიელი   ტექსტის ასაკრეფი ველი,დააჭირეთ და შეყვანეთ ის  open another screen screenName block-ში. ჩაწერეთ  თქვენი სლაიდ შოუს ბოლო გვერდის(ეკრანის) სახელი. ჩვენს შემთხვევაში  ეს იყო მესამე გვერდი (ეკრანი).
  4. დააჭირეთ “Next” ღილაკს და ხელი  კვლავ  ჩასჭიდეთ when button.click block -ს .
  5.  control-დან აიღეთ  open another screen screenName block-ი  .
  6. აიღეთ ტექსტის ასაკრეფი ცარიელი ბლოკი და ჩაბეჭდეთ მომდევნი გვერდში, რომელიც სლაიდ შოუში გამოჩნდება.ჩვენს შემთხვევაში ეს იყო Screen2.

blocks

Check Point!   გადამოწმება!

სანამ გააგრძელებდეთ დარწმუნდით ,რომ თქვენს მიერ შექმნილი კოდი მუშაობს.კოდის შემოწმება აპლიკაციისთვის საბოლოო სახის მიცემამდე ძალიან კარგი იქნება.წიააღმდეგ შემთხვევაში შესაძლოა აღმოაჩინოთ რომ,უკვე მრავალ ფუნქცია მინიჭებული აპლიკაცია   არ უშობს და  ამ შემთხვევაში,უკვე   ძალიან რთული იქნება მიზეზების პოვნა.

დააწყვილეთ  App Inventor-ი ტელეფონთან,ტაბლეტთან და ემულატორთან.  თქვენი ღილაკები  ისე მუშაობენ როგორც ეს თქვენ გინდოდათ და მოელოდით? ჩვენი ღილაკები მუშაობენ: ღილაკმა “Previous” გადაგვიყვანა Screen3-ზე,და ღილაკმა  “Next” გადაგვიყვანა Screen2-ზე.თუკი თქვენი ღილაკები ისე არ მუშაობენ როგორც თქვენ გინდოდათ და იმას არ აკეთებენ რაც თქვენ გინდოდათ,გირჩევთ უკან დაბრუნდეთ და დარწმუნდეთ კოდი მუშაობს თუ არა.

მინიშნება: იმის გამო რომ Screen2 -ზე და Screen3 -ზე ჯერჯერობით არაფერი არ არის,ჩვენს კომპიუტერში App Inventorმეშვეობით დავბრუნდით  screen -1ზე. App Inventor- ი საშუალებას გაძლევთ კომპიუტერის მეშვეობით ნავიგაცია მოახდინოთ სხვადასხვა გვერდებზე(ეკრანებძე) რომლებიც დაკავშირებულნი არიან   ტელეფონებთან ან ემულატორებთან.ეს ხრიკი მოგვიანებით გამოგადგებათ.

 Finishing your app-აპლიკაციის დასრულება

განმარტება: ახლა როცა უკვე წარმატებით შექმენით და დააპროგრამეთ  გვერდი(ეკრანი) , უკვე შეგიძლიათ შემდეგი გვერდების კოდინგზე გადახვიდეთ. სალაიდ-შოუს შეგიძლიათ იმდენი გვერდი(ეკრანი)დამატოთ რამდენიც თქვენ გსურთ,მაგარამ დაიმახსოვრეთ რომ სალაიდ-შოუში უნდა იყოს სულ  ცოტა სამი გვერდი(ეკრანი).ქვემოთ მოცემული დიაგრამა გვიჩვენებს  გვერდებს(ეკრანებს) და  ღილაკებს რომლებიც მათ აკონტროლებენ

  1. გაიმეორეთ  1-12  ნაბიჯები  თქვენი სლაიდე -შოუს თითოეული   გვერდის ( ეკრანის) შესაქმნელად. დარწმუნდით რომ ღილაკ ‘Next’-ყოველთვის შემდეგ გვერდზე გადაჰყევხართ და ღილაკი    ‘Previous’  -ი ყოველთვის  წინა გვერდზე გაბრუნებთ.
 3screen-diagram 4screen-diagram


Final Check Point! საბოლოო შემოწმება!

დარწმუნდით ,რომ აპლიკაცია მუშაობს! გამისცადეთ ყველა “Next” და  “Previous” ღილაკი.ხომ გადაჰყევხარ თითოეულ მათგანს ახალ გვერდზე(ეკრანზე)?თუ არა,კვლავ გადაამოწმე შენს მიერ შესრულებული სამუშაო და დარწმუნდი ,რომ გვერდების სახელები სწორად გაქვს ჩაბეჭდილი.

გილოცავთ!თქვენ  ეს-ესაა დაასრულეთ კოდინგის პირველი გამოწვევა,რაც იმის საბაბს გაძლევთ, რომ თავი სრულყოფილად იგრძნოთ.ირგვლივ არც ისე ბევრი ადამიანია ,ვისაც აპლიკაციის კოდინგი გაუკეთებია.

ისევ შეფერხდით? მაშ გადმოტვირთეთ ჩვენი საწყისი კოდი!  იხილეთ ინფორმაცია იმისა,თუი როგორ ჩამოტვითოთ და ისარგებლოთ საწყისი კოდებით,აქ: source code instructions


Download the source code

Code Challenge 1: Make a Slideshow

Code Challenge 1

Make a Slideshow

Designing your screen

For this app you will create a slideshow that allows your user to navigate through different images. When you design your screen, you will put an image and buttons for your user to click to move to a different image. You'll need to set this up first in the designer screen.

  1. Add an image to your screen.
    • Make it fits your screen by changing the width and the height!
    • We choose to make our image “fill parent”. When you select “fill parent” you are telling the component to fill the space of whatever it is in. Image1 is inside of the screen, but the buttons are inside the container of the horizontal arrangement. You can see which things are inside other things by how they are listed in the components menu.
  2. Add a horizontal layout to your screen below the image.
  3. Drag and drop two buttons into the horizontal layout.
    • Click on the buttons in the component menu
      • Edit the text to make the buttons say ‘Previous’ and ‘Next’.
      • You should also change the names of your buttons to help you remember what they are supposed to do! We changed ours to ‘Previous’ and ‘Next’. You can do this by pressing “rename” under components.
  4. Upload a picture you want to use in your slide show!
  5. Select the picture you want to use on the first screen of your slide show.
    • Click on “Image1” in the “Components” menu and then “Picture” in the properties menu. You can then select the picture you uploaded.
  6. Add at least two more screens. For our slideshow we used three screens but you can add as many as you like.
    • For now you do not need to do anything with those screens, but after you code the blocks you will add buttons and images to them just like you did for this screen.

designer

Programming the blocks

Explanation: Now that you have your screen set up, you need to make it do something. When the user presses the buttons, you want your app to open another screen that has another image on it. To do this you will use the button event handlers.

  1. Click on button you named ‘Previous’ to see all the blocks you can use. Grab the when button.click block and drag it to your workspace.
  2. Click on ‘control’ and find the open another screen screenName block.
  3. Get an empty text box and click it into the open another screen screenName block. Type the name of the last screen that will be in your slide show. For us, it was Screen3.
  4. Click on your "Next" button and grab the when button.click block again
  5. Get another open another screen screenName block from control.
  6. Get an empty text block and type in the next screen that will appear in your slide show. (For us, that was Screen2.)

blocks

Check Point!

Before moving on, let’s make sure the code you just created works. It is a good habit to check bits of your code before you write an entire app, to make sure it is working. Otherwise you might make the entire app that has many features that do not work and it might be difficult to find out why it doesn’t work!

Pair up App Inventor with your phone, tablet and emulator. Do your buttons work like you expect them to? Our buttons worked: “Previous” brought us to a blank Screen3 and “Next” brought us to a blank Screen2. If your buttons do not do what you expect them to, try going back and making sure your code is correct.

Hint: Because there is nothing on Screen 2 or Screen 3 yet, we returned to screen 1 by moving back to it using App Inventor on our computer. App Inventor allows you to navigate through different screens on your connected phone or emulator using your computer. This will be a good trick to use later on.

 Finishing your app

Explanation: Now that you have successfully set up one screen and programmed it, you can code the rest of the screens! You can add more screens if you want your slideshow to have more pictures, but make sure you always have at least three. The diagrams below show the flow of the screens and how the buttons control them.

  1. Repeat steps 1-12 for each screen of your slideshow. Make sure the ‘Next’ button always leads you to the next screen and the ‘Previous’ button takes you back to the previous screen.
3screen-diagram
4screen-diagram

Final Check Point!

Make sure your app works! Test every "Next" and every "Previous" button. Do they each take you to a new screen? If not, check your work and make sure you've typed the names of your screens correctly.

Congratulations! You just completed your first coding challenge! You should feel very accomplished! Not many people have ever coded an app before!

Still Stuck? Download our source code. Here are instructions on how to download and use source codes: source code instructions

Code 1: Introduction to Coding & App Inventor

სწავლების მიზნები :

ამ მოდულში თქვენ ისწავლითl..

  • პროგრამირების ენას და მის გამოყენებას
  • App Inventor-ის დაყენებას და მის გამოყენებას
  • კოდირების დაწყებას App Inventor-თან ერთად


ალგორითმები

ჩრდილოეთ ამერიკაში გაზრდილ ბავშვების უმეტესობას უყვართ მიწისთხილის კარაქის და ჟელეს სენდვიჩები.მისი გაკეთება ძალზედ მარტივია,ერთ ნაჭერ  პურზე კარაქი-მეორეზე ჟელე და სენდვიჩი მზად არის.

ქვემოთ იხილეთ ვიდეო თუ როგორ ცდილობენ Lynese and Pablo მეგობრისთვის სენდვიჩის გასაკეთებელი ინსტრუქციების მიცემას.

Video 1
Video 2

It you’re having trouble getting these videos to play, try loading this page in Google Chrome.


Jarad-ი კომპიუტერივით მოქმედებს,არაფერს აკეთებს მანამ,სანამ ბრძანებას არ მიიღებს.ადამიანმა უნდა იცოდეს, რომ ინსტრუქცია “spread some jelly on the bread” სინამდვილეში  ჟელეიანი ქილის გახსნას,დანის ქილაში ჩაყოფას,უკან ამოღბას და პურზე ჟელეს წასმას ნიშნავს.ამ ყველაფრის გაკეთბა Jared-ის მსგავსად კომპიუტერსაც შეეძლო ,მაგრამ შესაძლოა მთელი ქილა ჟელე წაესვა პურზე, რაც ცოტა დამაბნეველი აღმოჩნდებოდა.

ადამიანებისაგან განსხვავებით კომპიუტერები ვერ ასკვნიან და ხვდებიან ვერეფერს,ისინი მხოლოდ იმას აკეთებენ რასაც უბრძანებენ.ლინესმა და პაბლომ Jared-ს  გადასცეს სენდვიჩის დასამზადებელი ალგორითმი. ალგოტიმი  არის დეტალური ინსტრუქციების დასტა.იმისათვის ,რომ კომპიუტერს რამე გააკთებინო მისთვის გასაგები ალგირითმი უნდა დაწერო.

Technovation -ის ფარგლებში  ისწავლით ალგორითმის წერას და ამით შეძლებთ თქვენმა აპლიკაციამ გააკეთოს ის ,რაც თქვენ გსურთ!


Activity

აიღეთ ფურცელი , შეასრულეთ შემდეგი გასართობი აქტივობა და ამ გზით კომპიუტერის ფიქრების იმიტირებას მოახდენთ!

დაწერე ალგორითმი ყოველდღიური აქტივობებიდან გამომდინარე,ეს შეიძლება იყოს: ველოსიპედით სიარული,სენდვიჩისს გაკეთება,თამაში ან ნებისმიერი სხვა რამ! როცა დაასრულებ ,გადაეცი თანაგუნდელს ან მეგობარს და სთხოვეთ გააკეთონ ზუსტად ის რასაც ,ალგორითმი მოითხოვს.( Jared-ის მსგავსად, იხ,ვიდეო)

ყველაფერი ისეა როგორც მოელოდით?


Programming Languages-პროგრამირების ენა

კომპიუტერული ალგორითმები შედგენილია პროგრამირების ენაზე.პროგრამირების ენა გეხმარებათ თქვენს კომპიუტერთან ურთიერთობში.კოდების მწერლები ,განსხვავებული საქმეების გასაკეთებლად იყენებენ პროგრამირების განსხვავებულ ენებს,აქედან ზოგი აპლიკაციების შესაქმნელადაა კარგი,ზოგი ვებ გვერდის შესაქმნელად და ზოგიც რთული კალკულაციების შეასრულებლად. პროგრამირების ენაზე საკომუნიკაციოდ საჭიროა მისი კარგად შესწავლა.

ტექნოვაციის ფარგლებში შეისწავლით App Inventor-ის გამოყენებას,რომელიც წარმოადგენს მობილური აპლიკაციების შესაქმნელად საუკეთესო პრგარმირების ენას.   ‘mobile app’ -ი არის პროგრამა ,რომელიც განკუთვნილია მობილური ტელეფონებისთვისა და ტაბლეტებისთვის და არა კომპიუტერებისთვის .

ქვემოთ  მოცემულია პროგრამირების ენის რამოდენიმე დასახელება და მათი ინსტრუქციები(ზუსტად რისთვის გამოიყენება).


Javascript – გამოიყენება ვებ-გვერდებში  ინტერაქტიული ელემენტების შესაქმნელად

Objective C -გამოიყენება  ანდროიდ აპლიკაციის შესაქმნელად

Swift -გამოყენება აიფონისთვის განკუთვნილი აპლიკაციების შესაქმნელად

App Inventor -გამოიყენება  ანდროიდებისთვის განკუთვნილი აპლიკაციების განსავითარებლად. ამ ყველაფრის შესახებ, უფრო დაწვრილებით  შეისწავლით ტექნოვაციის ფარგლებში!


როგორც დამწყებმა პროგრამისტმა სასურველია  იკითხოთ ან მოიძიოთ  თქვენთვის უცხო და გაუგებარი სიტყვების  მნიშვნელობა ,რათა შესაბამისბაში მოხვიდეთ სხვა პროგრამისტებთან.

Activity- აქტივობა

თქვენს მენტორს ან ვინმე სხავას ხომ არ აქვს გამოცდილება ტექ-ინდუსტრიაში? ჰკითხეთ მათ თავიანთი გამოცდილების შესახებ და იმ პროექტებზე რომლებზეც მათ უმუშავიათ.იხილეთ მსგავსი კითხვები:

  • ტექნოლოგიებთან დაკავშირებულ რა პროექტებზე გიმუშავიათ და რა ისწავლეთ? თქვენს მენტორს შესაძლოა წვლილი შეუტანია ტექნოლოგიების განვითრებაში  და ბიზნესის მოდელირებაში  , რაიმე განსხვავებული გზით.
  • გაქვთ,  თუ არა  კომპიუტერულ ენასთან დაკავშირებული  პირადი გამოცდილება და რისთვის იყენებდით?If you have personal experience with a computer language, what did you use it for?

If you don’t know anyone in the tech industry, watch these interviews with women engineers at Facebook and Google!

დავიწყოთ  App Inventor-ით

  თუკი App Inventorის გამოყენება უკვე იცით ან უკვე იყენებთ პროგრამირების სხვა ენას შეგიძლიათ ეს ნაწილი გამოტოვოთ შემდე ნაწილამდე   next section 

 App Inventor  არის უფასო ვებ. აპლიკაცია,  რომელიც მომხმარებლებს საშუალებას აძლევს შექმნან მობილური აპლიკაცია  ტელეფონებისთვისა თაბლეტებისთვის. App Inventor -ზე წვდომა შესაძლებელია შემდეგ ვებ.მისამართზე :  http://appinventor.mit.edu/.

App Inventor- გამოყენების დაწყება მართლაც ძალიან ადვილია.თქვენი აპლიკაციის დიზაინისა და პროგრამის მართვა შეგიძლიათ კომპიუტერის საშუალებით , ხოლო შემდეგში , თქვენს შექმნილ აპლიკაციას გამოსცდით ანდროიდ ტელეფონში ან ემულატორში. თქვენს მიერ შესრულებული სამუშაოები შენახული იქნება(დასეივებული) App Inventor-ის სერვერებზე და  როცა გვერდზე შეხვალთ  ყველაფერი  იქ დაგხვდებათ. App Inventor-ის შესახებ უფრო მეტის გასაგებად ეწვიეთ this page.


რა დაგჭირდებათ 

ეს ,სწავლების ის ნაწილია სადაც შეისწავლით App Inventor-ის მეშვეობით ალგორითმების წერას, რომლებიც ანდროიდ ტელეფონებისთვისაა განკუთვნილი.აი რა დაგჭირდებათ App Inventor-ის გამოსაყენებლად:

  • კომპიუტერი
  • ინტერნეტი
  • Gmail ანგარიში
    • ( Gmail -ანგარიში  App Inventor -ში შესასვლელად დაგჭირდებათ.]
    • Gmail -ანგარიშის შესაქმნელად შედით here.
  • Android ტელეფონი ან ტაბლეტი (სასურველი და ამავდროულად მაღალ-რეკომენდირებული)
    • თუკი Android ტელეფონი არ გაქვთ, Amazon-ზე არსებობს ხელმისაწვდომი ვარიანტები შეღავათან ფასებში ,რომლებიც არ საჭიროებენ დამატებით მომსახურების გეგმებს.ჩვენ რეკომენდაციას ვუწევთ Ice Cream Sandwich-ს ვერსია  4.0 ან or მომხმარებლისთვის უფრო ახალ ოპერატიულ სისტემას როგორიცაა:
    • Motorola Android
    • BLU Android
    • Android Tablet

Gmail ანგარიში უკვე გაქვთ ახლა შქმენით App Inventor-ის ანგარიში here. მასშემდეგ რაც შექმნით App Inventor -ის ანგარიშს და შეხვალთ , დაბრუნდით უკან ამ გვერდზე და გადადით შემდეგ ნაწილზე.


 App Inventor-ის დაკავშირება Android Phone-თან

არსებობს სამი ვარიანტი App Inventor-ში შექმნილი აპლიკაციის  ანდროიდ ტელეფონში ან ემულატორში  გამოსაცდელად.ტელეფონი თუ გაქვთ  შეგიძლიათ ისარგებლოთ wifi-ით ან   USB -ით.თუკი ანდროიდ ტელეფონი არ გაქვთ,შეგიძლიათ გამოიყენოთ ემულატორი,პროგრამა რომელიც საშუალებას გაძლევთ გქონდეთ ვირტუალური ტელეფონი კომპიუტერში.. როდესაც ამ მეთოდებიდან ერთ-ერთს იყენებთ  App Inventor-ი ნებას გრთავთ აპლიკაცია დამოსცადოთ (დატესტოთ) live testing  რეჟიმში,რაც იმას ნიშნავს ,რომ თქვენს აპლიკაციას შეგიძლიათ დაუმატოთ ან შეცვალოთ  რამე და ყველა ცვლილებას პარალელურ რეჟიმში იხილავთ ტელეფონში ან ემულატორში .მას შემგედ რაც, ამ ნაწილს განიხილავთ და მოწყობილებებს მომართავთ,ცოტაც უნდა  მოითმინოთ , სანამ თქვენს პირველ აპლიკაციას შექმნით, და განიხილოთ  ქვემოთ  მოცემული აქტივობები.


Wifi მეთოდი

App Inventor -ის გამოსაყენებლად ეს მეთოდი არის ყველაზე ადვილი და Technovation გუნდის მიერ მაღალ-რეკომენდირებული. ეს მეთოდი იმ შემთხვევეაში აირჩიეთ, თუ გაქვთ  ანდროიდ ტელეფონი ,ტაბლეტი და wifi-ს  -წდომა . ამ მეთოდმა კარგად რომ იმუშავის აუცილებელია ტელეფონიც და კომპიუტერიც ერთი და იგივე wifi -სთან  იყვნენ დაკავშირებულნი.

wifi მეთოდით ,კომპიუტერში შექმნით აპლიკაციას და გამოსცდით ტელეფონში App Inventor Companion App-ის მეშვეობით, რომელსაც ეწოდება MIT AI2 Companion-ი. დააჭირეთ ღილაკს  MIT-ის ინსტრუქციების სანახავად ,რომლებიც ეხება  wifi-სთან დაკავშირეის გზებს.


Troubleshooting Tips-პრობლემების აღმოფხვრა
  1. დარწმუნდით ,რომ ტელეფონში სწორი MIT AI2 Companione -ი გადმოწერეთ, იხ.აქ: AI Companion App.  ლოგო ასე გამოიყურება : AppInventorLogo
  2. დარწმუნდით ,რომ კომპიუტერი და ტელეფონი ერთი და იგივე wifi -სთნ არიან დაკავშირებულნი
  3. თუკი რამე შეფერხებას გადააწყდით,გადატვირთთ კავშირიresetconnection
  4. თუკი თქვენმა მცდელობამ კვლავ უშედეგო ჩაიარა,იხ. ეს ვიდეო:  PhilsComputerLab: Connecting with Wi-Fi

და  თუკი ყველაფერი კარგად დამოგივიდათ გადადით შემდეგ აქტივობაზე activity.


USB Method

ეს მეთოდი  ტექნიკური თვალსაზრისით ყველაზე რთულია და კომიუტერში პროგრამის ჩამოტვირთვას მოითხოვს .ეს მეთოდი იმშემთხვევაში აირჩიეთ თუ გაქვთ ანდროიდი ტელეფონი მაგრამ არ გაქვთ wifi.

ამ დროს აპლიკაციას ქმნით კომპიუტერში  App Inventor-ის მეშვეობით და ტელეფონში  დატესტავთ, მას შემდეგ რაც მას კომპიუტერთან USB  კაბელით დააკავშირებთ.  ამისათვის კომპიუტერში პროგრამის ჩამოტვირთვა დაგჭირდებათ ხოლო ტელეფონში მსგავსი პროგრამის. თუკი ისეთ კომპიტერს იყენებთ რომელსაც  Windows მხარდაჭერა აქვს ,შესაძლოა               ტელეფონში  USB Driver  ჩამოტვირთვა გახდეს საჭირო  .Macs-ებისთვის მსგავსი პრროცედურები არაა საჭირო. MIT’s  -ის ინტრუქციების სანხავათ დააჭირეთ ღილაკს.იხილეთ ქვემოთ:


USB -მეთოდი

Troubleshooting Tips-პრობლემების აღმოფხვრა
  1. გადაამოწმეთ და დარწმუნდით, რომ MIT AI2 Companion აპლიკაცია ტელეფონში სწორად გადმოწერეთ,აქ: AI Companion App. ლოგო ასე გამოიყურება: AppInventorLogo
  2. შეფერხების შემთხვევაში გადატვირთეთ კავშირიresetconnection
  3. შესაძლოა დეველოპერული პარამეტრების ჩართვა მოგიწიოთ,სანამ ისინი თქვენს პარამეტრებში გამოჩდებიან.  ანდროიდ ტელეფონებში დეველოპერული პარამერტებისა და უსბ ს მართვასთან დაკავშირებული სტატია იხილეთ,აქ: howtogeek
  4. სანამ ტელეფონს კომპიუტერთან შეაერთებთ შესაძლოა, ტელეფონში დიალოგური ფანჯარა გამოჩნდეს.

Mac

  1. თუკი უსაფრთხოების პარამეტრები საშუალებას არ გაძლევთ რომ აპლიკაცია გადმოიწეოთ ,მათი შეცვლა მოგიწევთ ,  ან  სეთინგებში გახსენით  security & privacy  და დააჭირეთ“open anyway”-ს(დაიხსნას ნებისმიერ შემთხვევაში).

macerror

Windows

  1.  დარწმუნდით ,რომ  aiStarter -ი არის გაშვებული ,თუ არა და მისი მოძებნა და  დაწყება მოგიწევთ.is running. You may need to search for it and start it up.
  2. იმისათვის ,რომ ტელეფონით კომპიუტერთან შედეგიანად იმუშავოთ,სავარაუდოდ driver -ის დაყენება მოგიწევთ.  driver-ის დასაყენებელი ინსტრუქციები იხილეთ ,აქ: MIT USB help
    1. აუცილებლად უნდა შეარჩიოთ თქვენი ტელეფონისათვის შესაფერისი driver. MITs-ის დოკუმენტაცია დაგეხმარებათ იმ შემთხვევაში თუკი გაქვთ google phone.
    2. მას შემდეგ რაც ახალ driver-ს  დააყენებთ ,კომპიუტეში უკვე არსებული driver-ის განახლება მაინც მოგიწევთ.თუ როგორ იხილეთ,აქ: Update Driver Instructions

ყველაფერი მწყობრშია და კარგად მუშაობს?მაშინ გადადით ამ აქტივობაზე: activity.

Emulator Method-ემულატორით სარგებლობის მეთოდი

This method can be very tricky to use, especially on Windows-ებისთვის ამ მეთოდის გამოყენება არ არის რეკომენდირებული,ეს მეთოდი იმ შემთხვევაში გამოგადგებათ თუ არ   გაქვთ Android phone or tablet.

An emulator -ი არის პროგრამა, რომელიც საშუალებას გაძლევთ ისარგებლოთ ვირტუალური ტელეფონით თქვენსავე კომპიუტერში. emulatorის მეთოდით სარგებლობის დროს, აპლიკაციას ქმნით კომპიუტერში და ტესტავთ კომპიუტერშივე  emulator-ის საშუალებით.e ემულატორის მეთიდით სარგებლობის ინსტრუქციების სანახავად დააჭირეთ MIT’s instructions -ს.


Emulator -მეთოდი

Troubleshooting Tips-პრობლემების აღმოფხვრა
  1.  Windows -ით სარგებლობის შემთხვევაში  დარწმუნდით ,რომ  aiStarter -ი არის გაშვებული ,თუ არა და მისი მოძებნა და  დაწყება მოგიწევთ.
  2. The emulator-ი შესაძლოა შენელებულად ამუშავდეს may be slow to startup.
  3. დარწმუნდით ,რომ ტელეფონი ომპიუტრეთან არ არის შეერთბულიMake sure your phone is not plugged into your computer.
  4. პრობლემებს თუ გადააწყდით ან ემულატორი არ რეაგირებს ,გადატვირთეთ კავშირი .Reset your connection if you encountered an error or if the emulator is not responding.resetconnection
  5.  აქ კი იხილეთ  ემულატორთან დასაკავშირებელი ვიდეო: Using the Emulator

ყველაფერი მწყობრშია და კარგად მუშაობს?მაშინ გადადით ამ აქტივობაზე:  activity.

Activity-აქტივობა

სრულად უყურეთ ამ ორ ვიდეო გაკვეთილს!  მათი დახმარებით შეძლებთ შექმნათ პირველი აპლიკაცია  App Inventor -ში და ამავე დროს გაერკვევით შემდეგ ეტაპზე როგორ მოიქცეთ!  გახსოვდეთ ,რომ ეს თვენი პირველი აპლიკაციაა და თუკი სადმე  შეფერხდებით , ეს  ნორმალურია!

Tutorial 1: Talk to me Part I

Download a PDF copy of this tutorial here

Tutorial 2: Talk to me Part II

Download a PDF copy of this tutorial here

Event Handling-ღონისძიებების გატარება

Talk to Me app-ის შექმნის დროს უკვე გამოიყენეთ  App Inventor-ის ორი  შესაძლებლობა   designer   და blocks.   აპლიკაციაში დიზაინის ელემენტების  ,კომპუტერს უნდა “უთხრათ” ზუსტად რომელ ელემენტს გულისხმობთ.ამასთან დაკავშირებული ინფორმაცის მოცემული ოქნება  blocks-ში.

ამოტომაცაა ,რომ  App Inventor -ს ‘blocks programming language’  ჰქვია. აპლიკაციაში დიზაინის მიმართულებით რამდენ ელემენტსაც ჩადებთ,კომპიუტერს იმდენჯერვე უნდა “უთხრათ” რა უნდა გააკეთოს და როდის. აი,ამასა ეწოდება event handling-ი(ღონისძიებების გატარება).

Event- არის ის რაც მიმდინარეობს.სიტყვა ივენთი ალბათ გსმენიათ მეგობრის დაბადების დღეებსა და სკოლის ღონისძიებებზე.კოდინგში კი, ივენთი არის ქმედება , რომელმაც უნდა უზრუნველყოს კოდის გაშვება.მაგ:ეს შეიძლება იყოს,მომხმარებლის მიერ ღილაკზე თითის დაჭერა,ტელეფონის ეკრანზე ორიენტაციის შეცვლა,მომხმარებლის მიერ  text box-ში ტეხტის ჩაწერა და ა.შ.  კომპიუტერი მაშინ ახდენს ივენთის დამუშავებას როცა ამას “ეტყვი”.

Talk to Me app-ში  განსაზღვრული გაქვთ რა უნდა გააკეთოს მან ,როცა მომხმარებელი ღილაკზე თითს დააჭერს,ამგვარად ღილაკზე ღონისძიების დამმუშავებელი გაქვთ დაყენებული.ეს ყველაფერი ასე გამოიყურება!

screen-shot-2016-08-26-at-1-04-52-pm

ზემო აღნიშნული ივენთი შემდეგში მდგომარეობდა:მომხმარებელი აჭერდა ღიკლაკს და აპლიკაციამ  ის აღიქვა TextToSpeech -ის გამოძახებით,  რაღაცის სათქმელად. დაიმახსოვრეთ როცა კოდინგს აკეთებთ, ზუსტად უნდა გქონდეთ განსაზღვრული რა გინდათ რომ თქვენმა აპლიკაციამ გააკეთოს და როდის.

Activity

შეგიძლიათ გაიხსენოთ რამე “ივენთი”, რისაც თქვენი ტელეფონი აკეთბს?აი,მაგალითად:

  • როდესაც აჭერთ  “send” ღილაკს მოკლე ტექსური შეტყობინების გასაგზავნად ,ის გზავნის შეტყობინებას და  ამავე დროს გამოსცემს ხმას.
  • როდესაც  app store-დან რომელიღაცა აპლიკაციის  გადმოწერა გინდათ ,ტელეფონი პაროლს გთხოვთ.
  • როდესაც აპლიკაციისთვის განკუთვნილ  სურათს აჭერთ ,აპლიკაცია იხსნება.

Functions

    app Inventor-ში blocks-ში  როცა შეხვედით ,შეამჩნიეთ სხვადასხვა კატეგორიების მიხედვით ჩამონტაჟბული ფუნქციები?მაგალითი იხილეთ ქვემოთ:

technovation2

Functions-ფუნქციები  -არის  blocks of code რომელსაც რაღაცის კეთება შიეუძლია. ისინი  იღებენ  input-ს  (შემავალს)და აწარმოებენ output-ს  (გამომავალს). An input -ი არის ინფორმაცია რომელიც შედის function-ში, და  an output-ი არის ინფორმაცია რომელიც თქვენ დაგიბრუნდათ .  Talk to Me -ის გაკვეთილებზე  ,იყენებდით  Speech to Text ფუნქციას ,რომელიც ტექსტს იმახსოვრებს და მეტყველებაში გადმოსცემს .  input-ი არის ტექსტი ,ხოლო output-ი არის მეტყველება!   პროგრამის შესწავლის განმავლობაში ფუნქციები,მათი   input-ები და output- ები  ბევრად უფრო გასაგები გახდება.

The build-in functions ანუ ჩამპნტაჟებული ფუნქციები  App Inventor -ში წარმოადგენენ  იმ სფუძვლებს, რომლებსაც აპლიკაციის წერის დროს გამოიყენებთ. პროგრამირების ყველა ენას გააჩნია built-in function-ები  და კარგმა პროგრამისტებმა იციან როგორ დააკავშირონ ისინი ,იმისათვის კომპიუტერს გააკეთბინონის ის,- რაც მათ სურთ. თუკი შეისწავლეთ  ამ ფუნქციების  გამოყენების მეთოდები, თქვენი აპლიკაციის შესაქმნელად ისინი შეგიძლიათ დააკავშიროთ სხვადასხვა ხერხებით.ყველეფერ ამას შეისწავლით ,აქ:Code 2: Data and Variables and Code 3: Logic, Loops and Conditionals.

Activity-აქტივობა

სანამ გააგრძელებდეთ,მოდით ცოტა გავივარჯოშოთბ პროგრამირებაზე! შეძლებთ Talk to Me app-ში შემდეგ ეტაპზე გადასვლას?ქვემოტ მოცემული რამოდენიმე  იდეა,რომლებიც მცდელობაში დაგეხმარებიან.

  1. ტექსტის კომპონენტში,მეტყველების ნაწილში  შეცვალეთ ხმის ტემბრი. დააკლიკეთ მეტყველების ტექსტში გადაყვანას ბლოკების მხარეს დამოძებნეთ ხმის ტემბრის შესაძლო ვარიანტები.ხმას შეგიძლიათ შეურჩიოთ ტემბრი 0,1 ან 2.
  2. გამოიყენეთ Speech Recognizer -ის  (ხმის ამომცნობი) სენსორი და  თქვენიო ტელეფონი გაიმეორებს ან ამობეჭდავს იმას, რასაც ეტყვით.

კოდინგის იუნიტის ბოლოს,უნდას შეავსოთ კოდირების გამოწვწვა ( a coding challenge)  და  feedback-ისთვის (უკუკავშირისთვის) წარუდგინოთ მენტორს. ეს გაკვეთილები დაგეხმარებათ შეისწავლოთ კოდირების ცნებების  გასაღები და დაგეხმარებათ  თქვენი საბოლოო app-იის შექმნაში

Code 1 Challenge: Make a Slide Show-სლაიდ -შოუს შექმნა

Challenge: შექმენით აპლიკაცია რომელიც მომხმარებელს საშუალებას მისცემს დააჭიროს თქვენთვის საყვარელი სურათების სლაიდ-შოუს.

ამ აპლიკაციის შესაქმნელად დაგჭირდებათ შექმნათ სლაიდ -შოუ ,რომელიც მომხმარებელს სურათების ნავიგაციის(დათვალიერების) საშუალებას მისცემს.როდესაც ეკრანის დიზაინს გააკეთებთ  დაგჭირდებათ დადოთ სურათი და ამავე დროს დადოთ ‘previous’  და ‘next’  ღილაკები.სამუშაოს ეს ნაწილი შესრულებულ უნდა იქნეს designer screen-ში.


Try to figure out how to complete the code challenge on your own before looking at the instructions. The instructions show just one way of how this challenge can be solved.  You can also download our example app in the Google Play Store. Happy coding!

Reflect-შეჯამება

ამ გაკვეთილში ბევრი რამ დავფარეთ!ისწავლეთ საკვანძო სიტყვები რომლებიც დაგეხმარებიან ,რომ შეუდგეთ და დაწეროთ თქვენი პირველი პროგრამა.ქვემოთ მოცემულია  რამოდენიმე შემაჯამებელი შეკითხვა, რომლების სასურველია  თქვენს მენტორთნ ან გუნდთან ერთად განიხილოთ:

Q1:  App Inventor-ში მუშაობის დასაწყებად რა იყო ყველაზე რთული? შეფერხდით რომელიმე კონკრეტულ ადგილზე?Did you get “stuck” at any particular spot?

Q2: ამ გაკვეთილიდან ,რა მიგაჩნიათ ყველაზე უფრო სასარგებლოდ აპლიკაქციის შექმნის პრცესში?ქვემოთ მოცემული ის საკვანძო სიტყვები ,რომლებიც უკვე შეისწავლეთ:


  • Algorithms – ნაბიჯ-ნაბიჯი ინსტრუქციები  კომპიუტერით სარგებლობისათვის
  • Programming language -კომპიუტერთნ სალაპარაკო ენა
  • Event – შემთხვევა, როდესაც მომხმარებელი რამეს აკეთებს თქვენს აპლიკაციაში
  • Event handler – კოდის ბლოკი,  რომელიც აპლიკაციას გადასცემს რა უნდა გააკეთოს მაშინ როცა ივენთი ხდება
  • Functions – კოდის ბლოკები ,რომლებიც  იღებენ  შემავალ ინფორმაციას და გარდაქმნიან სხვა ინფორმაციად,რომელსაც ეწოდება გამავალი ინფორმაცია
  • Input – ინფორმაცია, რომელიც გადაეცემა function-ს.
  • Output– ინფორმაცია, რომელსაც გასცემს  function-ი.

Code 1: Introduction to Coding & App Inventor

Code 1

Introduction to Coding & App Inventor

Learning Objectives:

In this module, you will...

  • Learn an overview of programming languages and their uses
  • Get a basic understanding of computer logic
  • Start coding with App Inventor

Algorithms

Most kids who grow up in North America love peanut butter and jelly sandwiches. Making one should be easy, just put peanut butter on one slice of bread and jelly on the other! Watch Zoe and Pablo try to give their friend Jared instructions to make a sandwich.

Video 1

Video 2

It you're having trouble getting these videos to play, try loading this page in Google Chrome.

Jared is acting like a computer—he won’t do anything unless he is told to in simple step-by-step commands. A person would know that the instruction “spread some jelly on the bread” really means to open the jar of jelly, put your knife in, remove it, and use it to spread jelly on the bread. However, a computer would do what Jared did; it would just spread the whole jar of jelly on the bread and get confused!

Unlike humans, computers can’t infer, or make guesses, about anything! They can only do exactly what they are told. Zoe and Pablo gave Jared an algorithm to making a sandwich. An algorithm is a set of step-by-step instructions. In order to make a computer do something, you need to write an algorithm for it to understand.

In Technovation, you will learn how to write algorithms to make a mobile app!

Activity

Grab a piece of paper and do this fun activity to mimic the way a computer thinks!

Write an algorithm to do an everyday activity. It could be riding a bike, making a sandwich, playing a game or anything else! When you are done, give your algorithm to a friend and have them do exactly as it says, just like Jared does in the video. Did things go as you expected?

Programming Languages

Computer algorithms are written in programming languages. Programming languages are tools that help you speak to your computer. Coders use different programming languages to do different things. Some languages are better for making apps and some are better for making websites and some are better for running complicated calculations. Just like any other language, you need to learn how to use it to be able to communicate!  

For Technovation you will learn to use App Inventor, which is a programming language that is great for making mobile apps. A ‘mobile app’ is software built to be used on a device such as a phone or a tablet and not on a computer. Here are some names of programming languages and what they are commonly used for.

Javascript is used for creating interactive elements in webpages.

Java is used to create Andriod apps.

Swift is used to make iphone apps (iOS app development).

App Inventor is used in Android app development. You'll learn more about this with Technovation!

Look up any words here that you don’t recognize. When programmers don’t know what something means, they look it up! As a new programmer, it is good to ask questions and get familiar with some of the words that computer programmers use!

Activity

Does your mentor or someone you know have experience in the tech industry? Ask them about their experiences and projects they've worked on! Here are some example questions to ask:

  • What technology-related projects have you worked on, and what did you learn? Your mentor might have helped build the technology, develop the business model, or contributed in another way.
  • If you have personal experience with a computer language, what did you use it for?

If you don’t know anyone in the tech industry, watch these interviews with women engineers at Facebook and Google!

Getting started with App Inventor

You can skip to the next section if you already know how to use App Inventor or if you will be using another programming language to make your app.

App Inventor is a free web application that allows users to create apps for Android phones and tablets. You can access App Inventor using a web browser by going to http://appinventor.mit.edu/.

App Inventor is really easy to start using! You can design and program your app all from your computer and then test your app with an Android phone or an emulator. Your work will be saved on the App Inventor servers, so it will be there each time you log in. To learn more about App Inventor visit this page.

What you will need

In this section you will learn how to use App Inventor to write an algorithm that an Android phone can understand! Here’s what you’ll need to use App Inventor:

  • Computer
  • Internet access
  • Gmail account
    • You need a Gmail account to log into App Inventor. To set up a gmail account go here.
  • Android phone or tablet (optional but highly recommended)
    • If you don’t have an Android phone, here are some reasonably priced options from Amazon that don't require service plans. We recommended Ice Cream Sandwich version 4.0 or newer for the operating system.

Once you have a Gmail account, set up an account with App Inventor here. After you setup your App Inventor account and log in come back to this page and go to the next section.

Connecting App Inventor to an Android Phone

You can connect an Android phone or an emulator to test the app you built in App Inventor in three ways. If you have a phone you can connect it over wifi or through a USB port. If you don’t have an Android phone, you can use an emulator, which is software that allows you to have a virtual phone on your computer. When you any these methods, App Inventor allows you to do live testing, which means you can edit your app in App Inventor on your computer, and see those changes appear instantly on your phone or emulator. After you review these sections and set up your devices, you should wait until the activity below to get started building your first app.

Wifi Method

This is the easiest way to use App Inventor and is highly recommended by the Technovation team. Choose this method if you have an Android phone or tablet and access to wifi. You need to be able to connect your computer and your phone to the same wifi network in order for this method to work. 

With the wifi method, you will build apps on your computer and test them on your phone using the App Inventor Companion App, called MIT AI2 Companion. Click on the button to view MIT’s instructions on how to get connected using wifi.

Troubleshooting Tips
  1. Make sure you downloaded the correct MIT AI2 Companion app onto your phone here: AI Companion App. The logo looks like this: AppInventorLogo
  2. Make sure your computer and your phone are on the same wifi network
  3. Reset your connection if you encountered an errorresetconnection
  4. If you’re still stuck here’s a video that may help:  PhilsComputerLab: Connecting with Wi-Fi

One you are set up and have everything working, go to the activity.

USB Method

This is the most technically difficult method to use and requires you to install software onto your computer. Choose this method if you have an Android phone or tablet and no wifi.

Using this method you will build apps on your computer using App Inventor and will test them on your phone by connecting it with a USB cord. You will need to download software onto your computer and the companion app onto your phone. If you are using a Windows computer, you may also need to download a USB Driver for your phone. For Macs, you do not need to worry about USB Drivers. Click below to view MIT’s instructions for the USB method. Click the button to view MIT’s instructions for the USB method.

Troubleshooting Tips
  1. Make sure you downloaded the correct MIT AI2 Companion app onto your phone here: AI Companion App. The logo looks like this: AppInventorLogo
  2. Reset your connection if you encountered an errorresetconnection
  3. You may need to enable developer options before they show up in your settings. Here is a good an article to show you enable developer options and USB debugging on most Android phones: howtogeek
  4. You may need to accept the dialog on your phone before it can connect to your computer

Mac

  1. You may need to change your default security preferences to if you get an alert that says “”MITAppInventorSetup.pkg” can’t be opened because it is from an unidentified developer.” To change this open security & privacy in your settings and click “open anyway”  or change your settings to allow apps to be downloaded from anywhere.

macerror

Windows

  1. Make sure aiStarter is running. You may need to search for it and start it up.
  2. You will most likely need to get a driver to have your phone work with your PC. Here’s MIT’s documentation on how to install a driver MIT USB help
    1. You should look up what the correct driver is for your phone. MITs documentation will help you if you have a google phone.
    2. You may need to update the driver your computer is using for your phone even after you have installed a new driver. Here are instructions on how to do that: Update Driver Instructions

One you are set up and have everything working, go to the activity.

Emulator Method

This method can be very tricky to use, especially on Windows, and is not recommended by the Technovation team. You should use this method if you have no Android phone or tablet.

An emulator is software that allows you to run a virtual phone on your computer. With the emulator method you will build apps on your computer and test them on your computer using an emulator. Click the button to see MIT’s instructions for the emulator method.

Troubleshooting Tips
  1. In Windows, make sure aiStarter is running. You may need to search for it and start it up.
  2. The emulator may be slow to startup.
  3. Make sure your phone is not plugged into your computer.
  4. Reset your connection if you encountered an error or if the emulator is not responding.resetconnection
  5. Here is a video to help you connect with an emulator: Using the Emulator

One you are set up and have everything working, go to the activity.

Activity

Complete these two tutorials. They will help you make your first app in App Inventor and they will help you understand the next section. Remember, this is your very first app so it is okay if you get stuck!

Tutorial 1: Talk to me Part I

Download a PDF copy of this tutorial here

Tutorial 2: Talk to me Part II

Download a PDF copy of this tutorial here

Event Handling

When you made the Talk to Me app you used both the designer and the blocks side of App Inventor. Every time you create a design element in your app you have to tell the computer what the element will do! All of this information will be in your blocks.

This is why App Inventor is called a ‘blocks programming language’. For every element that you put into the designer side of your app, you have to tell your computer what to do with it and when it should do it. This is known as event handling.

An event is something that happens. You probably have heard the word ‘event’ in terms of a friend’s birthday party or a school play. In coding, an event is when something happens that should trigger the code to run. For example, it could be a user’s click on a button, a change in the orientation of the phone screen, or the user entering text into a text box. The way the computer handles the event is whatever you tell it to do when the event happens.

In your Talk to Me app, you told the app what to do when the user clicked a button, so you put an event handler on the button! It looked like this:

screen-shot-2016-08-26-at-1-04-52-pm

The event was the user clicking on the button and the app handled it by calling TextToSpeech to say something. This will be really important for you to keep in mind. When you are coding, you have to think about what you want your app to do and when you want it to do it.  


Activity

Can you think some examples of event handling that your phone does? Here are a few to get started:

  • When you click "send" for a text message, it sends the message and makes a sound.
  • When you try to purchase an app from an app store, the phone asks for a password.
  • When you click an icon for an app, the app opens.

Functions

When you enter the blocks screen in App Inventor, did you notice all the different categories of built-in functions? They look like this:

technovation2

Functions are blocks of code that do something. They accept an input and produce an output. An input is information that goes into a function, and an output is information that is returned to you. In the Talk to Me tutorials, you used a Speech to Text function, which takes text, and turns it into speech! The input is the text and the output is the speech! As you continue to learn and program, functions and their inputs and outputs will make more sense.

The build-in functions in App Inventor are the basis of what you will be using to write your app. All programming languages have built-in functions, and good programmers know how to combine these functions in order to get the computer to do what they want. Once you know how to use each of these functions, you can combine them in all different ways to make your app! You will learn how to use these functions in Code 2: Data and Variables and Code 3: Logic, Loops and Conditionals.

Activity

Before moving on, let’s program some more! Can you take your Talk to Me app to the next level? Here are some ideas for you to try out!

  1. Change the pitch of the voice in your speech to text component. Click on the speech to text in the blocks side and look for the pitch property. You can give your voice a pitch of 0, 1 or 2.
  2. Use the Speech Recognizer sensor to have make your phone repeat back or print out something you say to it!

At the end of each coding unit, you will complete a coding challenge that you should submit to your mentor for feedback. These tutorials will help you learn key coding concepts and will help you build your final app.

Code 1 Challenge: Make a Slide Show

Challenge: Make an app that allows the user to click through a slideshow of your favorite pictures!

For this app you want to create a slideshow by allowing your user to navigate through images. When you design your screen, you will need to put an image as well as ‘previous’ and ‘next’ buttons for your user to click. This part will be done in the designer screen.

Try to figure out how to complete the code challenge on your own before looking at the instructions. The instructions show just one way of how this challenge can be solved.  You can also download our example app in the Google Play Store. Happy coding!

Reflect

In this lesson, we covered a lot! You learned a lot of keywords to get you started and wrote your very first program! Here are some reflection questions for you to discuss with your mentor or team:

Q1: What was the hardest part of getting started with App Inventor? Did you get “stuck” at any particular spot?

Q2: What are some things from this lesson that you think will be useful in creating your app?

Here are the keywords you learned:

  • Algorithms - Step by step instructions for a computer to follow
  • Programming language - A way to talk to your computer and tell it to do things
  • Event - When the user does something in your app, like click a button, or enter text
  • Event handler - The block of code that tells your app what to do when an event happens
  • Functions - Blocks of code that do something. They take an input, and change it into something else, which is the output.
  • Input - Information that goes into a function
  • Output- Information that comes out of a function

Coding 15: Flowcharts

Flowcharts

Coding 15

In this lesson, you will…

  • Learn how to create flowcharts
  • Create one flowchart

Key Terms

  • Flowchart - a diagram that represents an algorithm using shapes and arrows
Georgian online casinos have witnessed a surge in popularity, attracting both local enthusiasts and international players looking for an exciting gaming experience. As the digital gambling scene evolves, Georgian platforms stand out for their diverse offerings and user-friendly interfaces on onlain kazinoebi. Amidst this booming industry, understanding the mechanics of how these platforms work becomes crucial, similar to deciphering the flowcharts laid down in the world of coding. Just as a page on the Technovation Girls website explains the importance of flowcharts in coding, players navigating Georgian online casinos need to understand the underlying algorithms that organize their gameplay. Whether you're delving into the complexities of code or immersing yourself in the exciting world of online gambling, mastering a flowchart is key to success and enjoyment.

Flowcharts

A flowchart is a diagram that represents an algorithm. It is read from top to bottom and uses shapes and arrows to show what happens in a program. You and your team can use flowcharts to help plan out how to create your code and organize your code.

Here is an example of an algorithm for finding out why someone’s stomach hurts:


An oval shows where the algorithm starts and ends In the example above, there are three different places where the algorithm may end, either the person needs to eat something, they need to rest, or they need to see a doctor. These are called terminals.


A diamond shows where a decision needs to be made. They are like “forks in the road”. This is whenever a conditional needs to decide true or false for a condition. Two arrows should come out of a decision, one for true and one for false. Note how the arrows come out of the diamond in the example above, one comes out from the bottom and one from the side.


Here’s another example of a flowchart:

This diagram uses a rectangle, which represents a process. A process is whatever you are having your code do. It could be alerting a user, setting a label to say something or adding two numbers together.


Here’s another example of a flowchart:

The last shape you should be aware of is the parallelogram. You should use this shape whenever you need to get data from a user or from somewhere else, like a website. The parallelogram is for inputs.

Activity: Create a Flowchart

In this activity, you will create one flowchart. With your team, write out some pseudocode for one algorithm you are going to use in your app. Once you are done, follow the instructions below.

1. Put an oval around the beginning and end of your event handler. This is called a terminal. There is often more than one ending to a flowchart. In the search button example above, the event handler ends either by displaying the search results in a listview or by notifying the user that there are no matches.

2. Put a diamond around where a decision needs to be made. This is whenever the app needs to decide true or false for a condition. Remember, conditionals can lead to more than one possibility for the ending.

3. Add a parallelogram around all the inputs in your code or the places where you are getting data from either the user or another place, like a website or local database.

4. Put a rectangle around all of the processes in your code. This is whenever your app is doing something that doesn’t fall into the categories above. This could be adding items to a list or sending an alert to the user.

5. Connect it all together with arrows! Pay special attention to how you are drawing the arrows for loops and conditionals and refer to the examples above if you need help.

Reflection

Flowcharts are a great way to help plan out your code and understand what you will need to program your app. Now that you’ve completed all the coding lessons, think back on everything you've learned and, with your team, start planning and creating a flowchart of your source code!

Additional Resources: More Practice and Online Tools

Want a bit more practice with flowcharts? You can either try making a flowchart of some of the activities in previous coding lessons or try making a flowchart of pseudocode with everyday activities. For example, what would a flowchart of making tea look like?

You can try out this website to make flowcharts online!

Remember this?

Way back in Coding 1, you saw two videos from the MIT App Inventor team that walked through the process of building an app. Now that you've completed all the Coding lessons, watch these videos again and see how much you've learned! Use them as guidelines as your build your own app.

Coding 14: Debugging Tips in App Inventor and Thunkable

Debugging Tips in App Inventor and Thunkable

Coding 14

In this lesson, you will…

  • Learn tips for debugging your code in App Inventor and Thunkable

Key Terms

  • Debugging - the process coders use to figure out why their code isn’t working and fix it
  • Test data - a simpler set of data that you can use to make sure your app is working correctly
  • Comments - text that is included in code to explain what it does
  • Version Control - saving working versions of your app as you make progress

Debugging Tips

Debugging is the process coders use to figure out why their code isn’t working, and then fix it so it does work. When you did the Code Challenges, you may have already run into something that forced you to go back over your code and figure out where you made a mistake. This is the essence of debugging and this next section will provide you with tips on how to make debugging easier for you. 

Sometimes, you may already know how to code something but it will still take you a very long time to do it. Great coders still make mistakes, even when they know exactly what they are doing, so it’s important to build a toolbox of debugging techniques that can help you out when you aren’t sure what went wrong. Everyone has a different method for debugging their code and you’ll figure out what yours is after you practice a bit. Debugging can often be the most time-consuming part of coding, so it’s really important to leave plenty of time for it!


Do things in small chunks

The best advice for getting your app to work correctly is to break the coding down into small chunks. Get one thing working before starting on the next thing. Sometimes programmers are tempted to try to code their entire app in one go, then test it. Don’t fall for that temptation!!! If something doesn’t work correctly, it’s hard to figure out where to even start to try to fix the error. The better option is to code a little bit, test a little bit, confirm it works, then code a little more, test a little more, etc. For example, if your app has 5 buttons that all do different things, code the action for the first button and then test to make sure it works. Then move onto the second button, etc. Even if your buttons all do similar things, get one working, and then you can use what worked for that first button to code the remaining buttons. It’s better to fix code in one place then go back and fix it in 5 places if there is an error in your code.


Using test data

If you have a lot of really complicated data to use in your app it can be helpful to use test data. Test data is a simpler set of data that you can use to make sure your app is working correctly.

As an example, let’s say you are making an app that shows the user where the closest restaurant is to them. You want to use Google Sheets to store the names of restaurants, the location data, and phone numbers. To get started building your app, you don’t need to have an entire list of restaurants ready in your Google Sheets spreadsheet to start coding your app. You can just put in one or two test restaurants and get your app working before adding the real data.

Using the Notifier & Alert

This component is called the Notifier in App Inventor and an Alert in Thunkable. This can help you figure out why your code is broken. To put a notifier in your App Inventor app drag it over from the user interface palette. In the new drag and drop interface of Thunkable, you add an alert in the Blocks window by clicking the + sign next to Alerts in the Palette.

App Inventor

Thunkable

Here are some scenarios when this method of testing may be helpful:

Using Labels

Just like with Notifier and Alert components, you can also add Labels to display current information in your app. For example, you might want to know the value of a variable as certain events happen while the app is running. You can set the Label.Text to whatever it is you want to know and it will display on your app. Once you’ve debugged your error, you can either make the Label invisible, or delete it altogether from your app.

App Inventor Thunkable

Changing Properties

A simple way to check things while you are testing your app is to change a property value in the Designer while you are running the app. For example, you might have a game with a sprite. Its position doesn’t look right to you on your phone when it’s running. If you are live testing, you can go to the Designer and change the X and Y values of the ImageSprite (App Inventor) or Sprite (Thunkable) and it will update the position on the screen in the running app. It can be helpful to see what changing a certain property of a component will do to affect the looks or behavior of a component as you are testing.

Do It (App Inventor only)

In App Inventor, while you are live testing your app, either with a phone and the AI Companion app, or with the emulator, you have access to a new command, “Do It”. The command is greyed out until you connect to a phone or the emulator through the Connect menu. The Do It command lets you run a block without having to interact with the app itself. It’s a great way to see the current value of a variable. Just drag out a “get global name” block and right-click. Select “Do It” from the dropdown menu and that block of code will execute. A yellow Do It box will appear above the box with the result.


You can also use Do It to change something in your app. For example, you might want to change an item in a list. Drag out the block to do that, and select Do It. You won’t see the result, but the list will be updated within your app.


You can also run an existing code block in your app. For example, here the ListView elements will be updated using Do It. That will be reflected in the app. The ListView will display the new elements set with the Do It command.

Other Coding Tips

Collapsing Blocks

Let's talk about a great feature to help you keep your code organized on App Inventor and Thunkable. 

If you right-click on a block, you'll see an option to collapse it.

App Inventor

Thunkable

Collapsed blocks will compress it down to one bar on your screen. Collapsed blocks still work the same as regular blocks, they just take up less space. This can be helpful if you have blocks you no longer need to edit and want to clean up your screen.

App Inventor


Thunkable

To expand your blocks again, right-click on them and select Expand Block.

App Inventor

Thunkable

Disabling blocks

You can also disable blocks. This will keep them on your screen but prevent them from doing anything. This can be very helpful if you want to test your app without certain code blocks, but don’t want to delete them. You can also disable blocks that you use for testing only, like the notifier.

There are a couple of different ways to disable blocks. In both App Inventor and Thunkable, simply dragging blocks out of an event handler block will disable them and prevent them from running. In App Inventor, the blocks will look the same, but because they are not part of any event, there is no way they will ever execute. In Thunkable, the blocks look greyed out with a crosshatch pattern. In App Inventor, you also have the ability to disable blocks by right-clicking, and selecting Disable blocks from the dropdown menu. In that case, they will appear greyed out too. The difference is, you can disable entire sets of blocks using this method, including the event handler block. 

App Inventor

Right-click and disable blocks, including event handlers.

App Inventor

Drag a block out of the event handler block and it will be disabled. It won't execute.

Thunkable

Drag a block out of event handler to disable it.

To enable your blocks again,  right-click on them and click “Enable Block”, or drag the disabled blocks back into the event handler block.

Comments

Programmers often leave comments in their code to explain what it does. Comments can be helpful when other people are looking at your code, such as teammates, mentors, and judges. Comments can also help if you return to your code later and have forgotten what parts of it do.

Version Control

Let’s say you have one part your app built and working. You add some new code and suddenly everything stops working.  You try to delete the new code but your app still isn’t working. You aren’t sure what went wrong and wish you had an “undo” button.

To avoid scenarios like this you can create different versions of your app.  These versions will save your code so that if you make a mistake and don’t know how to fix it, you can go back to the last working version you saved. You can also use version control to experiment with new features without worrying about breaking your app. 

Activity: Add a Comment

If you have started your final app for Technovation, use that app for this activity. Otherwise, pick one app that you made in one of the other coding activities.

Add at least one comment to your app explaining what a group of blocks does. Pick a group of the blocks that you think it is the hardest to understand because those blocks would probably be the hardest for someone else, like a team member, to understand.

Here’s an example of a comment we included in the last coding activity. Does it help you understand the section of code?

App Inventor Thunkable

Writing comments and explaining code blocks will help you when you make your demo video. You can use what you wrote in your comments to explain blocks of code in your video.

Reflection

Debugging is a natural part of the coding process, so don’t get discouraged if your app doesn’t work perfectly on the first try. Often, the bulk of your time coding is actually spent debugging. Make sure to plan with your teammates and mentors to leave extra time for debugging before you submit.

Additional Resources: More Debugging Resources

App Inventor and Thunkable Forums

If you have questions that are specific to App Inventor or Thunkable while you are debugging, you can join the App Inventor or Thunkable forum, and then post your question. 

Although the larger App Inventor and Thunkable communities are usually quite helpful and responsive to questions, try searching the forum first to see whether your question has already been asked and answered. This will save you time. 

Videos explaining debugging and version control in App Inventor

Watch this video to learn more about version saving in App Inventor:


Debugging in App Inventor

Debugging in Thunkable

Here are tips from to help debug your Thunkable Code:

App Inventor Testing Documentation

Here are tips from MIT to help debug your App Inventor Code:

Coding 13: Storing Data in the Cloud & APIs

Storing Data in the Cloud and APIs

Coding 13

Storing data in the cloud and/or using an API can be a possible way to help your app solve your particular problem. Learning about storing data in the cloud and using APIs  can also help earn points in the Demo Video section of the judging rubric

In this lesson, you will…

  • Learn about cloud storage and APIs
  • Create a login page

Key Terms

  • Cloud Storage - information that is stored on the web so that any device connected to the internet can access it
  • Web Database - a way to store and organize information in the cloud
  • API (Application Programming Interface)- the way you can get information from another website or database.

Web Databases and APIs

In the last coding lesson, you learned how to store information on a device, or how to use local storage. You also built a to-do list app that allowed users to save their to-do lists in between when they opened and closed the app. In this lesson, you’ll learn about cloud storage, or how to store information on the web so that any device connected to the internet can access it. Web Database is another term often used to describe cloud storage.

Cloud Storage

Let’s say you have two phones running an app, Phone A and Phone B. If Phone A stores data in local storage, Phone B can’t access it. If Phone A stores data in cloud storage or a web database, then Phone B can access the data.

Local Storage

Cloud Storage

Uses for Cloud Storage

Cloud Storage is useful for apps with information that frequently changes. Here’s an example. Let’s say you are building an app to show the 10 most popular restaurants in your city each month. You put a list of restaurants into your app and upload your app to the app store. The following month, you update the list of restaurants and update your app in the app store. Users who are already using your app will need to update or re-download your app to see the new top restaurants. 

Now let’s say you stored the top 10 restaurants in cloud storage. When you update the restaurants, all of the phones using your app will check for updates to this cloud storage automatically. Users will see the changes right away, and won’t need to re-download anything.

Have you ever shared a picture on Facebook or Instagram? Apps like these use cloud storage. When your friend uploads and shares a picture, your phone checks the web database for new photos, and then you see it in your feed. 

So when would you use cloud storage? Here are some common uses:

  • Requiring login and passwords for users
  • Sharing data from a game, like a high score list
  • Allowing users to share images with each other through a feed
  • Displaying a feed that all users see
  • Remembering things about a user such as their transactions, financial records or medical records

It is important to know that when using cloud storage, phones need to have an internet connection to get information. If the phone has a slow internet connection, this could slow down your app or make it impossible for your app to update.

App Inventor has one main option for storing data in the cloud, CloudDB. FirebaseDB still remains as an option under the Experimental tab, and works the same as CloudDB. Thunkable has three options for storing cloud data - cloud variablesAirtable and Google Sheets. Thunkable also has a special Sign In component that uses Firebase to store emails and passwords for users of your app. You will need to set up accounts to use Airtable and Sign In. Google Sheets is accessible if you have a Gmail account.

APIs

API stands for application programming interface. An API is a way you can get information from another website or another website’s database. APIs give you access to information external to your app, whereas cloud storage gives you access to information gathered within your app.

Let’s say you are building an app to help people decide what to wear based on the weather. You could spend lots of time uploading data about the weather into a database, but there are already websites that show the weather.  A better solution would be just to grab data from that website and show it to your users through your app. An API is what would allow you to do this.

Here are some common APIs that programmers use when they create apps:


You can learn more about APIs in Thunkable by watching this video and checking out resources here.

Google Maps

Location and Map Information

App Inventor Tutorial

Thunkable Tutorial

iTunes
National Weather Service

Activity: Create a Login Screen Using Cloud Storage

This app allows users to create an account and log in. It uses CloudDB in App Inventor and Sign In in Thunkable. Here’s how it works:

When a new user signs up, it saves their username and password in the cloud

When a user logs in, it calls the cloud database to get their username and password

If the user successfully logs in, the app takes them to their profile page

However, this app has a major security bug! It never checks to see if the user’s password matches the one in the cloud storage before logging in. This means that any user can log in to any account. You need to fix this bug and alert the user if they have an incorrect username or password.

You need to make sure that the value returned from the cloud storage matches the password the user entered into the textbox! Ready to get started? Download the source code below.

Important:

If using Thunkable, you will have to sign up for a Firebase account and set the url and API key for your Sign In component following  instructions here.

Reflection

Talk to your teammates and mentor about how you might use cloud databases or Web APIs in your app. If you want to share any information between different users of your app, you will need to use cloud databases. 

If you want users to access information from different websites, then Web APIs are the way to go.

Additional Resources

App Inventor


Thunkable

Coding 12: Storing Data Locally

Storing Data Locally

Coding 12

Storing data on your device is a feature that might be helpful for your app, depending on your particular problem solution. Learning about storing data on your device can help you score points in the technical part of the Demo Video section of the judging rubric.

In this lesson, you will…

  • Learn how to store data on your device in App Inventor and Thunkable
  • Learn how to use TinyDB in App Inventor
  • Learn how to use stored variables in Thunkable

Key Terms

  • Database - an organized collection of information
  • Local Database - an organized collection of information stored on a device
  • Tag-value pair - a way to store and access information in a database
  • Stored Variables - blocks in Thunkable that let you store information on your device
  • TinyDB - A database service you can use in App Inventor that allows you to store information on a device

Storing Information On Your Device

Local Storage

In this lesson, you will learn how to store data on your device, or use local storage. Here are some examples of data storage that you might use every day:

  • Contact list – you store your friend’s phone numbers so you can use them later
  • Messaging app – most messaging apps automatically store old messages so you can read them later
  • Filing Cabinet – you store and organize paperwork here
  • Photos - you store and organize your photos on your mobile device

In your app, you can use local storage to store information between the times when your user closes and reopens her app. 

Variables, which you’ve learned about, allow you to store information only while your app is running. What that means is when the app closes, the variable essentially “disappears”. Whatever the value of a variable is when the app closes is lost. For example, if the app is a game and the user scores 350 points so the score variable value is 350, when the user closes the app, that value is gone. When the user reopens the app, score will be reset to whatever the variable is initialized to. 

Sometimes you may want to save information so when the user comes back to the app, that information remains as it was the last time the user ran the app. For example, you might want to store the high score for a game. Or if you are tracking your daily walking steps, or number of glasses of water drunk each day, you would want to save that information each time you run the app. So you want to use local storage, which means storing the data on the mobile device.


Databases

Local storage is sometimes called a local database. A database is an organized collection of information. Accessing a database is known as calling it, or making a call to it. When you call a database, you can get information, delete information, store new information, or update information. The key is like a variable name, it is how you tell the database which piece of information you want to get, store, update, or delete. 

These next two sections show you how to store information on your device in App Inventor and Thunkable. The two platforms deal with local storage a little bit differently, so we’ll separate the lesson. If you are using Thunkable, skip to Using stored variables in Thunkable.

Using Tiny DB Component in App Inventor

In App Inventor, the component TinyDB allows you to save data on the user’s phone that will be there each time she opens your app. It is important to know that TinyDB only allows you to store data locally. This means that two users cannot share data with the same TinyDB.  When a user stores data in TinyDB, it will only be available on her phone, and no one else’s. In the next lesson, you will learn how to share information between phones.

To use TinyDB, drag it onto your screen through the Designer. You can find it under the Storage menu in App Inventor. It will appear as a non-visible component and will look like this:

You can talk to your TinyDB or Local Storage by making calls to it. When you make a call, you can store things and get things from it. TinyDB uses tag-value pairs. Each piece of information in your storage is known as a value, and the tag is the name. This is a name that you will use to retrieve the data. It is a lot like a variable name. If you use the same tag name to store data twice, TinyDB will overwrite, or erase, the old data with the new data. So, it works exactly like updating or setting the value of a variable. 

Here are examples of how to make calls to TinyDB. StoreValue is like the set variable block. GetValue is like the get variable block.

Store or Save

Get

Above, we stored our fruits list with the tag  “Food”. The second block shows how to retrieve the fruits list from storage. The tag needs to be typed exactly as it was when the data was stored, including all capital letters. Also, always make sure the valueIfTagNotThere matches the data type. For example, Food is storing a list of fruits, so if the app has not yet stored anything in the Food tag, you would want it set to an empty list.

To better understand this, let’s walk through an example.

Let’s say you needed to store three things in a database. One is the Fruits lists, one of them is your age, and the other is a list of your favorite things to do.

You make three calls to the database like this:

You now have three entries in your database, and can you guess what they look like?

Note: For a refresher on how lists work, reference Coding 6: Lists

Now, when you want to retrieve your favorite things, you make a call like this:

When you use this block you will get a list {Learn how to Code, Visit Family, Listen to Music}. Now let’s say you want to retrieve your age, so you make a call like this:

When you use this block you just get 0 back. This is because the tag “myage” does not exist in your database! Since your database did not recognize the tag, it defaulted to show you the block next to “valueIfTagNotThere”, which is the value zero.

You can make valueIfTagNotThere anything you want, but it makes sense to keep it the same data type as what you are storing. So, making it a number value makes sense. Always use the exact same spelling and capitalization when storing and getting tag-values from TinyDB or it won’t be able to get your information.

Note: In App Inventor, if you create an app with multiple screens, components and variables will not be able to talk to each other between each screen. You can use TinyDB to transfer information from one screen of your app to another. Visit this page for more information: MIT Screens.

Using Stored Variables in Thunkable

Thunkable has simplified storing data locally on mobile devices by differentiating its variable types into app variables, stored variables, and cloud variables

App variables allow for storing information in the app. What that means is when the app closes, the variable essentially “disappears”. What that means is that whatever the value of a variable is when the app closes is lost. For example, if the app is a game and the user scores 350 points so the score variable value is 350, when the user closes the app, that value is gone. When the user reopens the app, score will be reset to whatever the variable is initialized to. That means, if you want the app to maintain the value, you would need to use a stored variable. The value would be stored on the user’s phone, so when she reopens the app, the value is the same as when she last closed it. This could be useful if, for example, you wanted to keep track of your high score for a game.

Cloud variables allow your app to store data in the cloud. We’ll discuss cloud variables much more in depth in Coding 13, so we won’t talk more about it here.

Stored variables work very much like app variables. When you drag out the initialize variable block, the default type is app. However, there is a dropdown menu where you can set the variable type to stored or cloud.


Note when you initialize an app variable, you must give it a starting value. For stored variables, there is no starting value, because its starting value is pulled from where it is stored on the phone. 


That does mean that you will have to set the value of the variable somewhere in your app. For example, you could set the high score to whatever the current game score is so it’s saved between game play.


Thunkable has another component called LocalDB, which allows you to store table data in your app. It’s useful if you want to include a table of information within your app. However, it currently does not work for storing information locally on your mobile device, so you are better off sticking with using stored variables.

Activity -  To-Do List

This To-Do List lets the user create a to-do list that will be remembered each time they open and close their app. However, the source code has a bug. The app never remembers any tasks the user adds or deletes. Can you figure out how to fix it?

If you’re stuck, check out this App Inventor video solution by Technovation alumni Jennifer John:

Reflection

Now that you’ve learned how to store data on your phone, you should brainstorm with your team where you might use this in your app. The next coding lesson will teach you how to store information in the cloud that is not only accessible on the user’s phone but anywhere that they login to their account.


Additional Resources

App Inventor and TinyDB

This tutorial shows you how to use TinyDB to track goals locally on your phone.

Part 1

Part 2

Part 3

Stored Variables in Thunkable

This tutorial is a basic app to store a note:

Coding 11: Components and Sensors

Using Components and Sensors in App Inventor and Thunkable

Coding 11

Using particular sensors or components can help your app be a good solution to your problem. Learning about new components and sensors can also help earn points in the technical part of the Demo Video section of the judging rubric


In this lesson, you will…

  • Review  different components you can use in App Inventor or Thunkable
  • Find one sensor or component that can help your app
  • Research a tutorial and code at least one sensor or component into your app

Key Terms

  • Media Components - Examples of media components are photographs, audio, and video.
  • Sensors  - Different types of devices installed on a phone that gathers data for various purposes
  • Social Components - These are features that enable users to make phone calls, send emails, text and share things through your app.
  • Connectivity Components - These allow your app to interact with places outside of your app, like the web and other apps.

Smartphone Components and Sensors

Now it’s your turn to choose and code the components, some of which include sensors, that you want your app to use.  The various components available in App Inventor and Thunkable will allow your app to do many different things - be sure to choose the ones that are right for you! 

This lesson is a reference for you to learn about many components you can use in App Inventor or Thunkable.  You don’t need all of the components listed, but you should look for ones that will help you build your app.


Here are some important components mobile phones have:

Component What it does
Camera, speaker, microphone Allow you to take pictures, videos, record sounds
GPS Shows the physical location of the phone
Storage on a phone Allows you to store preferences, images, and sounds 
Connectivity to the web Allows you to connect the phone to information on the web
Accelerometer, gyroscope Shows how fast the phone is moving
Phone calls, text messages, contacts lists Allows you to make phone calls, send text messages, and connect to people

In the new drag and drop version of Thunkable, any non-visible components will be found in the Blocks tab, not the Designer. So if you are searching for components and cannot find them, try looking for them in the Blocks tab.

The components below are ones beyond the standard User Interface components. Both platforms continue to add more features and components all the time. This is not a complete list, but does cover most of the available components in App Inventor and Thunkable.

Media Components

If your app needs features related to things like photographs, audio, and video, these components will be very helpful for you.

Sensors

If your app needs to gather information about the world around it or the user, here are some sensors that App Inventor and Thunkable can access. Please note that not all phones or mobile devices will have all of these sensors available. Be careful adding features if you are not sure your target audience will have access to devices with these sensors built in.

Social Components

If you need your app to make phone calls, send emails, text and share certain types of information, these social components may be helpful.

Connectivity Components

These allow your app to interact with places outside of your app, like the web and other apps. 

Activity: Learn how to use a new sensor and component

For this activity, you will choose at least one component or sensor to use in your app. One of the best skills you can learn as a programmer is how to find resources to help you when you are stuck or need to learn how to use something. For this activity, you will find your own tutorial or video to learn from.

Here are some good places to start looking for tutorials or instructions:

  • You should start by searching online. Make sure to use keywords that include the name of your component, such as “Proximity Sensor App Inventor” or “Google Maps Thunkable”
  • Search for videos on YouTube. Make sure to use keywords just like an online search.

App Inventor

Thunkable

Reflection

This lesson is a reference for all of the components you can use in App Inventor and Thunkable. You did the hard work of finding a tutorial or video to learn how to use your component.

  • How did you find the tutorial or information you needed for the activity?
  • How will you use your work from this lesson in your app?

What are some other areas of your life where you can use this “find your own tutorial” skill?