Code 7: Fehlerbehebung

Lernziele:

In dieser Einheit wirst du lernen…

  • wie du Fehler in deinem Code beheben kannst

Tipps zur Fehlerbehebung

Du hast deine Ideen in einen Programmcode übersetzt. Leider kann man dabei manchmal auch auf Fehler (bugs) stoßen.

Wir sind so stark von Software abhängig, dass wir uns gar nicht mehr vorstellen können ohne sie zu leben. Software hat unser Leben auf vielerlei Weise vereinfacht: wir schreiben E-Mails, chatten mit Freunden auf Facebook, spielen Computerspiele und suchen nach Informationen auf Google. Software ist überall um uns herum, selbst wenn wir uns nicht einmal bewusst sind, dass wir sie gerade verwenden. Denk zum Beispiel mal an Autos, Ampeln, Fernseher, Waschmaschinen oder Hörgeräte. Wir sind inzwischen so an Software gewöhnt, dass wir einfach davon ausgehen, dass sie immer funktioniert!

Aber warum tut sie es nicht immer? Wo kommen die Fehler her? Wie sich herausstellt, ist es nicht so einfach gute Software zu schreiben. Software ist kein berührbares Produkt, wir können sie nicht anschauen und direkt sehen, ob alles richtig ist.

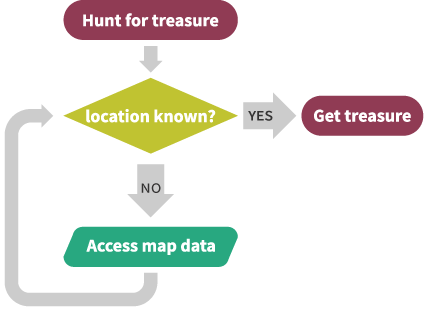
Fehlerbehebung oder -suche (debugging) ist der Ausdruck für den Prozess, in dem Programmierer versuchen herauszufinden warum ihr Programm nicht funktioniert. Wenn ihr die Code Herausforderung bearbeitet habt ist es euch vielleicht auch schon passiert, dass ihr euren Code noch einmal nach einem Fehler durchsuchen musstet. Dies ist der Kern der Fehlerbehebung. In den nächsten Abschnitten werden wir dir hilfreiche Tipps geben, die dir die Fehlersuche vereinfachen.

Manchmal weißt du vielleicht schon wie du etwas programmieren musst, dennoch dauert es sehr lange es wirklich zu tun! Auch gute Programmierer machen Fehler, selbst wenn sie genau wissen, was zu tun ist. Es ist also wichtig verschiedene Vorgehensweisen für die Fehlersuche und -behebung zu lernen, die dir helfen können, wenn du nicht mehr weiterweißt. Jeder benutzt verschiedene Strategien bei der Fehlersuche im Code, auch du wirst nach etwas Übung herausfinden, wie du am besten Fehler findest. Die Fehlersuche nimmt häufig einen Großteil der Zeit beim Programmieren ein, nimm dir also wirklich viel Zeit dafür!

Schau dir dieses Video an um mehr über Fehler, die in deinem Code sein könnten, zu lernen und zu erfahren, wie App Inventor dir dabei hilft sie zu finden!


Wenn du bei der Fehlersuche spezielle Fragen zu App Inventor hast, kann dir das App Inventor Forum helfen. Hier kannst du dich anmelden und deine Fragen stellen. Auch wenn die App Inventor Nutzer meistens sehr hilfsbereit sind und schnell auf Fragen antworten, solltest du zunächst das Forum nach älteren Beiträgen durchsuchen, in denen vielleicht schon auf deine Frage geantwortet wurde. Auf diese Wiese kannst du Zeit sparen.

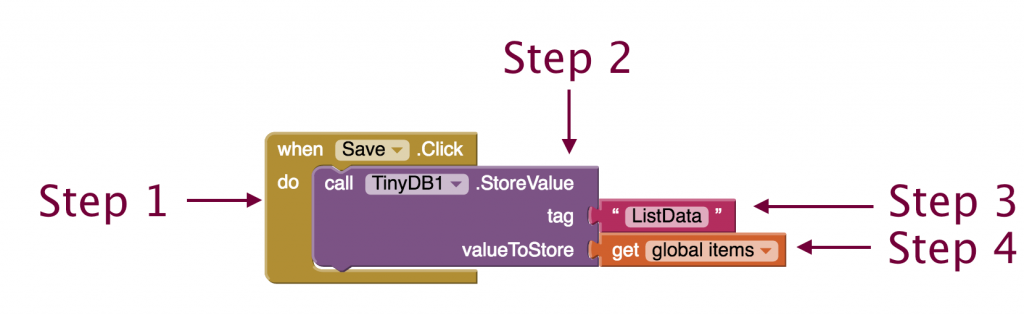
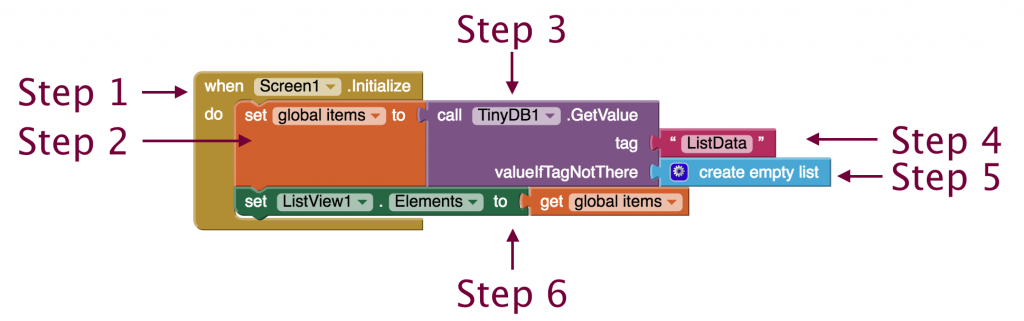
Nutze Testdaid=”testdata”ten

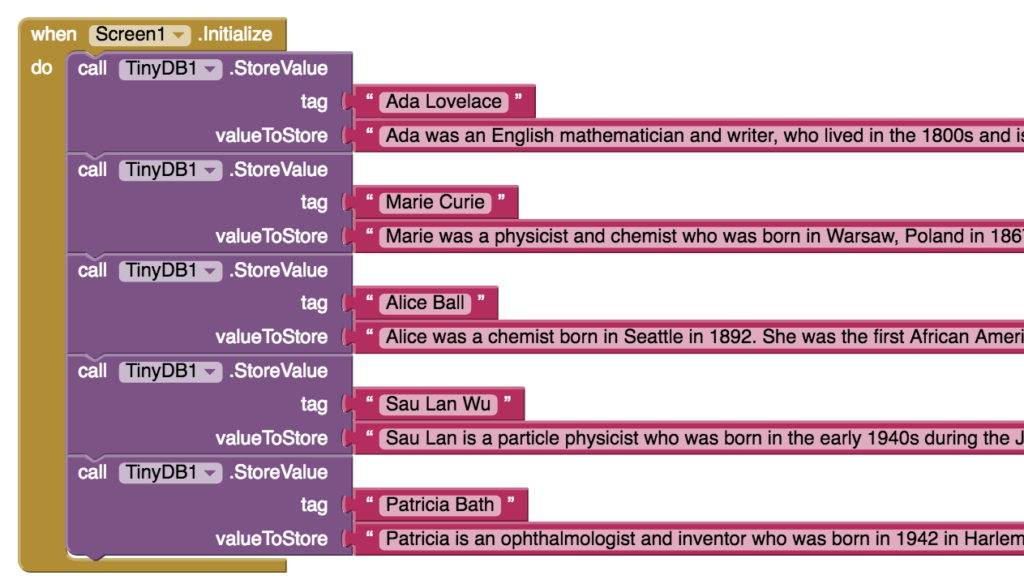
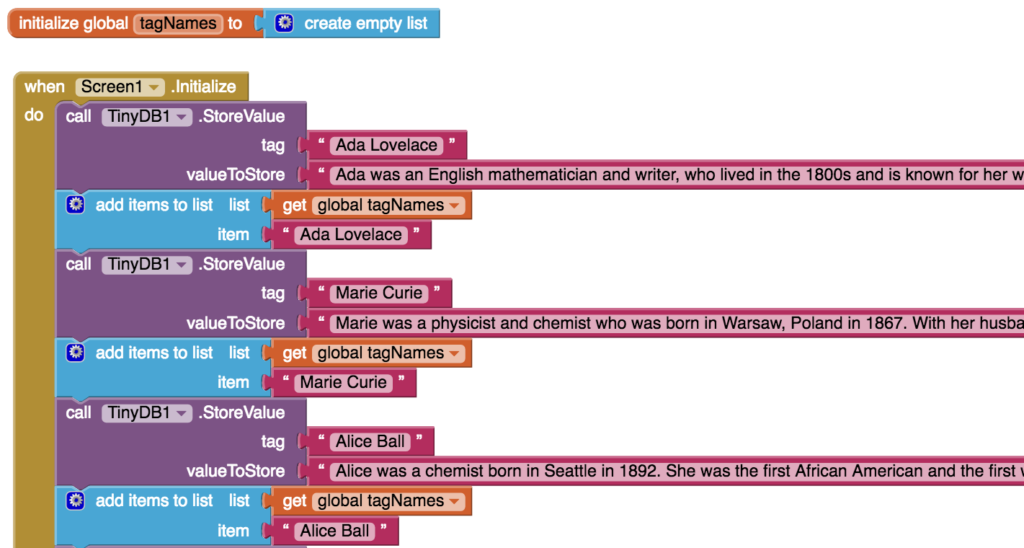
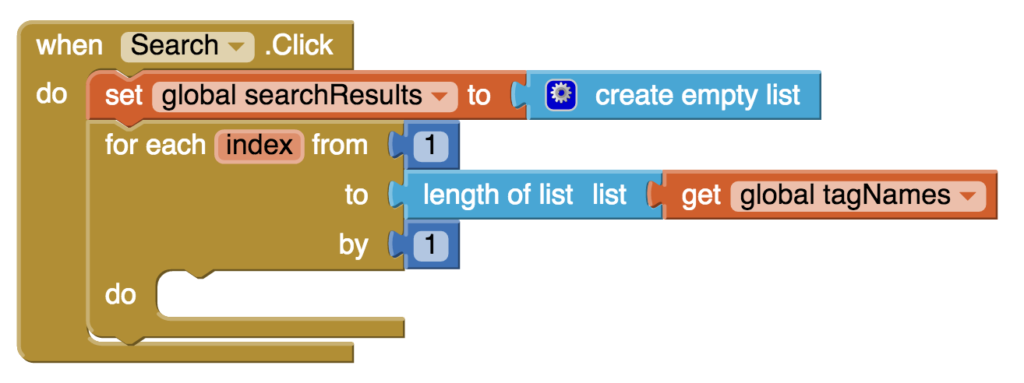
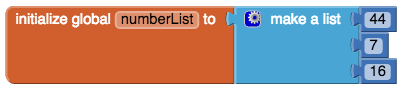
Wenn du viele komplizierte Daten in deiner App verwendest kann es hilfreich sein zunächst Testdaten (test data) zu verwenden. Testdaten sind ein Set von einfacheren Daten, die du nur nutzt, um zu testen ob deine App richtig funktioniert.

Stell dir zum Beispiel vor du entwickelst eine App die dem Nutzer anzeigt, welches Restaurant am nächsten ist. Du willst verbundene Tabellen nutzen um die Namen der Restaurants, ihr Adresse und ihre Telefonnummer zu speichern. Wenn du anfängst deine App zu programmieren brauchst du noch keine komplette Liste aller Restaurants in deiner Datenbank. Es reicht, wenn du nur ein oder zwei Restaurants speicherst und mit diesen testest, ob deine App richtig funktioniert. Anschließend kannst du die realen Daten deiner Datenbank hinzufügen.

“It’s hard enough to find an error in your code when you’re looking for it; it’s even harder when you’ve assumed your code is error-free. ”


–Steve McConnell, Software-Engineering-Experte und Autor

Nutze Notizen

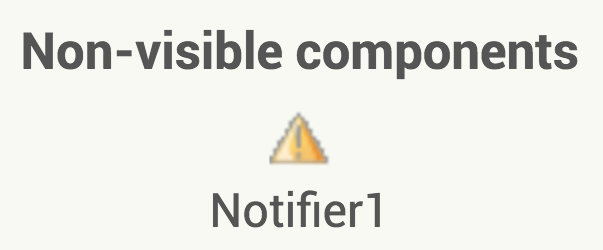
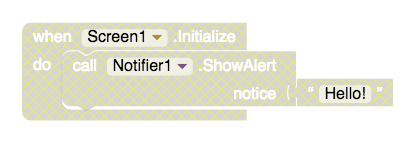
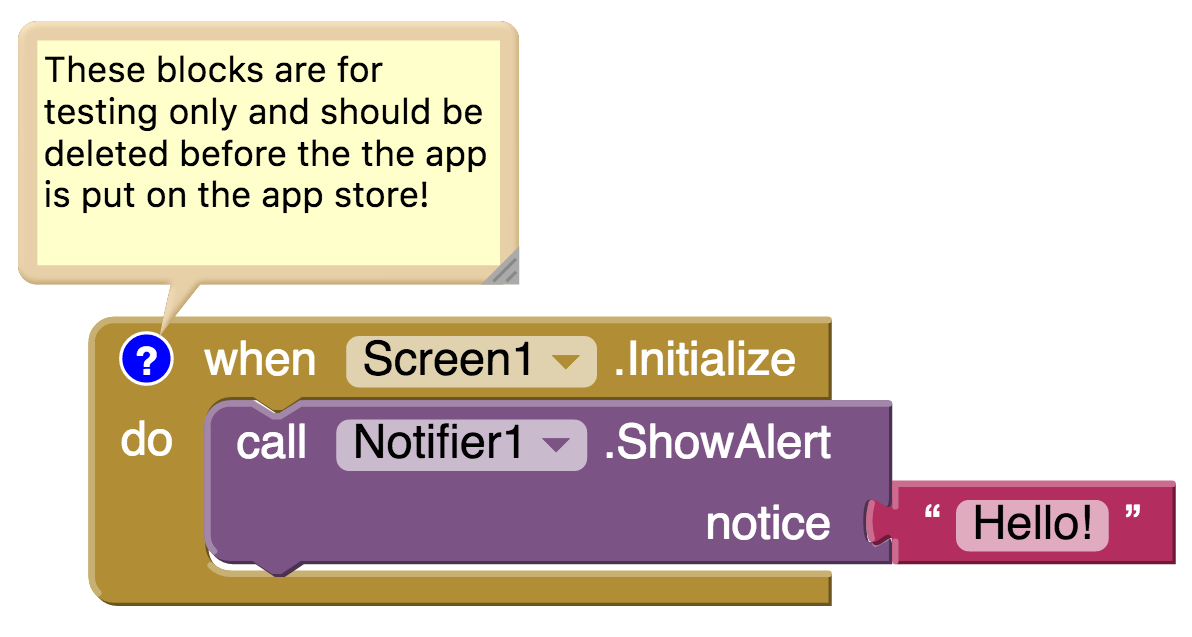
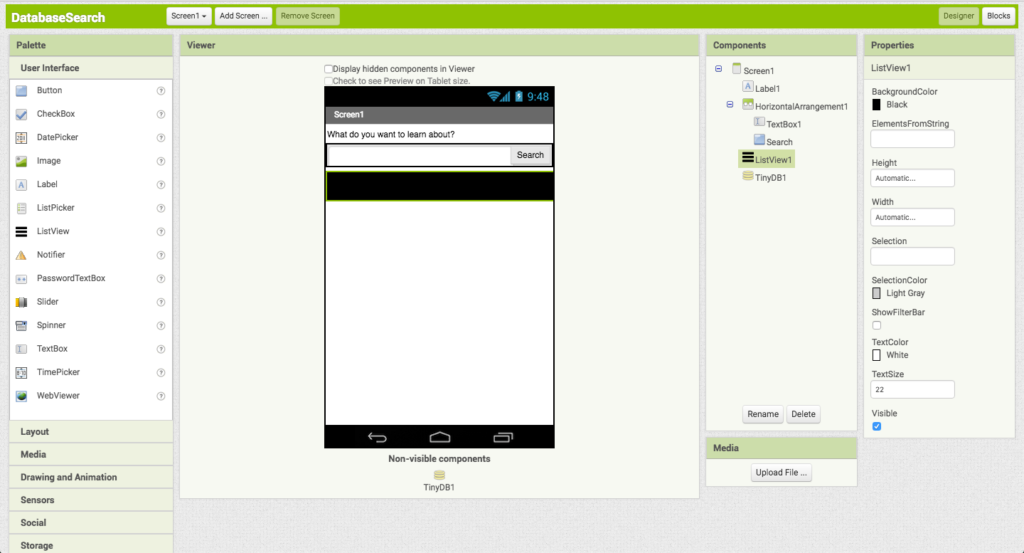
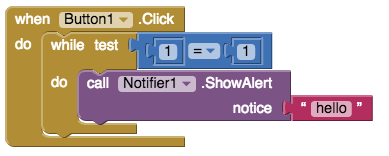
Stell dir vor deine App funktioniert nicht und du weißt nicht warum! Du kannst Notizen (notifier) verwenden um zu notieren wo dein Code nicht funktioniert. Um eine Notiz in deinen Code einzufügen, ziehe das Notizensymbol aus der Benutzerleiste in deinen Code. Es wird als nicht sichtbare Komponente an dieser Stelle erscheinen und so aussehen:

image00

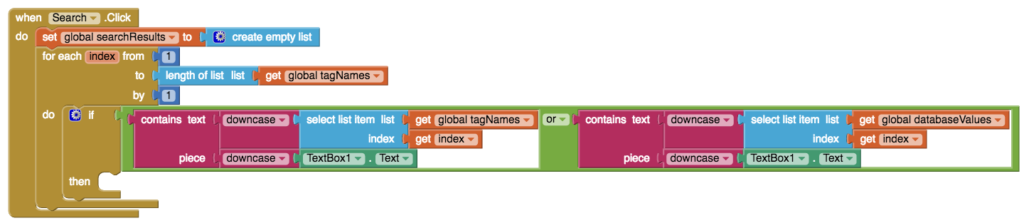
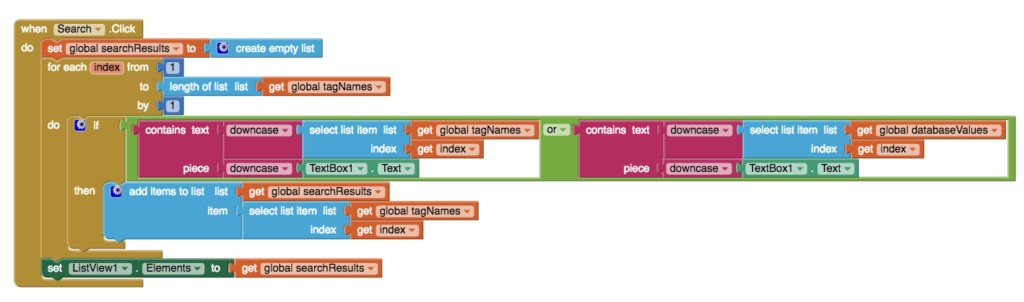
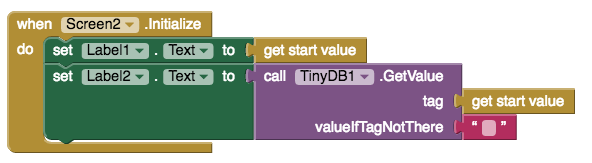
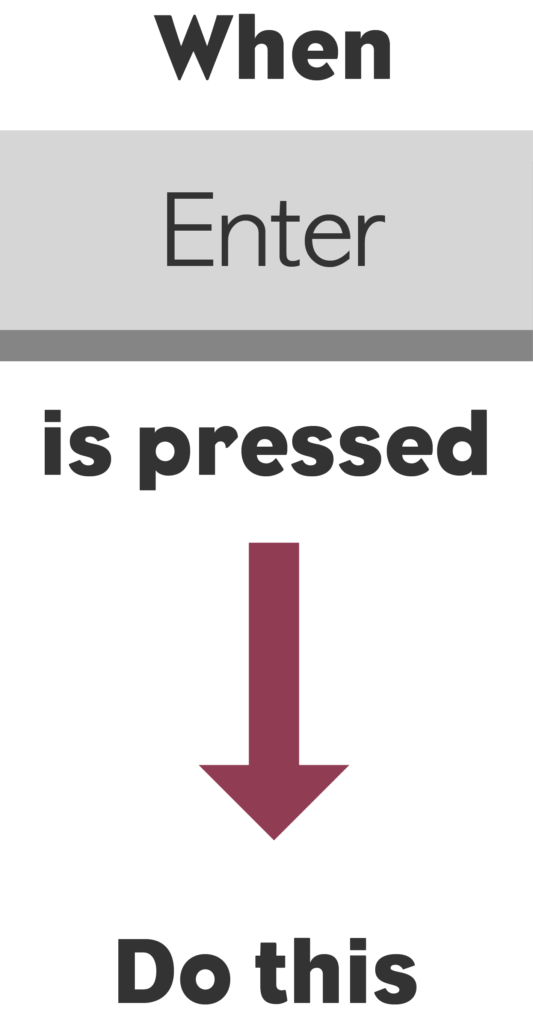
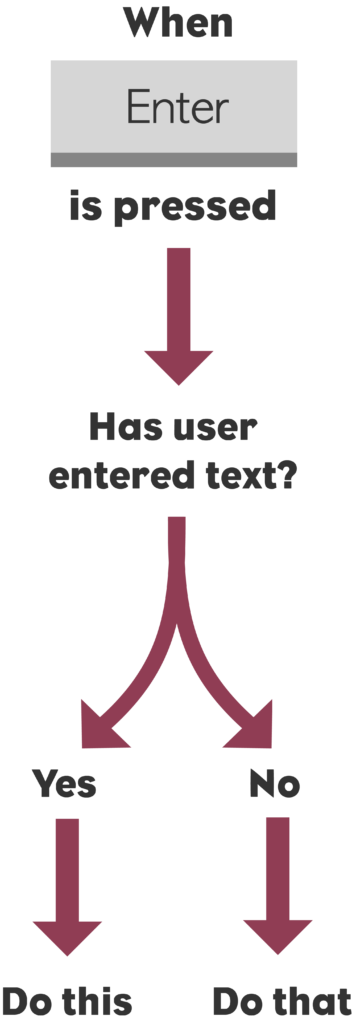
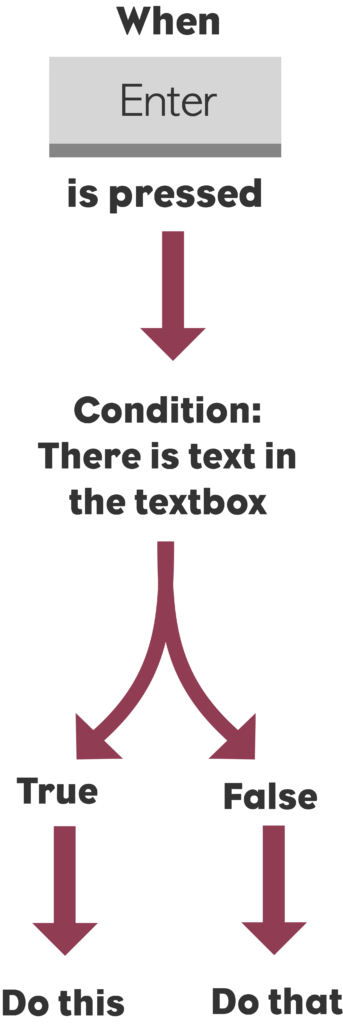
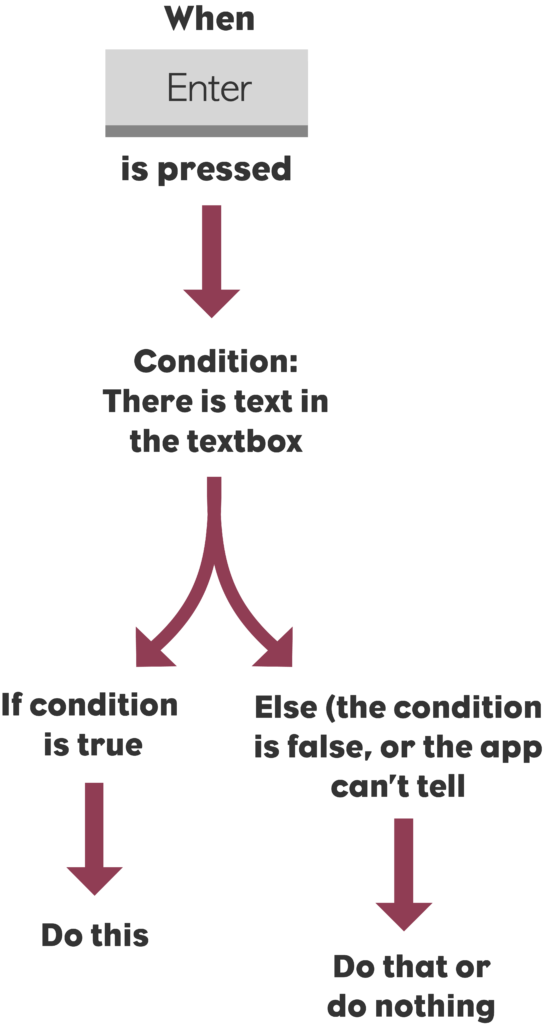
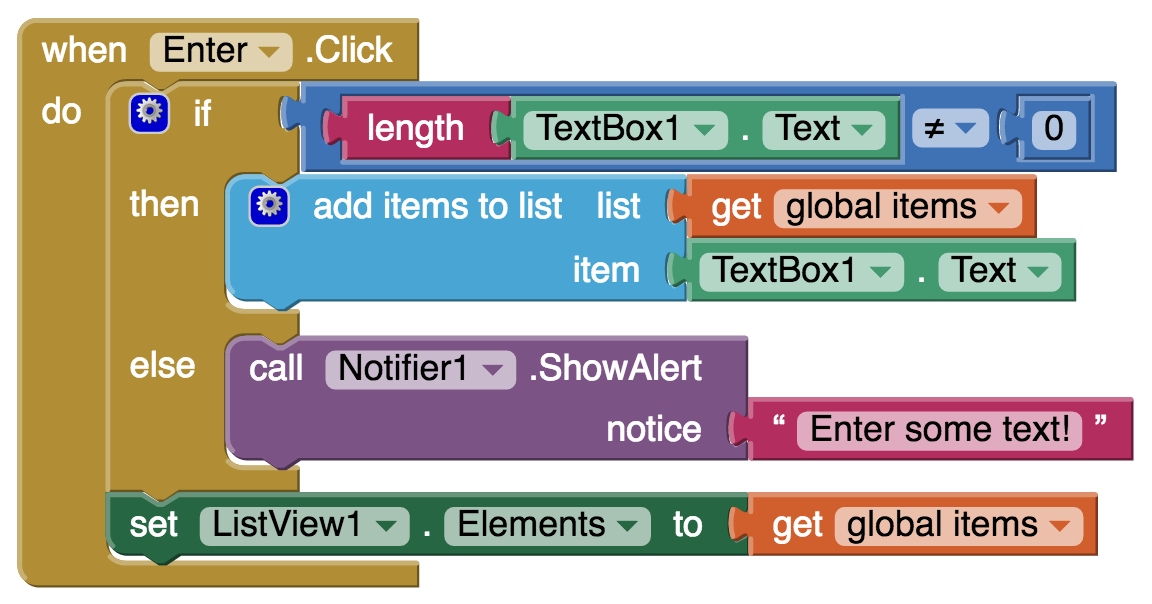
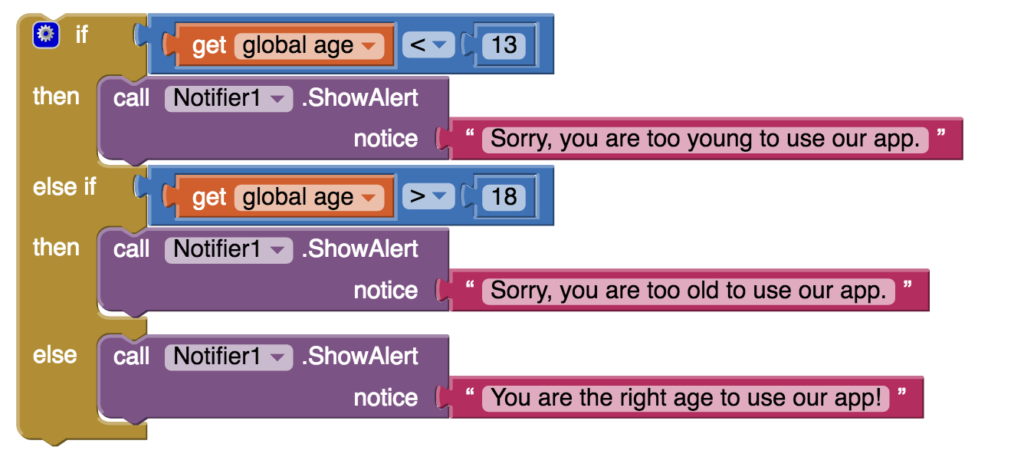
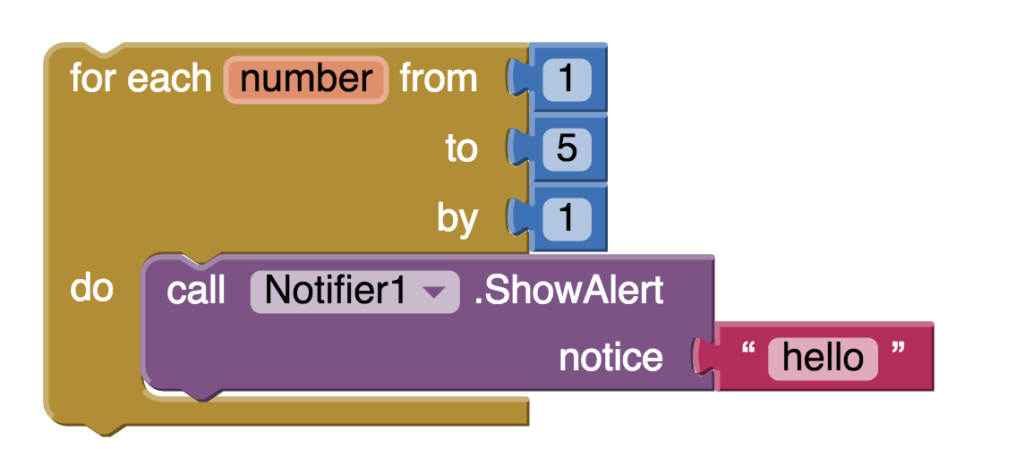
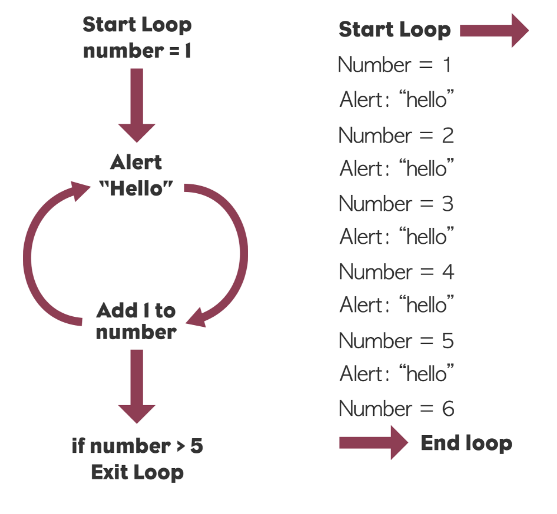
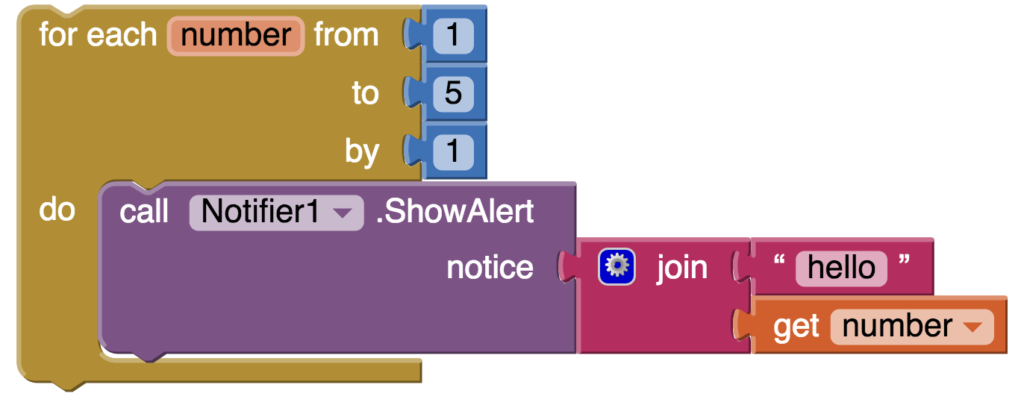
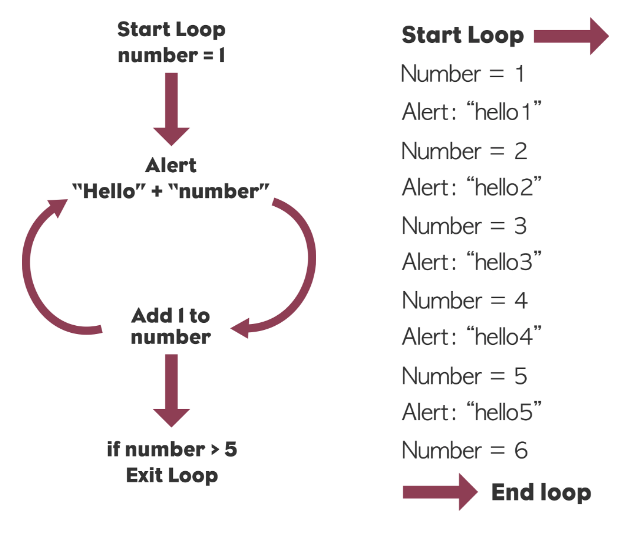
Du kannst diese Meldungen nutzen um dir anzeigen zu lassen, an welchen Stellen deine App nicht richtig arbeitet. Stell dir zum Beispiel vor, dass du eine wenn (if) Funktion in deiner App nutzt, um einen Prozess zu starten. Wenn du Option 1 auswählst gehst du davon aus, dass der Prozess 1 startet. Wenn du jedoch deine App testest passiert gar nichts! Dein Code könnte ungefähr so aussehen:

image17

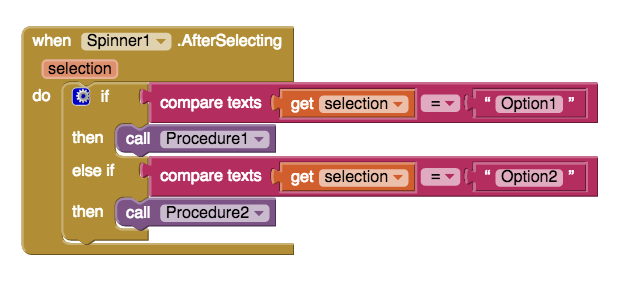
Du bist dir nicht sicher, ob der Fehler im Prozess 1 liegt oder ob deine Bedingung einen Fehler enthält. Der Fehler könnte auch in den Elementen im Spinner liegen! Es gibt viele Stellen zu überprüfen, Notizen können dir dabei helfen die möglichen Fehler einzugrenzen und herauszufinden an welcher Stelle der Fehler nun genau liegt. Du kannst Meldungen oder Alarme (alerts) wie folgt in die einzelnen Teile deines Codes einfügen:

image19

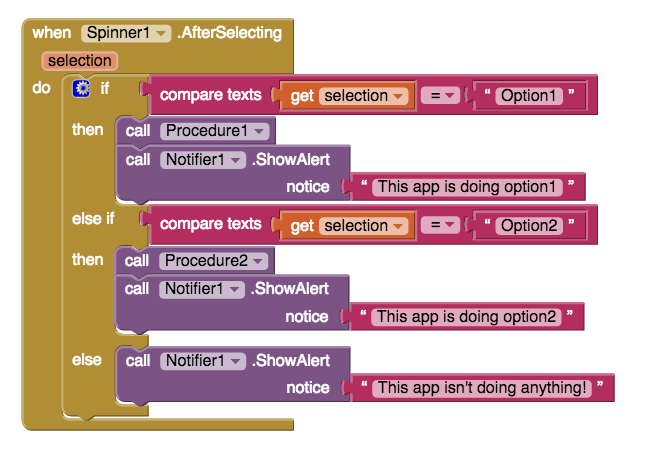
Wenn du deine App nun testest und sie die Meldung “This app isn’t doing anything!” ausgibt weißt du, dass das Problem in deiner Bedingung liegt,image19 nicht in dem Prozess 1. Die Bedingung führt den Code im sonst (else) Abschnitt aus anstatt im wenn (if) Anschnitt. Jetzt kannst du deine Bedingungen überprüfen und kontrollieren, ob du zum Beispiel einen Tippfehler oder Fehler in den Elementen deines Spinners hast.

Wenn du die App testest und die Meldung “This app is doing option1” erhältst, weißt du, dass die Bedingung richtig arbeitet und der Fehler im Prozess 1 liegt, da dieser nicht macht was er soll. Hier sind eine paar Situationen in denen diese Testmethode hilfreich ist:

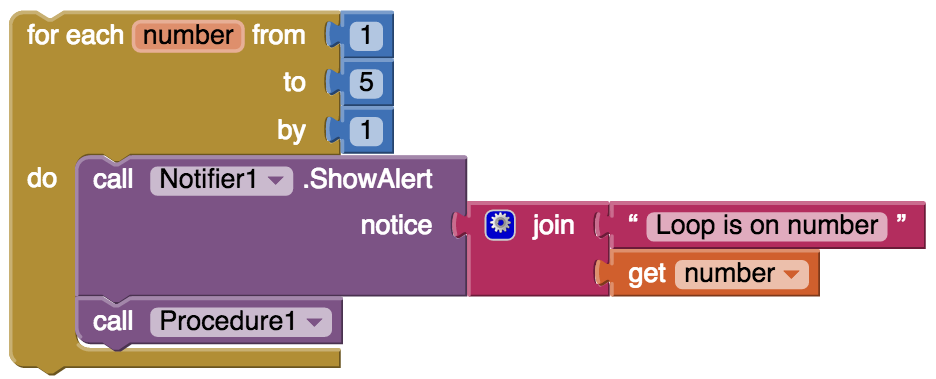
  • Um Probleme bei einer Schleife (loop), die nicht endet, zu finden
    forloop
  • Um zu testen ob ein Bildschirm geladen wird oder hängenbleibt
    screeninitalize


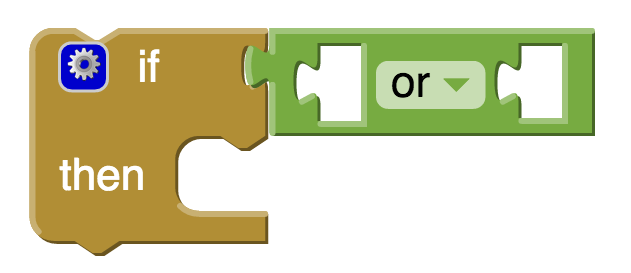
Verbergen und Deaktivieren von Blöcken

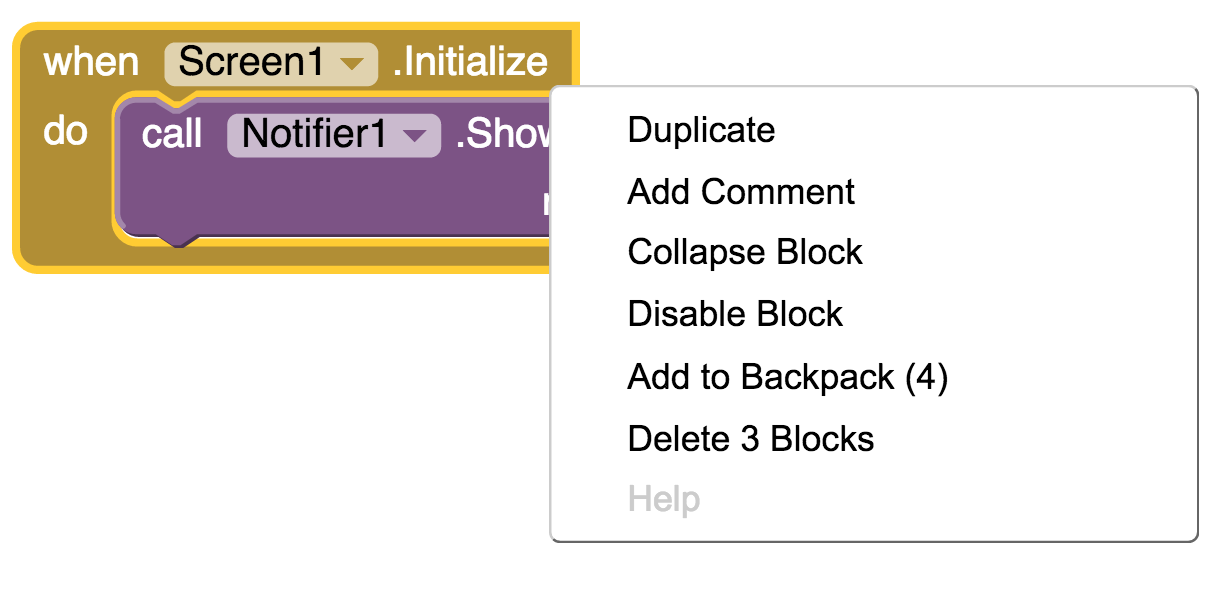
Zwei Dinge können dir dabei helfen Blöcke zu deaktivieren oder zu verbergen, wenn du sie nicht benötigst. Ein Rechtsklick auf den App Inventor gibt dir die Optionen einen Block zu verbergen (collaps) oder zu deaktivieren (disable):

image11

Wenn du den Block verbergen lässt wird nur noch ein Balken auf dem Bildschirm zu sehen sein:
image16

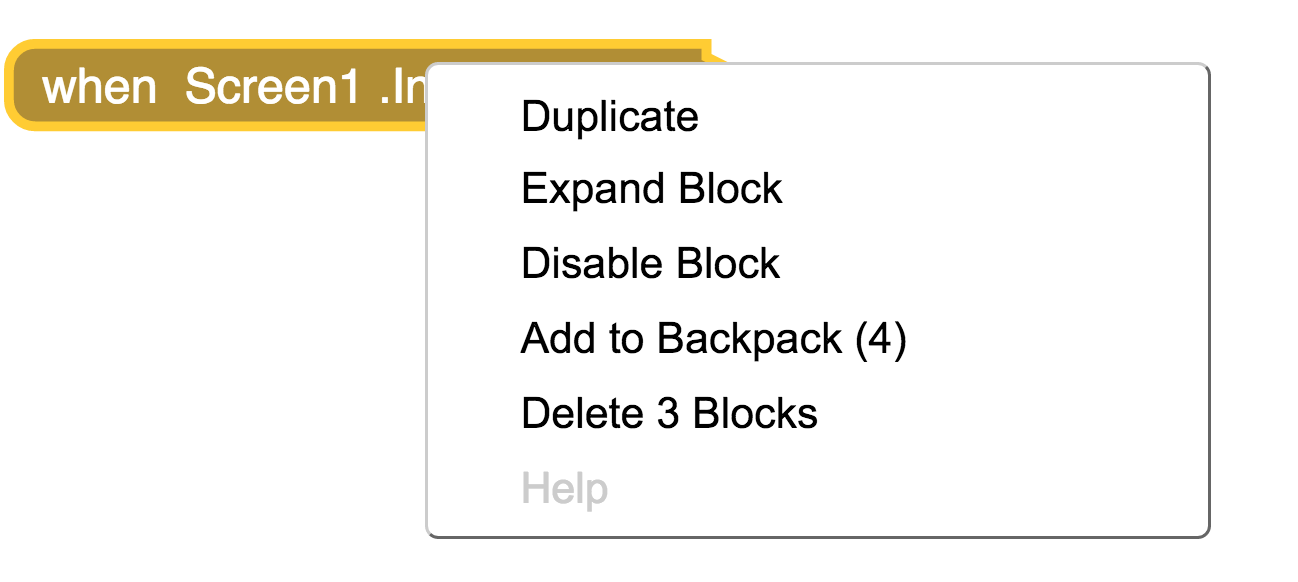
Dies kann hilfreich sein, wenn dir viel Code auf deinem Bildschirm angezeigt wird und du Teile, an denen du gerade nicht arbeiten willst, nicht sehen willst. Um den Block wieder komplett zu sehen (expand), klicke mit der rechten Maustaste auf ihn.

image04

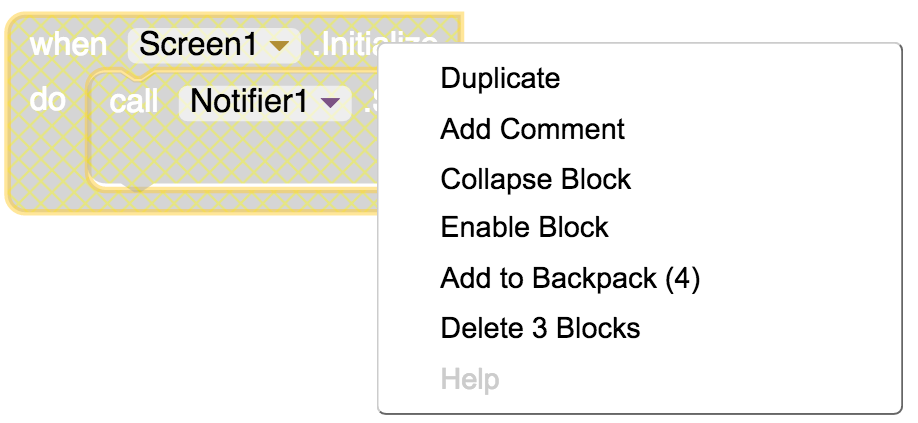
Du kannst auch Blocks deaktivieren. Sie werden noch auf deinem Bildschirm angezeigt, werden aber nicht mehr ausgeführt. Dies kann hilfreich sein, wenn ein großer Teil deines Codes nicht funktioniert und du die App ohne diesen Abschnitt testen willst. Du kannst diese Funktion auch verwenden, wenn du einen Notizblock zum Testen eingefügt hast und diesen zwar nicht mehr verwenden, aber auch noch nicht komplett löschen willst. So deaktivierst du Blöcke:

image18

Um Blöcke wieder zu aktivieren, klicke mit der rechten Maustaste auf sie und wähle “Enable Block”.

image12

Kommentieren

Gute Programmierer schreiben Kommentare in ihren Code um zu erklären was er macht. Kommentare können hilfreich sein, wenn andere Leute, z.B. Teammitglieder, Mentoren oder Juroren, sich deinen Code ansehen. Kommentare helfen aber auch dir dabei zu verstehen, was du zu einem früheren Zeitpunkt gemacht hast. Um einen Kommentar im App Inventor hinzuzufügen, klicke mit der rechten Maustaste auf den Block und wähle “add comment” aus:

image11

Daraufhin erscheint ein blaues Fragezeichen in der Ecke des Blockes und du kannst deine Kommentare einfügen. Du kannst dir die Kommentare wieder anschauen, indem du auf das Fragezeichen klickst.

image14

“By learning to create technology, girls learn to speak up.”


–Regina Agyare, Gründerin von Soronko Solutions

Versionen Kontrolle

Stell dir vor du hast einen Teil deiner App fertig programmiert und er funktioniert. Nachdem du weitergearbeitet hast und einen neuen Teil programmiert hast, funktioniert gar nichts mehr, nicht einmal der vorherige Code! Selbst wenn du versuchst die neuen Abschnitte zu löschen, funktioniert auch der alte Code nicht mehr! Du weißt nicht was falsch gelaufen ist und wünscht dir du hättest einen “Rückgängig” (“undo”) Knopf.

Um so eine Situation zu vermeiden kannst du verschiedene Versionen deiner App erstellen. Diese unterschiedlichen Versionen speichern deinen Code genau so wie er gerade ist. Wenn du später einen Fehler machst und nicht weißt wie du ihn beheben kannst, kannst du immer wieder zu deiner letzten funktionsfähigen Version zurückgehen. Du kannst verschiedene Versionen auch verwenden, wenn du neue Funktionen für deine App ausprobierst und dir noch nicht sicher bist, ob du sie später wirklich einbauen willst. Es gibt zwei unterschiedliche Wege verschiedene Versionen deines Codes in App Inventor zu speichern, du kannst die Befehle “Speichern unter” (“save as”) oder “Checkpoint” nutzen.

save as

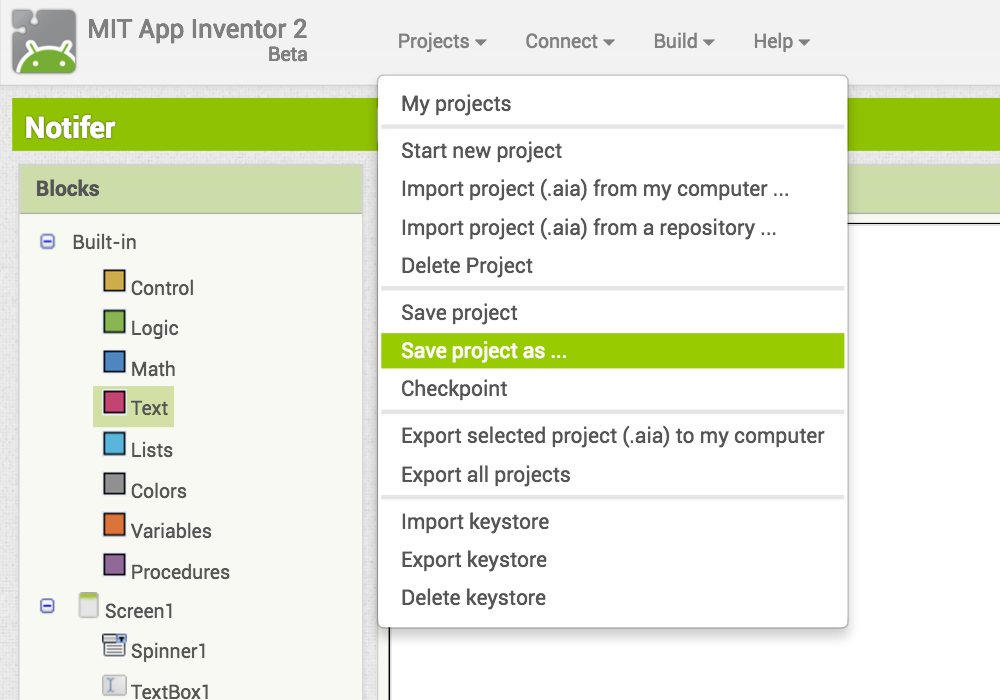
Der Befehl “Speichern unter” (“save project as”) erlaubt dir eine Kopie deines aktuellen Codes unter einem anderen Namen zu speichern.

Stell dir zum Beispiel vor dein aktuelles Projekt heißt “test”. Du kannst dein Projekt nun unter dem Namen “test_version2” speichern und weiter daran arbeiten. Wenn bei deiner Arbeit etwas schief geht kannst du immer auf das Projekt “test” zurückgreifen und daran weiterarbeiten.

checkpoint

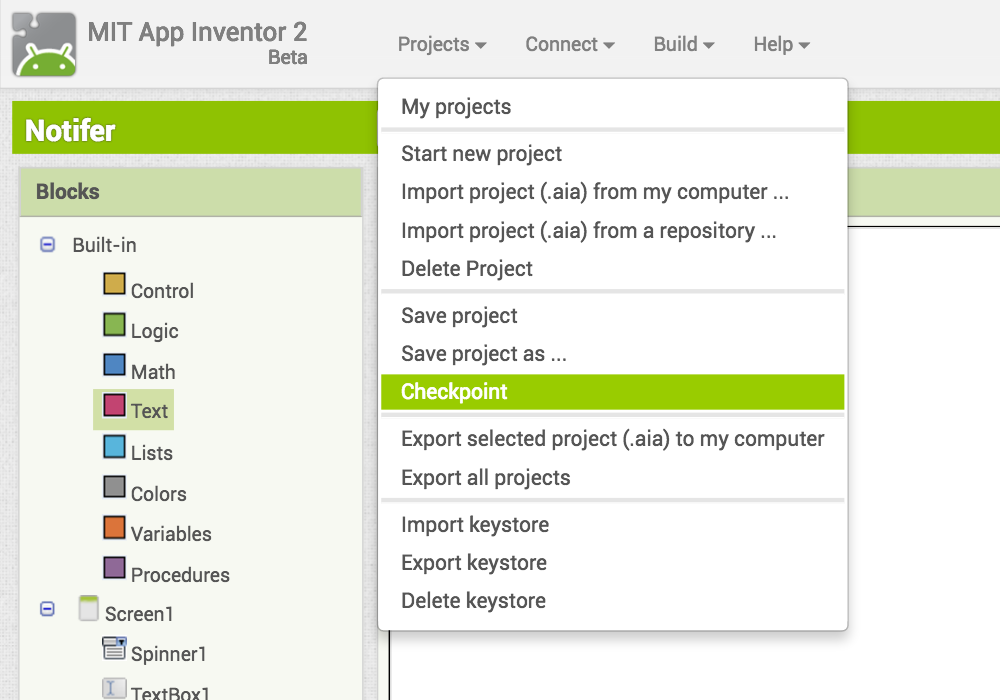
Die “Checkpoint” Funktion speichert den Code, an dem du gerade arbeitest, unter einem neuen Namen.

Stell dir zum Beispiel vor dein aktuelles Projekt heißt “test”. Der Checkpoint speichert deinen Code unter dem Namen “test_checkpoint1”. Wenn bei deiner Arbeit nun etwas schief geht kannst du immer auf das Projekt “test_checkpoint1” zurückgreifen.

Schau dir dieses Video an, um noch mehr darüber zu erfahren wie man verschiedene Versionen des Codes in App Inverntor speichert.


Reflexion

Herzlichen Glückwunsch! Du bist bald mit deiner App fertig und bereit sie bei Technovation einzureichen. Wir freuen uns, dass du es so weit geschafft hast und wissen wie hart die Arbeit für dich und dein Team war.

Falls du zum ersten Mal eine App entwickelt oder Programmiert hast, hast du bestimmt sehr viel gelernt und auch Rückschläge einstecken müssen. Manche Teams haben sogar Sprachbarrieren und technische Probleme überwunden, die ihnen den Anfang erschwert haben.

Wir sind stolz auf euch und hoffen, dass ihr es auch seid. Ihr habt durchgehalten, hart gearbeitet und voneinander gelernt. Ihr seid eine Inspiration für uns und viele andere.

Weitere Quellen

Code 7: Debugging

Code 7

Debugging Your App

Learning Objectives:

In this unit, you will learn…

  • Tips for debugging your code

Debugging Tips

You have taken your ideas and translated them into code. But you are encountering bugs. Agh!

We are so reliant on software that we can’t even imagine life without it anymore. In many ways, software has made our lives easier: we write emails, chat with friends on Facebook, play games and search for information on Google. Software is just about everywhere so we don’t even know we’re using it, for example in cars, traffic lights, TVs, washing machines, and hearing aids. We’re so used to having software that we expect it to function all the time!

So why doesn’t it? Why do we get bugs in the first place? As it turns out, writing software is not always easy. Software isn’t a physical product, so we can’t just look at it to see if it’s correct.

Debugging is the name for the process that coders use to figure out why their code isn’t working. When you did the Code Challenges, you may have already ran into something that forced you to go back over your code and figure out where you made a mistake. This is the essence of debugging and this next section will provide you with tips on how to make debugging easier for you.

Sometimes you may already know how to code something but it will still take you a very long time to do it! Great coders still make mistakes, even when they know exactly what they are doing, so it’s important to build a toolbox of debugging techniques that can help you out when you aren’t sure what went wrong. Everyone has a different method for debugging their code and you’ll figure out what yours is after you practice a bit. Debugging can often be the most time-consuming part of coding, so it’s really important to leave plenty of time for it!

Check out this video to learn about some of the errors that you may encounter in your code and how App Inventor helps you spot them!


If you have questions that are specific to App Inventor while you are debugging, there is an App Inventor Forum you can join here, and then post your question. Although the larger App Inventor community is usually quite helpful and responsive to questions, try searching the forum first to see whether your question has already been asked and answered. This will save you time.

Using test data

If you have a lot of really complicated data to use in your app it can be helpful to use test data. Test data is a simpler set of data that you’ll only use to test your app and make sure it is working correctly.

As an example, let’s say you are making an app that shows the user where the closest restaurant is to them. You want to use fusion tables to store the names of restaurants, the location data, and phone numbers. To get started building your app, you don’t need to have an entire list of restaurants ready in your fusion tables to start coding your app. You can just put in one or two test restaurants and get your app working before adding the real data.

“It's hard enough to find an error in your code when you're looking for it; it's even harder when you've assumed your code is error-free. ”


–Steve McConnell, software engineering expert and author

Using the Notifer

Let’s say your app is getting stuck and you’re not sure why! You can use the notifier to pinpoint where your code is broken. To put a notifier in your app drag it over from the user interface palette. It will appear as a non-visible component like this:

image00

You can then use these alerts to tell you where your app is getting stuck. For example, let’s say you were using an if statement in your app to carry out a procedure. When you select Option 1 from the spinner you expect Procedure1 to happen. However when you test our your app nothing is happening! Your code looks like this:

image17

You aren’t sure if the problem is with Procedure1, or if it is with the conditional statement you set up. Your problem could also be with the elements that are in the spinner! There’s a lot of things to check so using the notifier can help you narrow down your options and figure out where your mistake is. You add an alert to each part of your conditional statement like this:

image19

When you test your app now you get an alert that says “This app isn’t doing anything!” Now you know that the problem is with your conditional statement, not with Procedure1. The conditional statement is carrying out the code in the else section instead of the if section. Now you can check your conditional statement and see if there are any typing mistakes or if there is a mistake with the elements in your spinner.

If you had tested the app and gotten an alert saying “This app is doing option1” then you would know that the conditional statement is working correctly and that there is an error with Procedure1 not doing what it is supposed to. You could then check the code in Procedure1. Here’s some other scenarios when this method of testing may be helpful:

  • To resolve problems with a loop getting stuck
    forloop
  • To test if a screen is loading or getting stuck
    screeninitalize


Collapsing and Disabling Blocks

Two things that may help you are disabling and collapsing blocks you are not using. If you right click on the a block App Inventor will give you the option to collapse or disable a block:

image11

Collapsing the block will compress it down to one bar on your screen like this:image16

This can be helpful when you have a lot of code on your screen and don’t need to see certain parts of it that you are not working on. To expand your block again you need to right click on them.

image04

You can also disable blocks. This will keep them on your screen but prevent them from doing anything. This can be very useful if you have a chunk of code that is not working and you want to test your app without it. You can also do this if you have a notifier block that you were only using for testing purposes but you don’t want to delete it yet. Disabled blocks look like this:

image18

To enable your blocks again,  right click on them and click “Enable Block”.

image12

Comments

Good programmers often leave comments in their code to explain what it does. Comments can be helpful when other people are looking at your code, such as teammates, mentors, and judges. Comments can also help if  you return to your code later and have forgotten what parts of it do. To add a comment in App Inventor, right click on the blocks and select “add comment”:

image11

After that a blue question mark will appear in the corner of block and you can add text. You can view the comment by clicking on the question mark.

image14

“By learning to create technology, girls learn to speak up."


–Regina Agyare, Founder of Soronko Solutions

Version Control

Let’s say you have one part your app built and working. When you build and test a second part of your app, everything has stopped working including the part the used to work! You try to delete the blocks you just added but your whole app still isn’t working! Now you aren't sure what went wrong and wish you had an "undo" button.

To avoid scenarios like this it can be helpful to create different versions of your app.  These different versions will save your code exactly as it is so that if you make a mistake later on and don’t know how to fix it, you can go back to the last working version you saved. You can also use version control if you are experimenting with features for your app and you’re not sure if you want to keep them. There are two ways to save different versions in App Inventor, using “save as” and “checkpoint”.

save as

The “save project as” option allows you to create a copy of the code you are working and save it under a new name.

For example let’s say the project you are working on is called “test”. You can save the project you are working on as “test_version2” and keep adding code to it. If you mess something up you can go back to your project called “test”.

checkpoint

The “checkpoint” option lets you save your code as it is under a new name.

For example let’s say the project you are working on is called “test”. Checkpoint will save your current code as a project called “test_checkpoint1”. Then you can keep working and if you mess something up you can go back to the project called “test_checkpoint1”.

Watch this video to learn more about version saving in App Inventor.


Reflect

Congratulations! You are almost done building an app that is ready to submit to Technovation. We are excited that you have made it this far, and know it has been very hard work for your team.

If this is the first time you have created an app or used code, you've undoubtedly learned a lot and overcome frustration. Some teams even overcame language barriers and limitations to resources that made getting started very difficult.

We are proud of you, and hope you are just as proud for yourself. You have persevered, worked hard, and learned from each other. You are an inspiration to us, and many more.

Additional Resources

Code 6: Planning Your Code

Code 6

Planning Your Code

Learning Objectives:

In this unit, you will learn…

  • How to plan out what you will code
  • Ways to manage your project and structure your time 

Planning Your Code

In Code 5 you planned out what your app will look like and how users will interact with it. In this next section you will learn two techniques to help you plan out your code and think about how your app will actually work. It’s really important to plan your code so you can figure out if you need to learn something you don’t already know and think through how things will work before getting to the computer!

Pseudocode

Writing pseudocode is an important part of the planning process of your app. Pseudocode uses plain language with some code mixed in to explain what your app does. You should use programming terms that you know, such as loop or conditionals, and any App Inventor components that you may want to use such as ListView or buttons. There aren’t many rules for how to write pseudocode but the goal is to get an idea of how your app will work before you program it. 

Let's look at an example from Code 3. In this app, the user can search a database of women scientists. The app displays the names in a ListView and the user can select a scientist to learn more about her.

Search Button

  • When the user hits search
  • The app uses a for loop to search through all of the names and descriptions stored in TinyDB
  • If there is a match
    • The app adds the scientist name to an empty list variable called searchResults
  • If searchResults is empty after the loop ends
    • The app notifies the user that there are no matches
  • Else
    • The app displays searchResults in a ListView

Scientist Selection

  • When the user makes a selection from ListView1
  • The app opens a Screen2
  • The app retrieves the description and name of the scientist from TinyDB
  • The app displays the description and name of the scientist

Activity

Write pseudocode for two event handlers in your app. If you’re having trouble breaking down how an event handler in your app will work, you may want to ask your teammates or mentor for help!

Questions to ask yourself:

  • What is the event that starts this code? 
  • Will your app need to use any stored values?
    • If so, where will the values be stored?
  • Will your app need to use any variables? If so, it helps the give them a name to keep track of them.


Flowcharts

A flowchart is a diagram that represents an algorithm. It uses shapes and arrows to show how data moves through program.  It is always read from top to bottom. Programmers use different shapes to represent different things that can happen to the data. Here is an example of an algorithm for finding out why someone's stomach hurts:

flowchart-1

terminal

An oval shows where the algorithm starts and ends In the example above, there are three different places where the algorithm may end, either the person needs to eat something, they need to rest, or they need to see a doctor. These are called a terminals.

decision

A diamond shows where a decision needs to be made. They are like "forks in the road". This is whenever a conditional needs to decide true or false for a condition. Two arrows should come out of a decision, one for true and one for false. Note how the arrows come out of the diamond in the example above, one comes out from the bottom and one from the side.

Here's another example of a flowchart:

flowchart-2

process

This diagram uses a rectangle, which represents a process. A process is whatever you are having your code do. It could be alerting a user, setting a label to say something or adding two numbers together.

This flowchart shows a while loop. The condition and process (in this case, accessing an input) will repeat until the condition is satisfied. There's another type of loop you learned about in Code 3: a for loop. The condition in a for loop is to check if the counter has reached high enough yet, so the process will repeat a set number of times until the condition is met.

flowchart-3

input

The last shape you should be aware of is the parallelogram. You should use this shape whenever you need to get data from a user or from somewhere else, like a website. The parallelogram is for inputs.

Activity

In this activity you will turn your pseudocode into a flowchart. Use the pseudocode you made for the activity above and follow these steps.

  1. terminal oval
    Put an oval around the beginning and ends of your event handler. This is called a terminal. There is often more than one ending to a flow chart. In the search button example above, the event handler ends either by displaying the search results in a listview or by notifying the user that there are no matches.
  1. conditional diamond
    Put a diamond around where a decision needs to be made. This is whenever the app needs to decide true or false for a condition. Remember, conditionals can lead to more than one possibility for the ending.
  1. input
    Add a parallelogram around all the inputs in your code or the places where you are getting data from either the user or another place, like a website or local database.

  1. Put a rectangle around all of the processes in your code. This is whenever your app is doing something that doesn't fall into the categories above. This could be adding items to a list or sending an alert to the user.
  2. arrow
    Connect it all together with arrows! Pay special attention to how you are drawing the arrows for loops and conditionals and refer to the examples above if you need help.

Take a picture of one of your flowcharts and include it with your submission to earn a point! Don’t worry if it isn't exactly accurate, the whole purpose is to help planning and to learn something new! It is okay if your code doesn’t match your flowchart by the end of building your app, you don’t need to update your flow chart.

Pair Programming

Pair programming is when two programmers share a single workstation (one screen, keyboard and mouse among the pair), and either work together or take turns “driving” and “navigating”. In this scenario, the person sitting at the keyboard or touchscreen is the driver, and the other person is the navigator. The navigator is also actively involved in the programming task but is focused more on the bigger picture, answers questions that the driver has, and keeps her eye on the code to check for bugs. The driver and the navigator swap roles every so often.

There are advantages to pair programming, such as:

  • Better quality of code since the navigator can check the work of the driver.
  • Better communication between team members because the driver is providing a running commentary on what she is doing (or programming out loud), and the navigator is able to respond or ask what is happening if the driver is quiet.
  • Knowledge can be shared and transferred on your team, especially if one person is more of a beginner and others are more advanced.
  • It can help make your teamwork more efficient because the driver can attend to fixing a bug while the navigator can keep focused on the task and help regain focus afterwards.


Tips for pair programming:

  • Don’t be afraid to say, “Let’s try out your idea first!” Sometimes where you’re driving, you need to know when to listen to your navigator. The goal is to use the best ideas and to arrive at them through collaboration, and to avoid errors.
  • Here are ten suggestions for improving the experience.

“None of us is as smart as all of us."


–Ken Blanchard, author and management expert

Time Management

At this point, you may have questions, such as:

  • How to work efficiently towards this goal, and meet the deadline?
  • Who will test the digital prototype and when?
  • How to know when you have a working digital prototype to submit?

In order to help you get the programming part of your project on track, let’s review the stages of the software development process.

  • The users, their needs, and an MVP has been identified (from Code 5)
  • The actions that the users will take in your app have been mapped out with a flow chart
  • Software is created
  • User testing happens, bugs are identified
  • Bugs are fixed and the team ensures that the app is free of errors
  • If the app works without any flaws on a mobile device and the team is satisfied with the end result, then it is ready to be shared

Tips:

  • Set a schedule
    • Assign tasks to team members, and set deadlines and goal reminders on your calendars!
    • If you are using the 12 week curriculum, your team should give itself about 5 weeks to program your app
    • Make sure that your digital prototype is done and ready to be shared no later than two days before the Technovation Challenge submission deadline. This will save you a lot of stress in case there are connectivity issues.
  • Break the tasks down and divide them up
    • Have everyone on the team work together in pairs and tackle different tasks simultaneously. This can help move the coding aspect of the project along faster.
  • Prioritize
    • Make sure your app is functional first, and then it can be made to look better afterwards. Remember, you are submitting a digital prototype and the judges will be interested in knowing that it works, gets the job done, and is easy to use. You can use your demo video and your business plan to let the judges know what your future plans are for the app in terms of new features you would add. Right now you should focus on MVP.
    • Ask your mentor to help you if you are having a hard time prioritizing your tasks
  • Focus
    • Turn off all devices you are not actively using during your team meeting or your programming time. You can also mute notifications and anything that will distract you.
    • Make sure you finish one task before moving on to the next. Multitasking doesn’t usually save time. If you are working in pairs, the navigator can help you stay focused.

It is definitely a good idea to document your process and save everything. You will be able to access things like different versions of your app, your flow chart, or your paper prototype in case anything gets lost, so you don’t lose time. You can also use these when discussing any hurdles you come across to more clearly state the issue with your mentor.

Reflection

Congratulations! You are on your way to creating your app so that it is ready to submit to Technovation. If you find yourself get stuck a lot while coding your app, check out the next coding unit for tips on how to debug. Good luck with your digital prototype and we at Technovation are excited that you have made it this far!

Additional Resources

Code 5 Challenge: Paper Prototype

Code 5 Challenge

Paper Prototype

Build your Paper Prototype

Design your app by creating a paper prototype. Paper prototyping is a fast process, enabling you to test multiple designs, gather feedback, and make improvements.

What you will need:

Optional:

  • Stickers
  • Glue
  • Scissors
  • Tape
  • Magazines

What you will do:

  1. As a team, sketch each screen of your app. Put your ideas down as they come and try not to judge them yet. You can question them later! As you do this, you may want to consider:
    • What would the first screen look like?
      • Will it have a logo? (Hint: Take a look at your favorite apps for inspiration)
      • What is the color scheme going to be?
    • What happens if you click on a button to get to the next screen?
    • What will each screen look like?
    • How will the user navigate the different screens?
    • Can you show with arrows how this would happen?
  2. Here is an example of a paper prototype. Notice the way the stickers are used to show where users can click on buttons? Also, it looks like in some cases there are sketches underneath, which would possibly be the next screen a user gets taken to once a button is clicked.
    MVP reminder: What is the smallest most concise set of functions you can deliver to help your users meet your goal?
    image00
  3. Once you have a working prototype, create a run through of how the user would navigate the app. You can take pictures as shown in the video above and create a .gif or video. Then you can bring this to the stakeholders you interviewed, test it with them, and get their feedback.
  4. We recommend that you save your paper prototype because you may need to refer back to it as your work through building your app. Make sure to leave it in a safe space so you don't lose it, or ask one of your team members to be responsible for it.

Test and Collect User Feedback

Now that you have a paper prototype, it’s time to share it for feedback! Remember the stakeholders who you interviewed? You will find out if the app meets their needs and expectations.

Here is a fun User Interface Design: Paper Prototyping Study video that you can watch for inspiration. Though it is a prototype for an iPhone in the video, the idea is similar for Androids. Notice how there is narration that goes along with it about the user experience?

What you will need:

What you will do:

  1. Rehearse! Run through different scenarios before you meet with your stakeholders, and practice the presentation of your prototype. Refine it if you think it can be better.
  2. If you want to create a video demo, you can do that instead. It might be good practice for the demo video you will create later to submit to the Technovation Challenge!
  3. Check in with your mentor and share what you plan to show your stakeholders. Ask for feedback and incorporate it. [Mentor Check In: Review the video or the live demo and let your team know whether there is anything missing from the demo, or if you have suggestions for improvement before the team shares it with stakeholders for their initial feedback]
  4. Bring either your paper prototype or your video to your stakeholders, and ask them for their feedback. What worked well, what can be improved in their view?
  5. Ask them questions that are in the User Testing Worksheet - for example, was anything was unclear in the user interface, and what features have the highest value? Write down the responses.
  6. A reminder to be gracious when receiving any feedback, including negative feedback. This is your chance to make your app better! If you have clarifying questions, you can ask them. Keep in mind that their feedback is about the app, and not about you personally!
  7. Send a thank you note to your testers and let them know you would be interested in meeting up with them again to test your digital prototype when it is ready
  8. Consider asking your peers and your mentor to complete the User Testing Worksheet as well!

Code 5: UX Design and Paper Prototyping

Code 5

UX Design and Paper Prototyping

Learning Objectives:

In this unit, you will…

  • Learn about user experience (UX) design and minimum viable product (MVP)
  • Clarify goals for your app
  • Gather information about your users’ needs
  • Create a paper prototype and get feedback on it

You have learned more about App Inventor, and your team has an idea for a problem you want to solve together, along with some ideas for a solution. But you may be wondering how you can take these ideas and transform them into a mobile app that works reliably and does what the users want it to do. Creating a usable app is about more than programming. In fact, the actual programming part may only comprise about 20% of the project!

Imagine your friend asks you to make an app to help her get to school on time every morning. You create an app that uses GPS to track her route to school and let her know if she’s going to be late. When you show it to her, it turns out that she takes the bus to school. She really needed an app that could provide her with a bus schedule in real time. You spent several hours working on the app in vain because you didn’t understand her needs and now you have to spend more time on the redesign!

What would you do differently next time to ensure something like that this doesn’t happen again?

What is UX  Design and Usability?

UX Design (short for user experience) helps people create technology that is easy and intuitive to use. It has to do with the quality of the experience that someone has when using a system or a piece of technology. You can think of it as improving the ‘user’s experience’ which means that a user will have an easy time using the technology and will keep using it because they are satisfied.

While you are designing your app that helps to solve a problem, you want to create something that is easy to use, helps get the job done, and provides an experience that is fun for the user. You will want to make it usable. But what makes an app usable?

Usability is the extent to which a system, product, or service can be used by specific users to achieve specified goals with effectiveness, efficiency, and satisfaction in a specified context of use.

It’s not just a matter of what you think might look good, or what you think you would like because you consider yourself a user of the app you will be creating. It’s about context. Think about who else will be using the app and what their needs are. Will people use it once a year, once a week, or once a day?

Where will people be using it? We used to think of applications as something that people use while sitting at their desk. What are some of your favorite apps, and what do they do? Where and how do you use them? Do they do many things, or do they do a few things really well? In order to save your team wasted hours of engineering time, you will be focusing on creating an app with minimal features. This is called Minimum Viable Product, or MVP.

Minimum Viable Product (MVP)

In the world of product development, the MVP is a product with just enough features to get the job done and test with users so that improvements can later be made. The goal is to create the most desirable end product. In general, products with more features involve increased costs and risk of failure. This can happen because of incorrect assumptions about users.

It’s especially important to think about where the app will be used and what would work well on a small screen, portable device such as a smartphone. You wouldn’t want someone to stop using your app because it is too hard understand and use.? How do you learn more about your users to prevent this?

User Centered Design

In User Centered Design, you keep the user in the loop while you are researching, designing, developing, and testing. This is an iterative process, meaning that there will be a sequence of operations that will repeat until you get closer to your final, most desirable product. The steps involved are:

research
Analysis and Research

design
Design

test
Test

These steps repeat until the product is ready to build!

circular-flow700x270

The most valuable thing you can do before you start is to be clear about the goal of your app. This part of the project is called analysis because you need to know what your app needs to be able to do, and getting the details right can be a little tricky.

Activity 1: Review Your Problem Statement and Create a Goal

Remember the problem statement your team worked on in the Ideation Unit? You will want to revisit this now and you will probably want to come back to it again so that your team remains focused on the problem and your original goals. This is an important part of the process because it will help you to analyze the needs of the people using your app, and to understand the technical requirements for your app.  

To summarize, the problem statement is a brief piece of writing that explains the problem that your team is addressing. It should outline the basic facts of the problem, explain why the problem matters, who it affects and how, and present a direct solution.

What you will need:

  • Your initial problem statement. Here is a template for creating your problem statement if the team has not yet done this in the Ideation Pre-Unit.

What you will do:

  1. Review your problem statement, or work on it if you have not yet done so. It should answer four questions:
    • What is the problem? In design terms, this also translates to: what is the need
    • Who does the problem affect and how? This is important because the people who are affected by the problem will be the users of your app. They will be your stakeholders
    • Why is it important to solve? Why is this problem compelling and do you have any evidence of the problem to back up your argument?
    • What is the solution? You may have an initial idea for a solution. You will be experimenting more with the solution in this unit as you get to know your user and through paper prototyping!
  1. Now, can you condense your problem statement into one sentence that says what problem you app is trying to address and how it will address it? This will be used as your goal moving forward.

Research

Once you clarify your goal, you need to define your stakeholders, which are the people who would use your app or would be impacted by your app. These are the people that you need to talk to learn more about what they need the app to do. You and your team might think you are typical users but you should still  talk to other people, interview them, get their feedback, and observe them in the environment that they would be using your app when possible.

Imagine that you are making an app that allows students to pre-order food from the school cafeteria. They can use the app to request the food in the morning and then go and pick it up at lunch time. The idea is that this will help reduce the waiting line in the cafeteria. Who do you think your audience  in this situation will be?

The potential stakeholders for this would be:

  • Students (who will be using the phone app)
  • Cafeteria staff (who will be receiving requests through the app)
  • Parents (who would need to buy their kids a smartphone so they can use the app)
  • School administrators (who might not think phones should be used during school hours)
  • School IT support (who would need to help students who can’t figure out how to work the app or connect to the network)

Activity 2: Make a Map of Your Stakeholders

What you will need:

  • Post-its
  • Markers

What you will do:

  1. Brainstorm and write down all the possible stakeholders for your project - one per post-it
  2. Cluster the stakeholders into similar groups, such as “adults”, “kids”, “school staff”
  3. Decide which stakeholders you will focus on for your app
  4. Write down questions you want to ask them
  5. Plan interviews with stakeholders - individuals on your team can interview people separately to save time, or you can go together if that is more comfortable for you.

Once you have clarified your goal and have identified the stakeholders you would like to interview, you will be ready to learn more about how they think.

Activity 3: Conduct Stakeholder Interviews, Gather Personas and User Stories

To find out what stakeholders want the app to do, you will need to interview them. You can ask them questions to help you find some functional requirements of your app. Functional requirements are things the app needs to do. Using the example above, the app needs to allow students to choose the food they want to order. It should then send the order to the cafeteria, along with the student’s name so that they can be easily identified when picking up the food.

Interview a set of people who are potential stakeholders of your app to learn more about the problem and get their thoughts about the solution. If you know of apps that already exist to help solve the problem your team is focusing on, you can ask users about the app and what they like about it or what doesn’t work so well for them. This will set the groundwork for what you'll do later in Market 3.

What you will need:

  • A print out of the questions you wrote down in the stakeholder map activity
  • Printouts of the Persona Template
  • Printouts of the User Story Template
  • Paper
  • Something to write with
  • Voice recorder or app if you want to record the interview

What you will do:

  1. Introduce yourself and give the person you are interviewing a short overview of what your project is about. Why are you interested in receiving her or his feedback?
  2. Ask the questions your team prepared.
  3. Use the Persona Template from the Goldman Sachs Web UI Toolkit to gather more information. A persona is a description of a person (real or fictitious) who will be using the app. A persona lets you design with a specific user in mind, rather than designing for ‘everybody’. Create as many personas as you need to capture the main categories of people who will be using the app. Be sure to ask them what their goals would be for your app, what their particular needs are, and what their pain points are. Pain points are problems, real or perceived, that people struggle with. Your app will essentially try to help provide solutions to those pain points.
  4. Use the User Story Template from the Goldman Sachs Web UI Toolkit to go a little deeper into what functions your user would like the app to have and why.
  5. Come back together as a team and share your experiences from the interview process, along with your personas and user story templates.
  6. If there are any more stakeholders you feel you need to interview in order to get the information, do this now before moving on to the next step, which is design! You will soon create a paper prototype, which is a fun and creative process.

What is a Paper Prototype?

Prototyping is a way to model ideas or concepts so they can be communicated to people as soon as possible and tested out.  

There are different kinds of prototypes, but we will be focusing on paper prototyping in this unit. A paper prototype is a hand-drawn representation of the user interface which typically looks like screenshots. It can help serve as a walkthrough of how users would navigate the app.

What are the benefits of paper prototyping?

  • You can quickly and communicate your ideas in a visual way. For example, you can show what happens when you click on buttons in your app
  • It’s collaborative! When you work on paper, it’s more casual and conversations spring out of experimentation
  • It’s inexpensive! You don’t have to spend a lot of money to create a paper prototype. You can use materials like paper, magazine cut outs, post-its, markers, stickers, tape, glue
  • You don’t have to be a technical expert for this part of the process
  • You can observe human interaction with the interface and will learn fast about what might and what might not work in your design
  • Prototypes can help to confirm design decisions before you spend more time developing the technology

Keep in mind that design of your app may change to accommodate user need after it has been tested and you have received feedback. This is fine, because you will want to know these things sooner rather than later! Some of you might be afraid to test out your ideas because you think you might receive feedback that isn’t positive and you would see this as failure.

The Importance of Failure

Remember—failure is part of the process and there is a lot you can learn from it. Find out what Richard DeVaul has to say about it in this short video. He is the Rapid Evaluation Team Lead for Google’s top secret lab called the Design Kitchen. You can also learn more about how failure and the rejection of ideas is part of the innovation process there in this article.


Are you inspired? We hope so! You are now ready to move on to the design stage!

Coding Challenge: Paper Prototype Your App

Every product has to start somewhere! Sketching is a fundamental part of the design process and can help you make key decisions about what to design. It can be as simple as drawing on a piece of paper and is helpful when you are working with your initial ideas. You can show your basic app structure and experiment with how people will interact with your app. You can also test color and where buttons will go. Spending time now to test your ideas on paper will help save you time later when you transfer your ideas to your digital prototype.

Before you start, you can learn more about paper prototyping, user flow, and color theory in this short video with Melissa Powel who is on the Google Developer Relations team, and Mariam Shaikh who is a Senior User Experience Designer at Google.

Ready? Find instructions for the challenge here:

“My best successes came on the heels of failures.”


–Barbara Corcoran, businesswoman, investor, and author

Reflection

You have come really far and you definitely deserve some congratulations! You are almost done with this unit.

While the feedback is still fresh, now is the time for iteration! Analyze the feedback with your team, make the necessary changes to your paper prototype, and repeat the process as needed!

Your team may be tempted to simply move on and transfer the paper prototype design to a digital prototype. But have you checked to make sure that you have a plan for your minimal viable product before moving on? Do you know which of the app's features are truly essential, versus which would be nice to have?

It wouldn’t hurt to do one more iteration or your paper prototype and share with your mentor and peers!

Additional Resources

Code Challenge 3: Search a Database

Code Challenge 3

Search a Database

Description

Create an app that allows the user to search a database of information and view their results. The database should contain names and descriptions of famous people, places, movies, music, events or anything else you want. Make sure you have at least three entries in your database.

See our example app here: Technovation Challenge #3

Try to figure out how to complete the challenge on your own before looking at the instructions. The instructions show just one way of how this challenge can be solved. Happy coding!

Overview

We decided to tackle this coding challenge by storing names and descriptions of women scientists in a TinyDB. We used the scientist's name as the tag name to store the description of her work. After that we made two lists, one with the person’s name, and one with the descriptions of her work. The user will enter text and the app will search each item in both lists for a match. If there is a match, the woman’s name will appear in a listview. The user can then select which scientist they want to learn more about and a new screen will open with the description of her work. For this app, we had to use a TinyDB to store the data so that we could use it on separate screens.

Name (Tag) Description
Ada Lovelace Ada was an English mathematician and writer, who lived in the 1800s and is known for her work on Charles Babbage's early mechanical general-purpose computer, the Analytical Engine. Ada is often credited as being the first programmer ever because she wrote the first algorithm intended to be carried out by a machine.
Marie Curie Marie was a physicist and chemist who was born in Warsaw, Poland in 1867. With her husband Pierre, she discovered 2 new radioactive elements. Marie won the nobel prize in physics in 1903. She also discovered that radium gas could be used for cancer treatment.
Alice Ball Alice was a chemist born in Seattle in 1892. She was the first African American and the first woman to graduate from the University of Hawaii.  At only 23 years old, Alice developed a cure for leprosy, which prior to her work seemed like a hopeless disease.
Sau Lan Wu Sau Lan is a particle physicist who was born in the early 1940s during the Japanese occupation of Hong Kong. She earned her PhD at Harvard. She led the team that discovered gluon. She is one of the most important particle physicist in her field and has made many groundbreaking discoveries.
Patricia Bath Patricia is an ophthalmologist and inventor who was born in 1942 in Harlem, New York City. She finished high school in only 2 and a half years and knew she wanted to be a doctor. In 1985 she finished an invention that removes cataracts and restore people’s  sight around the world.

Designing the Screen

Our users need to enter text to search, so we are going to add a textbox for the user to enter their search and a button for them to click once they are done.  We know we are going to store our data in a database, so we dragged a TinyDB onto the screen. We also know that we’ll be using lists so we added a listview to the screen.

image17

Adding Data to the Database

We decided to add the scientist’s name as the tag and the description of her work as the value to the database. We added the information to the database like this:

image37

We added this information to the database when the screen initializes so it is the first thing our app does. We need to use a database in order to share information between screens. In App Inventor, the only two ways to pass data between screens is by using a database or the startValue block. You will see how both of those methods work in these instructions. You can read more about this here.

Creating lists of tag names and database values

We created a list to store the tag names in. First we created an empty list called “TagNames”. Next we added blocks to add every one of our tag names to this list. We made sure that the tag names being added to the list matched exactly the tag names in the database, including all capital letters.

image58

Now that we have a full list with all of our tag names, we need to create another list containing all of the values in the database. It's important that they are in the same order as the tag names. First, we created an empty list to hold all the values from the database called “databaseValues”. Next, we added each value to the list in the same order as the tag that corresponds to it by using a for loop. For each item in the “tagNames” list, we added the value from the database to the “databaseValues” list. We then added this for loop to the when Screen1.Initialize event handler.

image42

image50

Check point #1

At this point you should have all your data in your database as well as one list with your tag names and one list with your database values. Make sure that each of your lists contains the values you want! Since your app doesn’t do anything yet, you can check your work by displaying your lists in your ListView and making sure everything is there. Add this block to your code underneath your for loop in your when Screen1.Initialize event handler to check that your “tagNames” list is accurate.

image00

Add this block to your code underneath your for loop inside your when Screen1.Initialize event handler to check that your “databaseVales” list is accurate.

image48

After you’ve made sure your lists are accurate, makes sure to delete these blocks!

Check Point #2

You just wrote a lot of code! Check your code to make sure you can search for something. Try searching for a name, like “Alice” or an occupation like “chemist”. Make sure you get the results you expected to get before moving on!

Displaying the search results on a new screen

We decided our app would be better if the user could select the women scientist that showed up in the search results to learn more about her. To do this, when the user picked something from the list, we opened a new screen with a startValue of the user’s selection. Remember, the only two ways to pass data between screens is by using a database or a startValue block!

image31

We designed our second screen with two labels. One to display the scientist's name and one to display her description. We also added a back button to return to Screen1. Don’t forget that you also need to add a TinyDB to this screen!

image56

Since the start value is the name of the scientist, we displayed the start value in Label1 and also used it to retrieve the scientist’s description from the database to display in Label2. You can find the get start value block in the control category.

image06

Don’t forget to program your back button to bring you back to the first screen!

image11

When the user goes back, Screen1 Initializes again and everything starts over.

Final Check Point

Make sure everything in your app is working! Does selecting an item in the ListView bring you to Screen2 and display the tag name and database value?

Still stuck? Download our source code. Here are instructions on how to download and use source codes.

Code 3: Logic, Loops, and Conditionals

Code 3

Logic, Loops, and Conditionals

Learning Objectives:

In this unit, you will

  • Learn about conditional statements and how to write them
  • Learn how to use logic operators in your code
  • Learn how to use for and while loops
  • Create an app that searches a database

Congratulations on all your hard work so far! This is a really big unit but it contains a lot of the coding concepts essential for programming your app. Don’t get hung up on things you don’t understand because you can always come back to them later!

Before you start this unit, let’s review some concepts from the previous coding units that you will need:

  • Algorithms are step-by-step instructions for your app to follow.
  • Booleans are a datatype with two values: true and false.
  • Event Handlers tell your app what to do when something happens.
  • Variables are names for pieces of data that can change.

Try playing this fun Made With Code Robot game before you get started with this unit. It will help you get you familiar with the concepts you are about to learn. If you can’t figure out all five levels now, try coming back to it after you’ve finished this unit!

Conditions

You’ve been using event handlers a lot so far! In the past two coding challenges when your user hit a button, your app did something. For example, in the app you made in Code Challenge 2, the enter button added items to a to-do list. The event was the user hitting “enter” and the way the app handled it was by adding the user’s text to the to-do list. The code for your app worked like this:

enter-pressed1

You may have noticed in our example app or in your own ‘to-do list’ app, that the user could add a blank box into the list. Because of this, the user could have a really long list with nothing in it!

Let’s say that you didn’t want your user to be able to add a blank box to their to-do list. So, every time the user hits enter, you write code to ask your app “has the user entered text”? If the answer is yes, then the app adds the text to the to-do list. If the answer is no, then the app doesn’t add it. Now your code looks more like this:

enter-pressed2

In this case, "do this" means "add the text", and "do that" means "don't add anything". This a great way to fix your problem, but remember that computers can’t think for themselves, so you can’t directly ask them questions like you would ask a person.

In coding, when you want to ask your app a question, you program it to check a condition. A condition is something that a computer determines to be either true or false. True is like the computer is answering yes and false is like answering no. You can tell your app to do different things depending on if the condition is true or false. Here’s how you would ask your app if the user has entered text using a condition:

enter-pressed3

Do you remember the data type booleans from Code 2: Data and Variables? Booleans are a data type that can be true or false. When your app evaluates a condition, it outputs a boolean!

Conditional Statements

If/Else Statements

So now you know what a condition is, but how do you use it in coding? In coding, you ask your computer to evaluate conditions by writing conditional statements.  Conditional statements are the way computers can make decisions. Conditional statements always have an if part, which tells the app what to do when the condition is true. Conditional statements also usually have an else part, which tells the app what to do when the condition is false. If you leave out the else part then your app will do nothing when the condition is false. Now your code for your enter button would look something like this:

enter-pressed4

Here is what conditional statements look like in App Inventor:

screen-shot-2016-11-01-at-12-05-58-pm

Here’s how these blocks work. You put a condition next to if. You put the code for what your app should do if the condition is true next to then and what you want your app to do if the condition is false next to else. If the condition is true, only the code next to then will run and all the code next to else will be ignored. If your condition is false, the code next to then will be ignored and the code next to else will run. Think of it as saying "If this condition is true then do this, else do this".

Let’s go back to the example we were using from Code Challenge 2. Here is what the conditional looks like filled in.

if-statement
Here, when the user clicks the ‘enter’ button the app will evaluate this condition: “the length of the string entered in the textbox is not equal to zero”. If this condition is true (the length of the string is not equal to zero) it means the user has entered text, so the app will add the text to a list. If the condition is false (the length of the string is equal to zero), then the app ignores all the code that is next to then and skips to else, which notifies the user to "Enter some text!".

Activity 1

Can you think of some conditional statements that you use to make decisions every day? Here are some examples to get started with:

  • If it is raining, then take an umbrella with you
  • If you are hungry, then eat snack, else wait until later
  • If it is cold outside, then bring a jacket
  • If you are sick, then go to the doctor, else go to school
  • If your phone is dead, then charge it

Else If Statements

So far you’ve learned how to write conditional statements that evaluate one condition and have two possible outcomes. In this section you’ll learn how to write conditional statements that evaluate more than one condition and have more than two possible outcomes.

Else if allows you to add another condition to your conditional statement. This second condition will be evaluated after the first condition and only if the first condition is false. If the second one is also false, then the app will default to else or it will do nothing. In the diagram below, the conditions are blue and the possible outcomes are in purple.

Conditional statement with one condition and two possible outcomes. Conditional statement with two conditions and three possible outcomes. Condition 2 is only evaluated if Condition 1 is false.
condition image04

Here’s what the blocks look like in App Inventor:

 image29  how to use the if else block

Your first condition goes next to if, and your second condition goes next to else if.  Let’s look at an example:

You are designing an app that is only meant for users ages 13-18 teenagers and you want your app to let your users know if they are too young or too old to use your app. You have three possible outcomes:

  1. The user is too young
  2. The user is too old
  3. The user is the right age

You have the user enter their age into the app and store it in a variable called “age”. Here’s how you could use an if/else if/else statement to check your user's age.

if/else else/if response blocks

The first condition tests if the user is younger than 13. If she is, then the app alerts her that she is too young. If she is not, the app then tests if she is older than 18. If she is, then the app alerts her that she is too old. If she is not, then the app tells her she is the right age.

You can actually add as many conditions as you want to your conditional statement by using else if, but it’s really important to note the order in which the app evaluates the conditions. Your code will always start with the first condition and then continue in order until it finds a condition that is true. When it finds a condition that is true it will carry out the code under it.  If none of the conditions are true, it will carry out the code in the else part.

Here are some things to remember when using if/else/else if statements:

  • You can test as many conditions as you want
  • The statement works from top to bottom, so put the condition you want to be tested first at the top of the statement
  • The only code that will be carried out is the code under the first statement found to be true

For more information on conditionals, check out MIT’s website here.

Activity 2

Identifying which conditions your app should evaluate can be tricky! Sometimes you know what you want your app to do, but it may be be hard to know which conditions to check. Let’s practice writing some conditions that you think the apps check when you use them.  Here’s an example to get you started! See if you can come up with more examples.

Logging into a social media account:

  • Conditions to check:
    • The username is correct
    • The password is correct
    • The user has not tried to log in more than five times

Another hard part about writing conditional statements is translating the condition you have in mind into something your app can actually understand. In the example above, we checked a user’s age by first creating a variable that would be equal the user’s age. It is not always intuitive to set up conditions and it will take practice! Here are questions to ask yourself when trying to set up the right condition:

  1. Does your condition depend on information the user entered?
  2. Do you need to set up any variables?
    • If so what type? Is it a number, list, or string?
  3. Can you use math operators such as less than (<) , greater than (>), equal to (=), not equal to (≠) in your condition?
  4. Do you need to compare the value of something with a value in a database?
  5. Do you need to compare something with data from somewhere else, like a website? (This will be discussed more in Code 4)
  6. What type of data does your condition rely on? Do you see any operations for that data type that will help you?
    • Ex: Comparing two strings, finding the length of a string, adding items to a list, comparing two lists, etc.
    • Try skimming through the operations in App Inventor to see if it helps you.

Logic

So far you’ve learned how to make your app do different things using conditional statements. You can tackle lots of new problems by knowing a few logic operators. Logic operators take multiple booleans inputs and simplify them into one boolean output. Because your app sees conditions as true or false, you can use conditions as inputs to logic operators. There are three major logic operators that you’ll learn in this section: and, or, and not. Although they may seem strange, you'll see examples below of how logic operators can help you build your app.

and Operator

In order for the and operator to output true, all of its inputs must be true. If any of the input conditions are false, your code will evaluate the whole statement as false. Here are all the possible outcomes when using and and function.

True and True = True

true/true blocks

True and False = False

true/false blocks

False and True = False

false/true blocks

False and False = False

false/false blocks

Here’s how you can think using and in a conditional statement:

condition3

Note: Using the and operator is different than using else if because both conditions are evaluated at the same time instead of one after the other. They also both need to be true for the app to see the conditional as true.

Examples

You should use and when you need two conditions to be true in order for something to happen. Here are some examples of when you may want to use and in your app!

  • Logging into social media:
    • If (the username is correct) and (the password is correct) → then allow the user to log in
  • Winning a game
    • If (the player finishes the level) and (time is not up) →then the user wins
  • Finding a grocery store:
    • If (the store is open) and (the store is near the user) → then show in the search results
  • Posting pictures:
    • If (the user has selected a picture) and (the user has entered a caption) → allow the user to post the picture

Can you think of any more examples?

or Operator

For the or operator to output true, only one of the inputs needs to be true. Here are all the possible outcomes when using the or operator.

True or True = True

true or true blocks

True or False = True

true or false blocks

False or True = True

false or true blocks

False or False = False

false or false blocks

Here’s how you can think using or in a conditional statement:

Note: The or operator may also seem similar to else if to you. The or operator is different because both conditions are evaluated at the same time instead of one after the other. The or operator is better to use when you have two conditions that should have the same outcome if they are true.

Examples
  • Losing a game:
    • (If time runs out) or (the player loses all their lives) → then the player loses
  • Showing search results
    • (If the title matches) or (the description matches) → show it in the search results
  • Recommending videos to a user
    • (If the user watched it in the past) or (it is similar to something the user liked) → recommend it to the user
not  Operator

The not operator is an easy one! The not operator switches the value of a boolean to be the opposite of what it is.

not true = false

not true blocks

not false = true

not false blocks

Sometimes it is easier to write a condition that makes your app check the opposite of what you want. For these scenarios you can use the not operator.  Here's how you can think of it in a conditional statement.

condition5

Examples
  • You want to check if there is text in a textbox, but it’s easier to check if the textbox is empty than to check if there is something there. You use the not operator so you can check if the textbox is not empty.
    • If not (textbox = “ ”) → do this
  • You want to exclude search results about puppies, so you make sure the word puppy is not there by using the not operator.
    • If not (article contains word puppy) → show results
  • You can combine logic operators to do more things. Here’s how you could show search results that have the word kitten and do not have the word puppy.
    • If not (article contains word puppy) and (article contains word kitten) → show results

Activity 3

Do you know that you can use and, or and not in a Google search? This is a good way of narrowing down or broadening search results when you’re looking for something. Try it out! Make sure that you type "AND", "OR" or "NOT" in all capitals. Check out the examples below:

Searching for 2017 AND Technovation gives results that contain both 2017 and Technovation:

image45

Searching for 2017 OR Technovation gives results that contain either 2017 or Technovation:

image25

Loops

Imagine if you were asked to write down your name one hundred times in a row. Not only would this be really boring, but it would take you a long time. If you got tired, you might even start to make mistakes! If you asked a computer to print out your name one hundred times, it would do it really fast without making mistakes! Unlike people, computers are great at doing the same thing over and over again. You can take advantage of this by using loops. A loop is a block of code that will repeat over and over again.

There are two types of loops, while loops and for loops. While loops will repeat until a condition you set is no longer true, and for loops will repeat a certain number of times.

For loops

For loops will repeat a block of code a set number of times. The reason they are called for loops is because you can tell your app how many times you want it to repeat to the code for. You can think about for loops as  telling your app, “repeat this, for 14 times” or “repeat this, for 5 times”.

For loops use a variable to count how many times the code has been repeated, called a counter. You control how many times the loop repeats by setting where the counter starts and ends. You also set how much the counter goes up by each time the code repeats. In most scenarios you’ll want the counter to increase by 1 each time the loop repeats.

In App Inventor, for loops look like this:

for loop block

The part that says number is the counter. For now the counter is has the name number, but you can change that. number will start at 1 and will stop when it is equal to 5. Each time the code inside the loop repeats, number increases by 1. So this loop will repeat the code inside of it 5 times. Right now, this loop doesn’t do anything, since the do part is empty. Let’s walk through an example.

image41

We haven’t changed anything about the number variable, but we have added some code to the do part of the loop. Each time this loop runs, the app will alert its user “hello”, so the user will get alerted 5 times. Here is how the app will run through this loop:

screen-shot-2016-11-01-at-2-00-15-pm

This loop would be useful if you wanted to alerts the user “hello” 5 times. This may not seem that useful since it isn’t that hard to put 5 notifier blocks in a row saying “hello”. But what if you wanted to alert the user “hello” 100 times? This would be much easier to do with a loop than by putting 100 blocks in a row!

Another way that for loops can be useful is by using the counter variable in your code. Each time the loop runs the counter variable will have a different value and this can be really useful. Here’s an example.

image27

In this for loop we are using the variable number in the code by attached it to the word “hello”. Number increases by 1 each time, so the app will keep print out different things each time it runs. Here is how the app will run through this loop now:

screen-shot-2016-11-01-at-2-04-17-pm

For Each Loops

Another useful type of for loop that you can use in App Inventor is this one:

image16

Here, the counter variable is called item and is already set to repeat for the number of items in a list. These loops be very useful whenever you need to do something with a list. Here’s an example.

Let’s say you had a list of numbers and you wanted to add up every number inside the list and store it in a variable called sum.  Here’s how you would do this with a for each loop.

listofnumbers

numberlist

Each time the loop runs, the variable sum will get an item from numberList added to it. The loop will automatically stop after all the numbers in the list have been added!

Note: You may have noticed that the counter variables in this section are a lot like the local variables you learned about in Code 2! Just like local variables, you can only use them inside the loop.

While Loops

While loops are loops that will continue to go until a condition is no longer true. The reason they are called while loops because the code will repeat while a condition is still true. You can think of while loops as telling your app “while this happens, repeat this” or “while this hasn’t changed, repeat this”.

Example

You’re having a party and you want the music to keep playing until all your guests leave. You could describe your party as this loop:

  • While (people at party > 0)
  • do:  keep playing music

What if you also want your music to stop playing when it gets later than midnight? You can program while loops to end the loop based on multiple conditions using logic. Now you can describe your party as this loop.

  • While (people at party > 0) and (time < midnight)
  • do: keep playing music

In this case the music would stop as soon as everyone left the party or if it is past midnight. 

To use a while loop you need to set up a condition that starts out as true. If your condition starts out as false, then your loop will never run. The loop will check the condition each time before it repeats to make sure the condition is still true.

startloop-arrow3

Here’s what while loops look like in App Inventor:

while loop block

With while loops it’s possible to run into errors! If you choose a condition that will never be false, then your loop will never end. This is called an infinite loop. Here’s an example:

image52

Since 1 will always be equal to 1, this condition can never be false! When we ran this code in App Inventor our phone froze and we couldn’t do anything. You may also get a message saying that the App Inventor Companion App has stopped working.

Code 3 Challenge: Search a Database

Create an app that allows the user to search a database of information and view their results. The database should contain names and descriptions of famous people, places, movies, music, events or anything else you want. Make sure you have at least three entries in your database.

Try to figure out how to complete the Coding Challenge on your own before looking at the instructions. The instructions show just one way of how this challenge can be solved.

Reflection

Congratulations on completing this lesson! This was a huge lesson but it will be very useful when you are creating your app! Don’t forget that you can always review anything you don't understand now.

Review of key words:

  • Booleans - datatype that can be true or false
  • Conditions - something an app evaluates to be true or false
  • Conditional Statement - tells the app what to do after evaluating conditions
  • AND Operator - evaluates as true if all of the inputs are true
  • OR Operator - evaluates as true if one of the inputs is true
  • NOT Operator - evaluates as the opposite of the input
  • Loop - a repeating block of code
  • For Loop - repeats a block of code a certain number of items
  • For Each Loop - repeats a block of code for the number of items in a list
  • While Loop - repeats a block of code while a condition is true

Code Challenge 2: Make a To-Do List

Description

To do list -ის (გასაკეთებელ  დავალებათა  ნუსხის) შექმნით მომხმარებელს საშუალება მიეცემა შევიდეს და აირჩიოს მისთვის სასურველლი საკითი.მნიშვნელოვანია რომ აპლკაციამ   საკითხები  დაიმახსოვროს ,იმისათვის რომ  მომხმარებელს აპლიკაციის ყოველი გახსნისას  ჰქონდეს მათზე წვდომა. მანამ სანამ ჩელენჯს სცდიდეთ,იქნებ თვალი გადაავლოთ და ისწავლოთ  ListView -ის გამოყენება.

ჩვენი  აპლიკაციის ნიმუში იხ,აქ: Technovation Challenge #2

მანამ სანამ ინსტრუქციებს წაიკითხავდეთ,მაქსიმალურად ეცადეთ, რომ ეს ჩელენჯი(გამოწვეწვა) თვითონ სცადოთ,ანუ საკუთარი ძალებით გააკეთოთ. დაიმახსოვრეთ,ეს ინსტრუქციები არის ერთადერთი გზა იმისა, რომ ჩელენჯი მაქსიმალურად იქნეს დაძლეული.წარმატებულ კოდინგს გისურვებთ!


Designing your screen-ეკრანის დიზაინი

ჩვენ შევქმენით აპლიკაცია, რომელიც მომხმარებელს საშუალებას აძლევს ნუსხაში (სიაში) ჩაამატონ საკითხები,ამოიღონ საკითხები,შეინახონ ( save ) სია და  გადატვირთონ სია.ამ ყველაფრისთვის საჭირო გახდა ეკრანზე გვქონოდა სამი ღილაკი.  ერთი იმისთვის ,რომ სიაში საკითხები ჩამატდეს,ერთი იმისთვის რომ  მომხმარებლის მიერ შემუშავებულოი საკითხები შეინახოს მომავლისთვის  და ერთიც გადასატვირთი ღილაკი რომელიც წაშლის სიას.

    1. ეკრანზე დაამატეთ სათაური  რომელიც მომხმარებელს  ეტყვის თუ რა უნდა გააკეთოს.
    2. დაამატეთ  textbox -ი ,რომ მომხმარებლმა შეძლოს და თავისი სამოქმედო-ნუსხა(სია)იქ შეიყვანოს.
    3. დაამატეთ ღილაკი რომელსაც მომხმარებელი დაჭერს მას შემდეგ რაც ის შევა  თავის  სამოქმედი პუნქტში .
      1. ჩვენ ამ ღილაკს გადავარქვით  ‘Enter’-ი,ამგვარად ბლოკების პროგრამირების დროს გავიხსენებთ მას  რა ფუნქცია აკისრია.
    4.  დაამატეთ ListView-ი ეკრანზე. მომხმარებელი თავის სამოქმედო სიას მისი საშუალებით იხილავს.
    5.  ‘Fill Parent’-ის შევსებისას ჩვენს მონაცემებს ვწერთ(სიმაღლე და სიგანე) , მაგრამ როცა საქმე ეკრანის დიზაინთან გვაქვს,როგორც თქვენ გენებოთ საქმე  ისე წარმართეთ .
      1. დააჭირეთ და გაიგეთ  ListView-ის  გამოყენების შესახებ უფრო მეტი .
    6. ეკრანზე დაამატეთ  save-ღილაკი რათა დაიცვათ მონაცემები და reset-ღილაკი სიის წასაშლელად.
      1. ჩვენ ამ ღილაკებს დავარქვით  ‘Save’ and ‘Reset’.
    7. სურვილისამებრ: ჩვენ დავამატეთ  ორი   Horizontal Arrangements-ი   ჩვენი ეკრანის განლაგების ორგანიზებისთვის,მაგრამ თქვენს ეკრანს როგორც გინდათ ისე გაუწიეთ ორგანიზება .

steps 1-6

  1. დაამატეთ  TinyDB   -ი   storage menu-დან . როდესაც მას ეკრანზე დასვავთ ის უხილავ კომპონენტად მოგევლინებათ( ‘Non-visible component’).

step 7


სამოქმედო სიაში პარამეტრების ჩამატება

ჩვენი აპლკაციის მონიტორის საშუალებით მომხმარებელი შემოდის , სიაში მონაცემებს ახარისხებს  და შემდეგ აჩვენებს მას  ListView-ის მეშვეობით.ჩვენ ეს გავაკეთეთ ცვალებადი სიის შექმნისთ სახელად items  .როდესაც ჩვენი მომხმარებელი დააჭერს   enter  ღილაკს,ჩვენ items-ში ვუმატებთ იმას რაც  textbox-ში გვქვს და ის გამოჩნდება ListView-ში.

  1. შექმენით  items-ი რომელიც თქვენს სამოქმედო სიის მონაცემებს  მართავს.დაიწყეთ ცარიელი სიის შექმნით.
  2. ხელი ჩასჭიდეთ   button.click block-ს თქვენი enter  ღილაკისთვის .
  3. აიღეთ add items to list block-ი   Lists-დან. ჩასვით ის  enter.click -ში.
  4. ჩასვით items-ი  სიის სახელად  და  TextBox1.Text -ი როგორც სიაში ჩასამატებელი პუნქტი.
  5. ხელი ჩაავლეთ  set ListView1.Elements to block -ს  და ჩასვით  add items to list block-ის ქვეშ.
  6. დაამატეთ თქვენი items-ი   set ListView1.Elements to block-ში.
  7. სურვილისამებრ:აპლიკაცია გამოსაყენებლად უფრო ადვილი რომ ყოფილიყო,მაშინ როცა მომხმარებელი დააჭერდა “შესვლა” ღილაკს   დავმალეთ კლავიატურა .ამის გასაკეთებლად დააჭირეთ TextBox1-ს   და ხელი ჩასჭიდეთTextBox1.HideKeyboard block-ს.

blocks steps 1-7

გადამოწმება #1

დროა გადაამოწმეთ ,მუშაობს თუ არა ის რაც ეს-ესაა შექმენით.მოიმარჯვეთ ტელეფონი ან ემულატორი და  გამოსცადეთ თქვენი აპლიკაცია.როდესც textbox-ში რაიმეს ბეჭდავთ  და აჭერთ enter  ღილაკს  ის უნდა გამოჩნდეს ListView-ში.თუკი აპლიკაცია არ მუშაობს ,სანამ გააგრძელებდეთ,უკან დაბრუნდით და მოძებნეთ რა შეგეშალათ. თუკი კვლავ შეფერხდით მენტორს ან გუნდის წევრებს შეეხმიანეთ.

 to-do list-დან ჩანაწერების წაშლა

როდესაც  მომხმარებელი to-do list-ში  დავალების შესრულებას  დაასრულებს  ,მაგრამ აღარ სურს მისი ხილვა იქ, ListView-ში დააჭერს იმას,რისი წაშლაც უნდა და წაშლის .

ჩვენ ამისათვის შევქმენით ცვალებადი  ელემენტი სახელად index-ი. ეს ადგილობრივი ელემენტია რადგანაც მისი გამოყენება კოდინგში მხოლოდ ერთხელ დაგვჭირდა. ეს ყველაფერი კი იმისთვის შევქმენით ,რომ  მომხმარებელს ქონოდა ინდექსი რომელსაც ListView-ში აირჩევდა. და  index-ს მივანიჭეთ იმის შესაძლებლობა რომ აპლიკაციისთვის ეთქვა  რა ამოეღო items-დან.  ListView-ი განახლდება, მას შემდეგ რაც საკითხების ნუსხა შეიცვლება.

  1. ჩასჭიდეთ   ListView1.AfterPicking block-ს.
  2. შექმენით ადგილობრივი ცვალებადი ელემენტი სახელწოდებით  index   და   დასვით იქ  რითიც  თქვენ გნებავთ,რომ დაიწყოთ.  ჩვენ ნულით დავიწყეთ და შესაბამისად იქ დავსვით..Create a local variable called  and set it whatever you like to start out. We set our to zero.
  3. აიღეთ set ‘name’ to  ცვალებადი ბლოკი და წაიღეთ ცვალებად index-ში.
  4.  მიამაგრეთ ბლოკები  index is list, thing, list-ები.
  5. მიანიჭეთ  thing-ს  შესაძლებლობა ,რომ იყოს  ListView1.Selection-ი   და  list -ს  მიანიჭეთ შესაძლებლობა, რომ იყოს   items list-ი.
  6.  ჩასჭიდეთ remove list item block -ს და ჩასვით  თქვენს ადგილობრივ ცცვალებად ბლოკში.
  7. დასვით items -ი   ისე რომ იყო  list-ი  და  index -ი  ისე, რომ იყოს the index.
  8. მოათავსეთ set ListView1.Elements to block -ი თქვენი ნარინჯისფერი ცვალებადი ბლოკის ქვეშ  და დააკავშირეთ თქვენი items-ი  მასთან.

blocks2

გადამოწმება #2

დროა გადაამოწმოთ აპლიკაცია მუშაობს თუ არა!მოიმარჯვეთ  ტელეფონი ან ემულატორია დაიწყეთ ტესტი. ტესტირების დროს აპლიკაციაში უნდა შეძლოთ იმ პარამეტრებზე წვდომა ,რომლებიც  სამოქმედო ნუსხაში შეიყვანეთ  და ამავე დროს უნდა შეძლოთ მათი წაშლა. თუკი ამას ვერ ახერხრბთ ე.ი.  აპლიკაცია არ მუშაობს  და შესაბამისად ,უკან უნდა დაბრუნდეთ და კოდი გადაამოწმოთ.თუკი კვლავ შეფერხდით  მენტორს ან გუნდის წევრებს დაუკავშირდით  ან იხილეთ გაკვეთილები  ListView-ის შესახებ!

 Reset-ღილაკის  პროგრამირება

იმისათვის, რომ აპლიკაცია გამოსაყენებლად უფრო ადვილი ყოფილიყო,ჩავამატეთ reset ღილაკი რომელიც to-do list-ის გარეთ ყველა მონაცემს შლის.ეს ღილაკი დავაპროგრამეთ და როდესაც მომხმარებელი მას დააჭერს ხელს ის  შეძლებს   და    list items-ებს   გადაიტანს  ცარიელ   list-ში . შემდეგ  გადავტვირთეთ ListView -ი რათა ახალი ცარიელი  contents of the list items-ები გამოჩენილიყო.

  1. reset  ღილაკისთვის ხელი ჩაავლეთ  when button.click block-ს.
  2. აიღეთ   set ‘name’ to variable block(ცვალებადი ბლოკი ) და აირჩიეთ  თქვენი   items list-ი.
  3. მიამაგრეთ   create empty list block-ი.
  4. ხელი ჩაავლეთ  set ListView1.Elements to block -ს  და მიამაგრეთ  get items variable block-ი.

Reset steps 1-4

გადამოწმება #3

დარწმუნდით ,რომ  reset   ღილაკი მუშაობს!მპიმარჯვეთ ტელეფონი ან ემულატორი  და დატესტეთ  აპლიკაცია. მას შემდეგ რაც to-do list-ში მონაცემებს შეიყვანთ ,უნდა დააჭიროთ reset  ღილაკს და მან list-ი უნდა წაშალოს.  თუკი ისევ შეფერხდით დაუკავშირდით მენტორს ან გუნდის წევრებს!!!

 TinyDB-ს პროგრამირება

როდესაც მომხმარებელი ხურავს აპლიკაციას, to-do list-ი აპლიკაციაში მეორედ შესვლამდე შეინახება.ჩვენ დავაპროგრამეთ “save” ღილაკი ისე რომ მონაცემთა ბაზისთვის დაგვერქვა(TinyDB)  და შეგვენახა items list-ი. მონაცემთა ბაზა მომხმარებლის მიერ შქმინლ to do list-ს იმახსოვრებს   ზუსტად ისეთს, როგორიც იმ მომენტისთვის არის და იქ ინახავს შემდეგ ვიზიტამდე.

  1.  save  ღილაკისთვის ხელი ჩაავლეთ when button.Click block-ს.
  2. დაამატეთ  call TinyDB1.StoreValue block.
  3. დაამატეთ  tag name.
  4. დაამატეთ თქვენი  items variable(ცვალებადი ელემენტები)  valueToStore-ში.

TinyDB steps 1-4


ჩვენი აპლიკაცია მონაცემთა ბაზის შემოწმებას to-do lists-ების  შემოწმებით იწყებს.ამის გასაკეთებლად გამოვიყენეთ   when Screen1.Initialize block  -ი, რომელიც  Screen1-ზე ჩნდება. ჩვენი  list items-  ი დავსვით მონაცემთა ბაზაში”ListData”-ს ქვეშ. შენახული მონაცემების არ არსებობის შემთხვევაში აპლიკაციას მივეცით იმის საშუალება ,რომ შექმნას empty list(ცარიელი სია )ან blank to-do list(დავალებათა ცარიელი სიაის ბლანკი). ამის შემდეგ აპლიკაცია აჩვენებს იმას რაც არის items variable-ში( ცვლად ელემენტებში) ,რაც ამავე დროს წარმოადგენს stored data-ს (შენახულ მონაცემს) ან empty list-ს (ცარიელ სიას).

  1. ჩასჭიდეთ  when Screen1.Initialize block-ს.
  2. ჩასჭიდეთ  set ‘variable name’ to block-ს და დასვით ისე ,რომ გახდეს თქვენი items list.and set the variable to be your
  3. მოაცემთა  ბაზის სამართავად გამოიყენეთ call TinyDB1.GetValue block-ი.
  4. შეიყვანეთ  tag-ის სახელი, რომელიც   list for the tag-ის შესანახად გამოგიყენებიათ.name you used to save the.
  5. დასვით  create empty list block-ი  valueIfTagNotThere-თვის .
  6. ჩასჭიდეთ  set ListView1.Elements to block -ს და მიამაგრეათ თქვენს  items variable-ს.

TinyDB steps 1-6

ბოლო გადამოწმება

დროა გადაამოწმოტ აპლიკაცია მუშაობს თუ არა! ჩამოტვირთეთ თქვენი აპლიკცია ტელეფონში ან ემულატორში,შეიყვანეთ მონაცემები(რამოდენიმე)თქვენსავე to-do list-ში. დააჭირეთ save ღილაკს და დახურეთ  AI companion app-ი . შემდეგ კვლავ გახსენიტ აპლიკაცია და გადაამოწმეთ მონაცემები ,რაც შეიყვანეთ იქ არის თუ არა.თუკი იქ არ აღმოჩნდებიან მოგიწევთ უკან დაბრუნდეთ და გადაამოწმეთ კოდში რამე შეცდომა ხომ არ დაუშვით.დარწმუნდით, რომ  ყველაფერი სწორად ჩაწერეთ ,გასათვალისწინებელია დიდი ასობგერებიც.თუკი ყველაფერი მუშაოს ,მაშ გ ი ლ ო ც ა ვ თ , თქვენ დაასრულეთ the challenge-ი (ჩელენჯი, გამოწვევა)!

ისევ შეფერხება?ჩამოტვირთეთ კოდის რესურსები.ჩამოტვორთვის და გამოყენების ინსტრუქციეი  იხ,აქ:

 Instructions


Download the source code