- Build a login and signup flow using Supabase Auth and Google login to control who can access your app
- Add authentication middleware to your Express.js backend to protect your API routes from unauthorized requests
- Test both frontend and backend security to verify that only logged-in users can trigger your AI features
- Signup and login pages that create user accounts and keep users logged in
- Protected API routes with backend middleware that checks authentication tokens before processing requests
Students have built a debugged MVP in a GitHub repository that includes a React frontend and an Express.js backend. The frontend and backend may run as two separate processes in Codespaces.
Securing your App with Authentication
Right now, anyone with your Codespace link can use your app. There’s no login screen, and your Express.js backend processes every request it receives, no questions asked. If someone discovers your URL, they can trigger AI calls that cost you money. As you explored when building your financial plan, every API call has a cost. Protecting those calls is not just a technical decision, it’s a business decision.
Throughout this unit, we use TutorMatch as our guided example. You’ll follow the TutorMatch examples, then adapt each step for your own MVP.
This unit adds two layers of protection.
- User authentication — a login screen so only registered users can see your app.
- Security check in your backend that verifies every API request actually came from a logged-in user.
Think of it this way: the login page protects the front door. The backend security check protects the windows. Together, they mean your app is protected from both sides.
Why Not Store Passwords Yourself?
The most intuitive approach to user accounts is also the most dangerous: create a users table, store each person’s email and password when they sign up, and check the password when they log in.
The problem is that this stores passwords as plain text, readable by anyone who accesses your database. If your database is ever exposed, every user’s password is compromised. Professional apps never do this.
Secure authentication requires several things working together:
- password hashing – converting passwords into unreadable strings before storage
- session tokens – temporary identifiers that keep users logged in without entering their password on every page
- secure storage – encrypted handling of credentials so they’re never exposed in transit or at rest.
Building all of this from scratch is complex and error-prone. That’s why authentication services exist — they handle the security so you can focus on your app.

There are several options when choosing a user authentication service:
Option
How It Works
Free Tier
Complexity
Verdict
Store passwords yourself
Build a users table, hash passwords, manage sessions manually
Free
High — security mistakes are easy to make and dangerous
Not recommended for MVPs
Google Sign-In (OAuth)
Users click “Sign in with Google.” Google handles all security.
Free
Medium — requires Google Cloud Console setup
Great option, but adds setup steps
Auth0 / Clerk
Third-party auth services with pre-built login pages
Free tier available
Medium — new account and SDK required
Good, but adds another service to manage
Supabase Auth
Built into Supabase. Handles hashing, sessions, and storage automatically.
Free (included)
Low — you already have a Supabase account
Great option for MVP
We will use Supabase Auth to authenticate users in this lesson. We’ll also add Google login, as that is a standard login option for professional apps, and it is not too difficult to set up. Supabase Auth is the main choice for three reasons:
- You already have a Supabase account from your Founder’s Toolkit.
- Supabase handles all the security complexity listed above out of the box.
- The free tier covers everything you need for your MVP.
One more thing to consider: Supabase Auth supports Row-Level Security (RLS), database rules that you configure to filter data so each user can only see their own records. We touched on it when we added Supabase to our Founder’s Toolkit. RLS won’t protect your AI routes, though. That is why we need to add further protections.
RLS is not needed at this stage, because we aren’t creating any custom tables. Supabase handles user storage internally. RLS becomes relevant if you are storing user-specific data in your MVP— like saving a user’s history, preferences, or transactions.”
Supabase Authentication
When you create a Supabase project, authentication is automatically enabled. You don’t need to do any special setup in Supabase settings. We did set up some specific RLS security policies in the Founder’s Toolkit for anonymous users vs team members, but for this database, we’ll use the default built-in authentication for Supabase.
What Supabase configures automatically:
- Email/password authentication enabled
- User table (auth.users) created
- JSON Web Tokens (JWT) issued
- Session management handled
In the first activity, you’ll add a login and signup flow to your MVP so only registered users can access your app. We will work through a series of prompts, testing after each one to make sure everything works before moving on.
Each prompt in the activities for this lesson uses the Role + Task structure. This is a prompt engineering pattern worth practicing:
- Role tells the AI what kind of expert to be
- Task tells it exactly what to do.
Separating these two makes your prompts clearer and produces better results, especially with smaller AI models.
ACTIVITY 1
Add User Authentication with Supabase
Estimated Time: 30 Minutes
You will update your app to require login to use it. New users will be able to sign up, returning users can log in, and anyone without an account will be redirected to the login page.
1. Open a New Branch in Your GIthub Repository
- Go to GitHub and open your MVP repository.
- Create a new branch called something like add-auth.
- Open your Codespace on the new branch.
You’re about to make significant changes — the feature branch keeps main safe. You’ll merge to main only after testing.
2. Set Up a New Project in Supabase
- Go to Supabase. You should have an account and project from your Founder’s Toolkit.
- Create a new project. Give it an appropriate name for your MVP.
- You will need to create a database password. Create one and store it somewhere safely as you cannot see it once you have saved it.
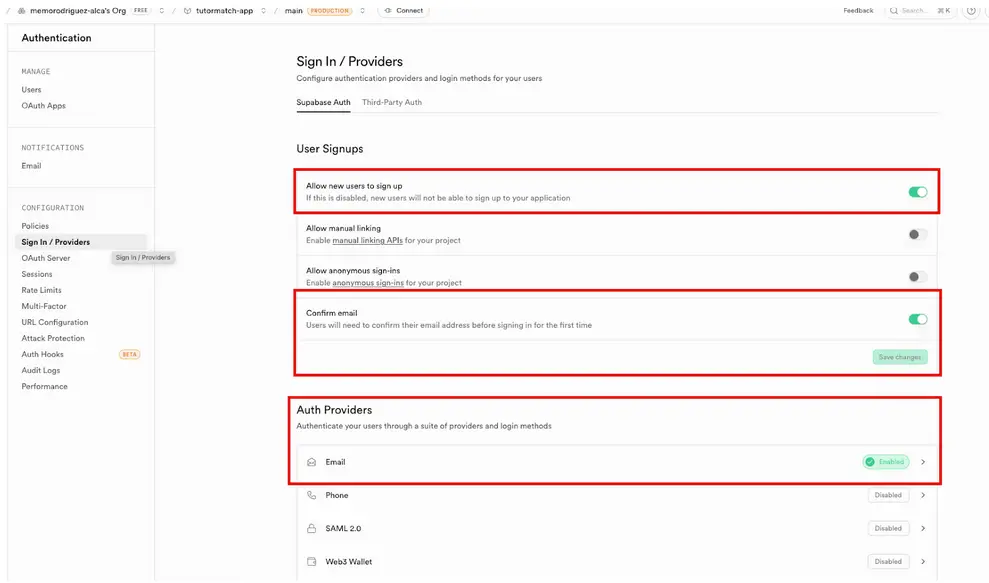
- Configure authentication settings:
- Go to your Supabase Dashboard → Authentication → Settings
- Scroll down to Signin/Providers section
- Find Enable email confirmations
- Toggle it OFF (for testing)
- Remember to turn it back on when you go to production!
- Get Your Project URL and API Keys
- In the left sidebar, click Project Settings (gear icon at bottom)
- Click Data API.
- You will see the API URL. Copy it and save it somewhere on your computer. You will need it for your app.
- Go back to the Project Settings menu and click on API Keys.
- You’ll see two keys, publishable key and secret keys.
- Copy the publishable key. You will need this for your app too.
Both the public URL and publishable key are open and are able to be used in the frontend of your app. Because Supabase uses RLS (Row Level Security), data is protected. Users can signup and login, but they can only see their own data, and aren’t granted admin access.
We won’t use the secret key here. That is never to be used in the frontend. We’ll use that later when we get to payment processing.
3. Add Supabase URL and API Key to .env
- In your project, add a new .env file in your root folder. You will already have a .env file in the server folder, but since the Supabase integration happens in the frontend, it needs to exist in the root directory of the project.
- Add 2 lines to your root .env file
VITE_SUPABASE_URL=your_public_URL
VITE_SUPABASE_KEY=your_publishable_key - Add your actual Supabase URl and publishable key to those lines in the file.
NOTE: We are using React, so VITE_ is needed to prepend and frontend environment variables. Your framework may be different.
4. Install Supabase Client
In your Codespace terminal, type
npm install @supabase/supabase-js
5. Prompt Copilot to Create Supabase Signup Form and Process
Prompt Copilot (or another LLM) to help generate the login/signup code for your app. Here is a sample prompt.
Role: You are a web developer helping me build user authentication into my React app.
Task: Add a Supabase signup and login form and interact with the Supabase url. The opening screen is the login, and once the user logs in, the other tabs appear and the user can access those 2 tabs. The login form should be added as a Authform.jsx file in the Pages folder. Add a logout button to the screen once a user logs in, next to the other tab buttons, so the user can log back out and return to the main screen.
Use the same formatting for AuthForm that you used for the FindTutor and GetAdvice tabs.
I have added the Supabase project url and publishable api key to my .env file as VITE_SUPABASE_URL and VITE_SUPABASE_URL.
6. Test Authentication
Test the complete flow:
- Sign Up:
- Go to /signup
- Enter email and password (min 6 characters)
- Click “Sign Up”
- Should redirect to home page
- Verify in Supabase:
- Open Supabase Dashboard → Authentication → Users
- You should see your new user listed
- Logout:
- Click logout button
- Should redirect to login page
- Login:
- Enter same email/password
- Should redirect to home page
- Session Persistence:
- Refresh the page
- Should still be logged in
If any step fails, use the “Teach Me” pattern with Copilot: describe what you expected, what happened instead, and ask Copilot to explain before providing a fix.
Keep the Codespace and branch open for the next activity.
While it is optional to add a Google login option, you can do it for free, and it adds an air of professionalism to your app.
ACTIVITY 2
(Optional) Add Google Login
Estimated Time: 30 Minutes
1. Enable Google Login in Supabase
- Go to your Supabase Dashboard → Authentication → Providers.
- Find Google in the list and enable it.
- Look for the Callback URL and copy it. It usually looks like: https://[YOUR-PROJECT-ID].supabase.co/auth/v1/callback.
2. Create a Project in Google Cloud Console
IMPORTANT: IGNORE the big “Try for Free” or “Activate $300 Credit” banners at the top of the screen. If you click those buttons, Google will demand a credit card for identity verification.
You do not need the $300 credit or a “Billing Account” to use the Identity/Auth APIs.
Go to the Google Cloud Console. You should have an account from using Google AI Studio.
Create a new project and name it appropriately. Google allows several free projects per account without billing or using a credit card.
Go to APIs & Services → OAuth consent screen.
- Click Get Started.
- Fill in your App Name and User Support Email.
- Click External for audience.
IMPORTANT Provide only the “App name” and “Support email.” If they you to add a logo or sensitive “scopes” (like reading a user’s entire Drive), Google might flag it for verification with a credit card.
Pro-tip for MVP: You don’t need to submit for verification yet as long as you stay in “Testing” mode or have few users.
3. Generate OAuth Credentials
- Go to APIs & Services → Credentials.
- Click + Create Credentials → OAuth client ID.
- Application type: Select Web application.
- Authorized redirect URIs: Paste the Callback URL you copied from Supabase above.
- Click Create. You will receive a Client ID and Client Secret.
- Make sure to copy these as you won’t be able to access them when you close the window. You can download it as JSON and have both available to you.
4. Enable the Provider in Supabase
- Go back to the Supabase Dashboard → Authentication → Providers→ Google.
- Paste your Client ID and Client Secret.
- Toggle Enable Google Provider to ON and click Save.
5. Add your Github Codespace URL as a Redirect URL in Supabase
When a user logs in with Google, it needs to know where to return to after authentication. It will default to http://localhost:3000/ but our frontend is running on http://localhost:5173.
- To ensure it works, copy the Github URL when your app is running (it will look something like https://codespace_name.app.github.dev/
- In Supabase, go to Authentication → URL Configuration.
- Add your Github URL as a redirect URL.
6. Add URL to .env
- Add the Github Codespace URL in your .env as a variable, VITE_DEVELOPMENT_URL (VITE only is needed if your app is React).
7. Prompt Copilot to Add Google Login to Your App
You will ask Copilot to add the Google login capability. Note that we are adding the instruction to include the redirect URL.
- Prompt Copilot to add Google login as an option in your login screen.
Role: You are a web developer helping me build user authentication into my React app.
Task: Add Google sign-in as an option to my login page. Use Supabase’s signInWithOAuth method with the ‘Google’ provider. Redirect to environment variable VITE_DEVELOPMENT_URL.
Note: If you switch codespaces, you will have to make a new .env with your redirect (as well as your supabase URL and API key for your frontend.
When you go to deploy your app, you will have to add your production app URL as a redirect in Supabase, and also add it as a redirect in your code.
9. Commit Your Work to Github
- Commit your changes to your branch.
Keep the branch and the Codespace open for the next activity.
Securing Your API Routes
Your app now has a login page, so users must log in to see your app. But your Express.js backend still processes every request it receives, even if the person didn’t log in through your frontend. Someone could open a browser console and call your API directly, bypassing the login page entirely.
This is the “windows” problem. You locked the front door with a login page, but the windows (your API routes) are still open. To fix this, you’ll add a security check (called middleware) to your backend that verifies every API request actually came from a logged-in user.
You need to:
Protect routes that:
- Cost money (AI calls, API usage)
- Modify data (create, update, delete)
- Show user-specific information
Keep public:
- Health checks
- Static assets
- Homepage (if publicly viewable)
When your backend receives a request:
- Check: “Did this request come with proof that the user is logged in?”
- If yes → process the request normally
- If no → reject the request with a “401 Unauthorized” error
The “proof” is a JWT (JSON Web Token), a long string of characters that Supabase gives to each logged-in user. Your frontend includes this token with every request it makes to the backend. The backend checks the token with Supabase to confirm it’s real and hasn’t expired.
What it contains:
- Who the user is (their user ID, email)
- When it was issued
- When it expires
- A cryptographic signature proving Supabase issued it and it hasn’t been tampered with
ACTIVITY 3
Secure Your API Routes
Estimated Time: 25 Minutes
1. Open Github Codespaces
If you are not already in Codespace, open it, with the same branch used for Activity 1 and 2.
2. Install Supabase in Your Backend
- In your server folder (where your Express backend lives), install Supabase:
- In the terminal window,
cd server
npm install @supabase/supabase-js
- In the terminal window,
3. Add Backend Environment Variables
- Go back to your Supabase project, and get the Secret API key (not the publishable key).
- Go to Project Settings → API Keys
- Scroll down to the Secret key(s).
- Copy it and save it somewhere safe on your computer.
- Update the .env file in your server folder (not the root .env – the server/.env is a separate file for the backend).
- Add these lines, pasting your Supabase URL and secret key:
SUPABASE_URL=your_public_URL
SUPABASE_SERVICE_ROLE_KEY=your_secret_key
Important:
- Use the SAME SUPABASE_URL as your frontend
- Use the SECRET KEY (not publishable key) for SUPABASE_SERVICE_ROLE_KEY
- The secret key has admin privileges – NEVER expose it in frontend code
4. Add Authentication Middleware to Your Express Backend
- Use this prompt to ask Copilot to add code to backend code to ensure API calls are secure.
Role: You are a backend developer helping me secure my Express.js API.
Task:
- Import the Supabase client library (@supabase/supabase-js)
- Initialize a Supabase client using SUPABASE_URL and SUPABASE_SERVICE_ROLE_KEY from environment variables.
- Add an authentication middleware function to my Express.js backend.
- Extract the token
- Ask Supabase to validate the token
- If yes → let request continue
- If no → return 401 error
Apply this middleware ONLY to routes that call external APIs
Do NOT apply it to public routes like the homepage or health check
- Review the generated code.
You should see a function called requireAuth (or a similar name) that checks for an Authorization header, extracts the token, and verifies it with Supabase. You should also see it applied to your API route but not to public routes.
The key parts should look similar to this code:
					async function requireAuth(req, res, next) {
  const authHeader = req.headers.authorization;

  if (!authHeader || !authHeader.startsWith('Bearer ')) {
    return res.status(401).json({ error: 'Unauthorized' });
  }

  const token = authHeader.split(' ')[1];
  const { data, error } = await supabase.auth.getUser(token);

  if (error || !data.user) {
    return res.status(401).json({ error: 'Unauthorized' });
  }

  req.user = data.user;
  next();
}

// Protected route — security check runs first
app.post('/api/ai-query', requireAuth, async (req, res) => {
  // This code only runs if the user is logged in
});

// Public route — no security check needed
app.get('/health', (req, res) => {
  res.json({ status: 'ok' });
});
For TutorMatch, the protected route is app.post(‘/api/ai-query’, requireAuth, …). Your app will have different route names, but the pattern is the same – protect the routes that cost money to run.
5. Update the Frontend to Send Tokens
Your backend now expects proof of login with each request, but your frontend isn’t sending it yet.
- Prompt Copilot to update your frontend code. Here is a sample prompt.
Role: You are a frontend developer helping me connect my React app to my secured Express.js backend.
Task: Update all my frontend API calls to protected routes to include the Supabase session token in the Authorization header.
- Look at the code Copilot updated.
You should see that your fetch calls now include an Authorization header. Here is what the change looks like:
					const { data: { session } } = await supabase.auth.getSession();

if (!session) {
  window.location.href = '/login';
  return;
}

const response = await fetch('/api/ai-query', {
  method: 'POST',
  headers: {
    'Content-Type': 'application/json',
    'Authorization': `Bearer ${session.access_token}`
  },
  body: JSON.stringify({ prompt: userInput })
});
This is where everything connects:
- Supabase Auth gives your frontend a token when the user logs in.
- Your frontend sends that token with every request.
- Your backend checks it.
- If it’s valid, the request goes through.
- If not, it’s blocked.
6. Test Both Layers of Security
- Run your app in Codespaces and test two scenarios:
Test 1 — Logged-in user (should work):
- Open your app and log in with your test credentials.
- Use your AI feature as normal.
- It should work exactly as before.
If this works, your frontend is sending the token and your backend is accepting it.
Test 2 — No login (should be blocked):
- Log out from the app, so the user is not logged in.
- Open DevTools (F12 or right-click Inspect), then click the Console tab.
- Try to call your API directly by pasting the following into the Console (Note: our fetch is /api/ai-query – change your fetch command to use the same one from your frontend code.)
					fetch('/api/ai-query', {
  method: 'POST',
  headers: { 'Content-Type': 'application/json' },
  body: JSON.stringify({ prompt: 'test' })
}).then(r => r.json()).then(console.log);
You should see { error: “Unauthorized” } — NOT an AI response.
If both tests pass, your app is secured. The login page protects the front door. The middleware protects the windows.
7. Commit and Merge
Check one last time to make sure your user authentication works:
- Log out completely and refresh the page — you should see the Login page
- Log in and verify your AI feature works
- Open DevTools Console and try calling your API without the token (as in Test 2) — verify you get a 401 error
Stage and commit your changes in Source Control, with a message like “Add API route protection with auth middleware,” and push to your branch.
Go to Github, create a Pull Request from your add-auth branch, review the changes, and merge to main.
Troubleshooting
Here are some issues that might arise, and possible solutions
Logged-in users get 401 errors
Open DevTools, then Network tab, then click on the API request, and look at Request Headers. You should see Authorization: Bearer eyJ…. If the header is missing, verify your getSession() call is working.
API calls work without login
Check that you applied requireAuth to the correct route.
Token keeps getting rejected
Make sure you’re using SUPABASE_SERVICE_ROLE_KEY (not SUPABASE_ANON_KEY) on the backend. The service role key has permission to verify tokens from any user.
"supabase is not defined" message
Check that the Supabase client library is installed (npm install @supabase/supabase-js) and imported it at the top of your server file.
Reflection
Adding user authentication is an important step in making your app professional and secure. Consider these questions:

Security
Your API Routes
Prompting
Key Terms
- Authentication: Verifying a user’s identity — confirming they are who they claim to be (signup and login). Different from authorization, which controls what a user can access.
- Authorization: Controlling what an authenticated user is allowed to do. Row-Level Security (RLS) is one way to implement this at the database level.
- Password Hashing: Converting a password into an unreadable string before storing it. Supabase Auth does this automatically. Storing plain-text passwords is a serious security risk.
- Session Token: A temporary identifier that keeps a user logged in after they authenticate. Supabase Auth manages these automatically.
- Authentication Middleware: Code that runs before your route handler to verify that the request comes from a logged-in user. If the user isn’t authenticated, the middleware blocks the request.
- Authorization Header: An HTTP header that carries authentication credentials (usually a token) from the frontend to the backend with each request.
- Bearer Token: A type of authentication token sent in the Authorization header. The format is Bearer <token>. “Bearer” means “whoever carries this token is authorized.”
- JSON Web Token (JWT): A standard format for authentication tokens. Contains encoded information about the user and an expiration time. Supabase uses JWTs for session management.
- OAuth: An authentication standard that lets users sign in with an existing account (like Google) instead of creating a new password. Short for “Open Authorization.”
Additional Resources
- Supabase Auth Documentation: Setup guides, provider configuration, and API reference
- Supabase Auth Helpers for Express: Server-side authentication patterns