- Deploy your MVP to a live production URL using Vercel
- Add rate limiting to protect your API routes from abuse
- Set up structured logging to monitor your AI features after launch
- Verify your app’s security using DevTools
- Evaluate your app’s production readiness using a pre-launch checklist
- Live Production App: Your MVP deployed to a public HTTPS URL that anyone can visit
- A debugged, tested MVP in a GitHub repository
- User authentication with login, signup, and API route protection
- A Supabase project with Storage configured
- User testing feedback incorporated into your app
From MVP to Production
Your app works. People have tested it, you’ve fixed bugs, and you’ve added user authentication. But right now, only people with your Codespaces preview link can use it, and that link disappears when your Codespace stops running.
This unit takes your MVP app from “works on my computer” to “anyone on the internet can use it.”
Throughout this unit, we’ll use TutorMatch as the guided example, the same tutoring recommendation app we’ve used in other lessons. You’ll see TutorMatch go from running in Codespaces to a live URL anyone can access, then adapt each step for your own MVP.
Three things change when your app moves from Codespaces to a public URL:
Visibility
Your app becomes public via a URL. Anyone who discovers or receives the URL can try to use it, not just your team.
Persistence
Your app needs to stay running without you manually starting it. In Codespaces, you manually started your servers as you tested, but in production with real users, the hosting platform keeps your app alive automatically.
Cost
Every AI API call costs money. In Codespaces, you controlled who used your app (mostly you). With a public URL, even with user and API authentication in place, you need additional protection against abuse.
Choosing a Deployment Platform
You’ve been running your app in Codespaces—a development environment that only you can access. In this activity, you’ll deploy it to Vercel, a platform that hosts web applications and gives you a permanent public URL.
There are many ways to deploy a web app. Here’s how the most common options compare for someone deploying an MVP:
Platform
Setup Complexity
Free Tier
Best For
Vercel
Simple (connects to GitHub)
100GB bandwidth, 100 hours serverless
React/Next.js apps with API routes
Google AI Studio Deploy
Very simple (one-click)
Requires Google Cloud billing ($300 free credits for new users)
Apps built entirely in AI Studio
Lovable / Bolt
Simple (built-in hosting)
Limited, varies by platform
Quick prototypes without GitHub
Netlify
Simple (connects to GitHub)
100GB bandwidth
Static sites, simpler backends
Railway / Render
Medium
Limited free tier
Full-stack apps with databases
For this program, you’ll use Vercel. Here’s why:
For most of you, youapp has a backend, and Vercel handles that well. Your MVP isn’t just a set of static pages—it has server-side API routes that call Groq or other LLM APIs, connect to Supabase, and possibly call other APIs. Vercel’s serverless functions handle backend code automatically. Platforms like Netlify work well for simpler apps but require more setup for server-side logic.
It connects directly to GitHub. Your code already lives in GitHub. Vercel imports your repository and automatically redeploys every time you push changes—the same Git workflow you’ve been using throughout this program.
No credit card required. Vercel’s free tier requires nothing beyond the GitHub account you already have.
Vercel automatically handles production setup and security. There are many aspects of deployment that require significant setup. Vercel automatically handles a good portion of these setup requirements.
Netlify is a close second and a solid alternative if you ever want to try another platform. Both Vercel and Netlify connect to GitHub, auto-deploy on push, and offer generous free tiers. The difference is that Vercel handles backend API routes out of the box, while Netlify requires you to restructure your server code into their specific “Netlify Functions” format. For your MVP app, Vercel is the simpler path and the most comprehensive as well.
What if my app is using other frameworks?
Next.js: If your app is a Next.js project, Vercel was built by the creators of Next.js so is still a great option.
Lovable or Bolt: These platforms include their own hosting and deployment. Your app may already be live on their infrastructure. Ask your coach about whether to migrate to Vercel or stay on the platform’s built-in hosting.
Python (Flask, Streamlit, FastAPI): Vercel’s free tier does not support Python backends. Ask your coach about Railway or Render as alternative platforms. Railway (railway.app) offers a free tier that supports Python — connect your GitHub repo and Railway handles the rest. The concepts in this unit — environment variables, monitoring, error handling — still apply, but the platform-specific steps will differ.
What Vercel Handles
Vercel takes care of a lot of the hard infrastructure work automatically. Here’s how the responsibilities break down:
VERCEL
- Keeping your app secure with HTTPS (encrypted connections)
- Blocking malicious traffic before it reaches your app
- Making your app fast for users worldwide
- Keeping your app running 24/7 without you starting it manually
YOU
- Limiting how often users can use your AI feature. Without limits, one user could trigger hundreds of expensive AI calls
- Showing friendly error messages. Without this, users see confusing technical errors when something breaks
In Codespaces, you may be running your frontend and backend as two separate processes:
- Frontend server, most likely React
- Backend server, most likely Express
This is a normal development setup that works well for building and debugging.
However, Vercel works differently than GitHub Codespaces. It doesn’t run a persistent Express server. Instead, it does two things:
- Your frontend files (HTML, CSS, JavaScript from npm run build) are served by Vercel’s global CDN. A CDN (Content Delivery Network) is a network of servers spread around the world that store copies of your app’s static files — HTML, CSS, JavaScript, images.
Vercel looks for these in the build output directory (like dist/). Your Vite dev server and any express.static() code aren’t used in production — Vercel’s CDN replaces them entirely. This is normal and expected.
- Your API routes (like /api/recommendations) run as serverless functions that start fresh for each request.
For this to work, Vercel needs your Express app to be exported from the file and placed where Vercel can find it. You’ll set this up in the first activities through a small configuration step.
Your existing code doesn’t need major changes though so don’t be concerned. You’re adding a deployment configuration layer, not rewriting your app.
By the end, you’ll have a live URL you can share in your friends, families, and even potential customers.
ACTIVITY 1
Prepare to Deploy Your App with Vercel
Estimated Time: 30 Minutes
1. Open Your Project in Codespaces
- Go to GitHub and navigate to your MVP repository.
- You should have all of your work from previous units merged into main before deploying. Merge any open, committed branches.
- Make sure you’re on the main branch.
- Click Code, then click Create codespace on main if you don’t have a codespace for your main branch. You may have an existing codespace for other branches, but open a new one from the main branch.
- Wait for the Codespace environment to load.
NOTE: In the past, we’ve explicitly made any updates to our repo in a new branch. Updating the main branch here is intentional because Vercel watches main for auto-deploys, and that prep work done directly on main is acceptable in this specific case since we are not changing app logic, just adding configuration files.
2. Check Your Javascript Standard
JavaScript has two different systems for files share code with each other, CommonJS and ES Modules. CommonJS is the older system, built for Node.js back when JavaScript only ran on servers. ES Modules is the newer standard that works in both browsers and Node.js, and is now the recommended approach.
The export code in your Express server must match whichever system your project uses — export default app for ES Modules or module.exports = app for CommonJS. Using the wrong one will break the deployment.
Knowing this is going to help with how you prompt Copilot to update your code.
Here’s how to tell:
- Check your package.json for this field: json”type”: “module”
If that line is present, you are using ES Modules. - If it’s absent or says “type”: “commonjs”, you are using CommonJS.
- Another way to check is the import statements at the top of server.js.
- ES Modules looks like:
import express from ‘express’
import dotenv from ‘dotenv’ - CommonJS looks like:
const express = require(‘express’)
const dotenv = require(‘dotenv’)
- ES Modules looks like:
- There most likely is also an export statement at the bottom of your code:
- ES Modules:
export default app
CommonJS:
module.exports = app
- ES Modules:
Check and note which standard you are using.
3. Prepare Your App for Deployment
Since you probably have been running your app in GitHub Codespace environment, it will likely have two separate processes for frontend and backend.
One for the React frontend (Vite) and one for the Express backend.
Vercel needs a different structure.
- serves your built frontend files from a CDN.
- runs your Express API routes as serverless functions.
The good news is that this transition mostly involves adding configuration files and a few lines of code. Your existing app logic stays the same.
Open Copilot Chat in your Codespace and use something similar to this prompt:
You are helping me prepare my Express.js + React app for deployment to Vercel.
Goal: Configure my project so Vercel can serve the frontend and run the backend API routes as serverless functions.
My app currently runs as two separate processes in Codespaces.
Terminal 1 runs the React frontend with Vite (npm run dev). Terminal 2 runs the Express backend (npm run dev) on a separate port.
I am deploying to Vercel, which serves static files from the build output and converts Express into a serverless function.
Make these changes:
- SERVER FILE: Move my Express server file [server.js or similar] into an api/ directory and rename it to index.js if needed. At the end of the file, add: [if ES_MODULES: export default app or COMMONJS: module.exports = app]. Keep the existing app.listen() for local development.
- VERCEL CONFIG: Create a vercel.json file in the project root with:
{
“rewrites”: [
{ “source”: “/api/(.*)”, “destination”: “/api” }
]
}
- PACKAGE.JSON: Ensure these scripts exist:
- “dev” should run both frontend and backend for local development (using concurrently is fine)
- “build”: “vite build” (compiles the React frontend into /dist)
Add an “engines” field: { “node”: “>=18.0.0” }
Make sure all backend dependencies (express, cors, dotenv, [your AI SDK]) are in the root package.json, not in a separate server package.json.
- URL CHECK: Search all frontend files for hardcoded URLs containing localhost, github.dev, or 127.0.0.1. Replace with relative paths like /api/recommendations instead of http://localhost:3000/api/recommendations.
- VITE PROXY: In vite.config.ts (or vite.config.js), add a proxy so local development still works with relative URLs:
server: {
proxy: {
‘/api’: { target: ‘http://localhost:3001’, changeOrigin: true }
}
}
For each update, show me what you changed.
4. Review the Updates
- Review what Copilot generates. Here’s what each change does and why it matters.
api/ directory and export
Vercel looks for serverless functions in the api/ directory. By moving your Express server there and adding export default app (or module.exports = app), Vercel can import your Express app and run it as a serverless function.
Your app.listen() line stays — Vercel ignores it in production, but you still need it for local development in Codespaces.
Your server file should end with something like:
					// Local development — Vercel ignores this in production
app.listen(process.env.PORT || 3000, () => {
  console.log(`Server running on http://localhost:${process.env.PORT || 3000}`);
});

// Export for Vercel serverless deployment
export default app;
vercel.json file
This small configuration file tells Vercel how to route requests. All requests to /api/* go to your Express app. Everything else goes to the built frontend files. The entire file is just 5 lines.
					{
  "rewrites": [
    { "source": "/api/(.*)", "destination": "/api" }
  ]
}
Relative URLs
If your frontend has fetch(‘http://localhost:3000/api/recommendations’), this won’t work on Vercel because there’s no localhost:3000.
Copilot should change it to a relative path like fetch(‘/api/recommendations’). The browser resolves the path against whatever domain is hosting the page, whether that’s Codespaces or your .vercel.app URL in production.
Vite proxy
With relative URLs in your frontend, you need a way to forward /api requests to your Express server during local development. The Vite proxy does this automatically.
- When your frontend makes a request to api/recommendations, Vite forwards it to http://localhost:3000/api/recommendations where your Express server is running.
- In production on Vercel, the vercel.json rewrites handle this instead.
package.json file
There are several changes needed in the package.json file.
- scripts — server script path is updated from server/server.js to api/index.js, and possibly the dev script updated to reflect the new path
- dependencies — all backend dependencies that were previously in server/package.json need to move to the root package.json since there’s no longer a separate server package
- “type”: “module” — may have been added or was already there
- “engines” — { “node”: “>=18.0.0” } added for Vercel compatibility
For example, here is what the scripts section should look like:
					"scripts": {
  "dev": "concurrently \"vite\" \"node api/index.js\"",
  "build": "vite build",
  "preview": "vite preview",
  "server": "node api/index.js"
},
Note the “build”: line. This can changed, depending on your setup:
- React + Vite (most common from Copilot) – “build”: “vite build”
- React with Create React App – “build”: “react-scripts build”
- Vanilla JS (no framework) – No build step needed
This is what GitHub Copilot showed us what it did:
I’ll help you prepare your Express.js + React app for Vercel deployment. Let me start by exploring your project structure to understand the current setup.
Perfect! I’ve reviewed your project structure in tutormatch-app-gemini-auth-working. Great news: your app is already fully configured for Vercel deployment. All 5 required changes are already in place!
Summary of Current Configuration ✅
1. SERVER FILE ✅
Your index.js is properly set up:
- Located in the api/ directory as required by Vercel
- Already exports the app with export default app (ES modules)
- Includes app.listen(PORT) for local development on port 3001
- All Express routes (including /api/recommendations and /api/health) are configured
2. VERCEL CONFIG ✅
Your vercel.json is correctly configured:
This tells Vercel to route all /api/* requests to the serverless function.
3. PACKAGE.JSON ✅
Your package.json has all necessary scripts and configuration:
- ✅ “dev” script uses concurrently to run both backend and frontend
- ✅ “build” is set to “vite build” for the React frontend
- ✅ “engines” field requires node >= 18.0.0
- ✅ All backend dependencies (express, cors, dotenv, @google/genai) are in root package.json
- ✅ concurrently is properly configured to run npm run server and npm run client together
4. URL CHECK ✅
No hardcoded URLs found. Your frontend correctly uses:
- Relative path: fetch(‘/api/recommendations’, …) in App.tsx
- This works on both local development (proxied) and production (Vercel serverless)
5. VITE PROXY ✅
Your vite.config.ts has the proxy configured:
This ensures that during local development with npm run dev, requests to /api are proxied to the Express backend.
What This Means
Your project is ready to deploy to Vercel right now! When you push to Vercel:
- Vite will build your React frontend into /dist
- Vercel will serve the static files
- All /api/* requests will be handled by your Express function in index.js
- Your Supabase authentication and Gemini API calls will work seamlessly
Local development: Run npm run dev and both the frontend (port 5173) and backend (port 3000) start automatically, with the Vite proxy handling API calls.
5. Add Frontend Environment Variables
Since you’re potentially running a new codespace directly from the main branch, you may have lost the .env file, which is local to each codespace. You will need those environment variables to be set in the root .env file to be able to test here in Codespaces.
- Check your code for all your VITE variables. These would have been in your root .env file in your development codespace.
- Add a .env file to the root folder, and add those back in. For us, the were:
					VITE_SUPABASE_URL=
VITE_SUPABASE_KEY=
VITE_DEVELOPMENT_URL=
VITE_DEVELOPMENT_URL should be set to your codespace github.dev url for testing here. When you get to configuring Vercel, you will update to your vercel app URL.
- Check to make sure ALL backend env variables are in your Codespace secrets. You cannot add them to the root .env folder because they will be exposed.
6. Test in Codespaces Before Deploying
- Install dependencies: npm install (installs concurrently and backend dependencies)
- npm run dev will start both frontend and backend servers.
- Test:
- page loads
- login works
- AI feature responds
- If everything works locally, you’re ready to deploy.
- Keep working with the LLM to ensure everything is ready for Vercel deployment.
6. Commit Your Changes
- Commit your changes and push to the main branch.
- Merge all changes so your main branch is up-to-date in Github.
Now that you have updated your code to work in the Vercel platform, it is time to deploy!
ACTIVITY 2
Deploy Your App on Vercel
Estimated Time: 30 Minutes
1. Create a Free Vercel Account
- Go to vercel.com.
- Click Sign Up.
- Choose Continue with GitHub. This connects Vercel to the same GitHub account where your MVP code lives.
- Authorize Vercel to access your GitHub repositories.
No credit card is required. The free Hobby tier is more than enough for your MVP.
2. Import Your GitHub Repository
- From the Vercel dashboard, click Add New → Project
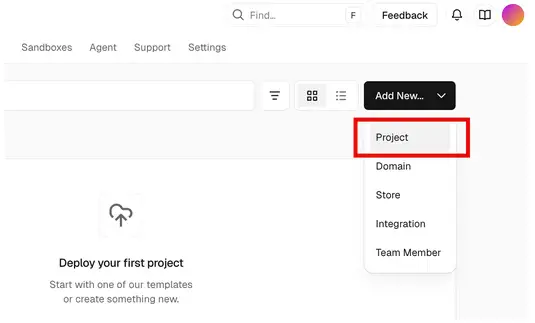
- Find your MVP repository in the list and click Import.
If you haven’t properly connected GitHub yet, go ahead and follow the steps from their documentation Deploying GitHub Projects with Vercel

Vercel auto-detects your project type and fills in the build settings
- Vercel is usually correct, but verify the settings match your project.
If Your Project Has…
Framework Preset
Build Command
Output Directory
vite.config.ts or vite.config.js
vite.config.ts or vite.config.js
vite build
dist
next.config.js or next.config.ts
Next.js
next build
.next
server.js + public/ folder
Other
(empty or custom)
public
react-scripts in package.json
Create React App
react-scripts build
build
This is what it looks like for our TutorMatch app:
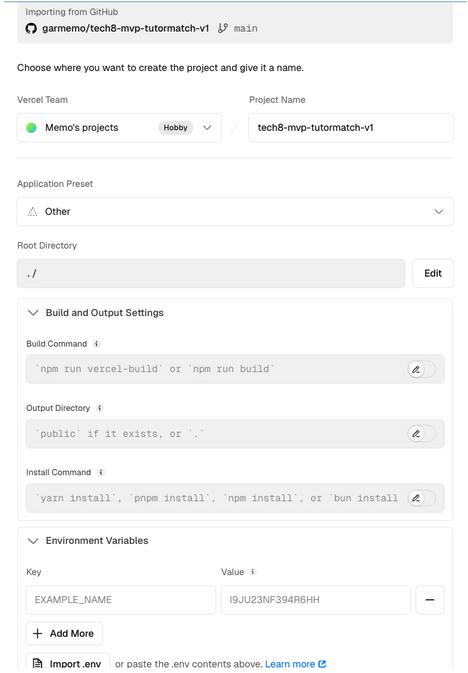
- If Vercel detected the wrong framework, click Build & Output Settings to override.
The Build Command and Output Directory are the two most important fields. If you’re unsure, check what npm run build produces locally — look for a dist/, build/, or .next/ folder after running it.
3. Configure Environment Variables
This is the most important step. Your app needs API keys to function, and they must be set in Vercel, not in your code.
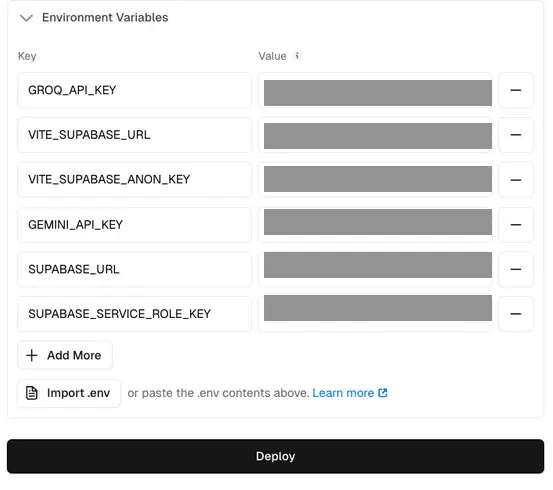
- In the project setup screen, click on Environment Variables.
- You have two options:
- Import .env – Click “Import .env File” and select your local .env file. Vercel reads all the key-value pairs automatically.
- Add manually – Type each key name and paste its value one at a time.
- Make sure you add every key your app needs, both frontend and backend env variables!
In Codespaces, your keys lived in .env OR GitHub Secrets. In production, they live in Vercel’s environment variable settings. This is the same concept, different location.
This is what it looks for us:
Note: When you learn how to add payments in later units, you’ll need to come back to this screen to add your Stripe keys. For now, the keys you added during development are all you need.
4. Deploy
- Click Deploy.
Vercel pulls your code from GitHub, installs dependencies, builds your app, and assigns a URL. This takes 1-3 minutes. You can watch the build logs in real time.
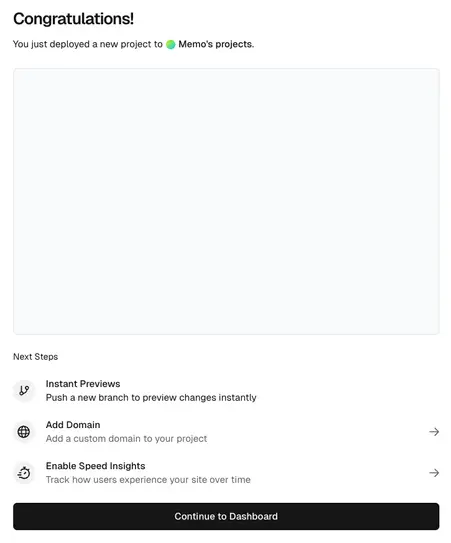
When it finishes, Vercel may show you a confirmation screen with a link to navigate to the Vercel Dashboard.
Go ahead. Here you will see more details about your app like
- your URL
- checklist that you can start doing for best practices recommendations that we will go through in later steps
- Observability panel that we will go through later
- Analytics panel that we will also go through later
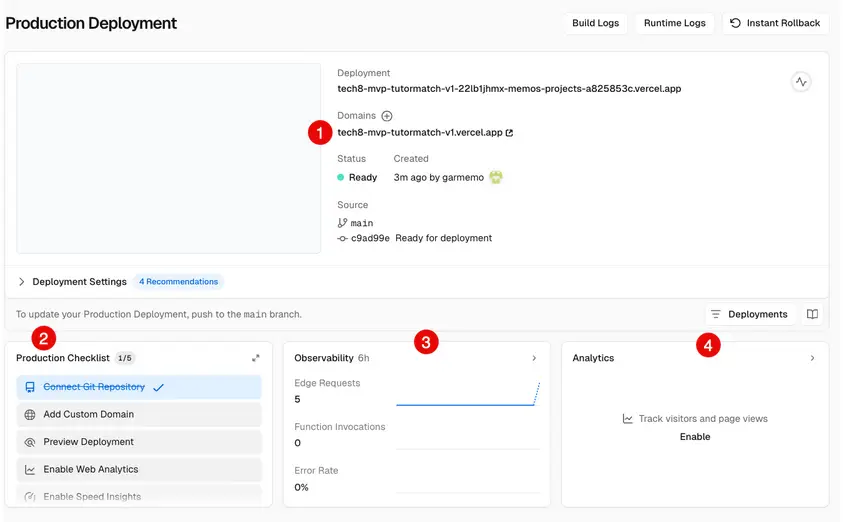
The URL is your production URL. Unlike your MVP app in Github Codespaces, where the URL changed, here in Vercel your URL will remain static and it will stay active whether your computer is on or off.
You can open the production URL anywhere, so go ahead and open on your phone to verify that your app is on the internet!
Congratulations!
5. Add Redirect URLs to Supabase
When your app is deployed to Vercel, you need to tell Supabase that your Vercel URL is a trusted redirect destination, otherwise authentication callbacks will fail. We added our Github dev redirect, but we must now add our Vercel URL as a redirect.
- Go to your Supabase Dashboard → Authentication → URL Configuration and you’ll see two fields:
- Site URL — set this to your Vercel production URL: https://your-app.vercel.app
- Redirect URLs — add both your Vercel URL and your Codespaces URL. You should already have your Codespace URL. You can replace that with a wildcard for github.dev, so any new codespace will work. Remove what is there and add these:
https://your-app.vercel.app
**https://*.github.dev/**
The wildcard /** at the end is important — it covers all route, which will be needed when you add payments.
6. Turn Email Confirmation On in Supabase
When we added User Authentication in Supabase, we turned off Email Notification in Supabase. We now want to turn it back on for production.
- Go to Supabase Dashboard → Authentication → Signin/Providers.
- Toggle the Confirm Email switch to ON.
6. Verify Your Deployment Works
Visit your live URL and test:
- Does the page load correctly? (You should see your login page)
- Can you create a new account and log in?
- After logging in, test your AI feature. Does it respond?
If something doesn’t work, check the troubleshooting section below. Build errors are normal on the first deployment.
7. Test from a Different Device
- Share your URL with a teammate or friend.
- Ask them to open the URL on their phone or computer and try creating an account and using one feature of your app.
This is the first time someone has accessed your app without Codespaces running. If it works, your app is live.
Want a custom domain? By default, your app’s URL will be automatically generated like your-app-name.vercel.app. But If you want a branded URL like tutormatch.app, check out the optional challenge at the end for a step by step guide on how to do this. You can also just try doing it yourself using Vercel’s guide in the Deployment checklist.
Troubleshooting
Click each problem below to show the possible solution.
Build fails on Vercel
Click into the failed deployment and read the build logs.
Common causes:
- missing dependency in package.json
- a typo in an import path
- a missing build script.
Run npm run build in Codespaces first and if it fails locally, it will fail on Vercel too.
"Serverless function crashed" or API routes return 500
Your server file probably isn’t exporting the Express app.
Add:
- export default app; for (ES modules) or
- module.exports = app; for (CommonJS)
at the end of your server file in the api/ directory.
This is the single most common deployment issue.
Environment variables not loading
- Go to Vercel project → Settings → Environment Variables.
- Verify every key name matches exactly what your code expects (case-sensitive).
Remember: VITE_ prefixed variables are for frontend code only.
Backend API keys like GEMINI_API_KEY or GROQ_API_KEY should NOT have the VITE_ prefix.
Page loads but AI feature returns errors
- Check the Vercel Logs tab (Deployments → click a deployment → Function Logs).
- Look for “API_KEY is not defined” or similar.
- If found, add the missing key in Vercel’s Environment Variables.
- Check your local (codespace) .env file locally to see which keys your app expects.
502 or 500 errors on every page
Your Express server may have a hardcoded port.
Change app.listen(3000) to app.listen(process.env.PORT) and make sure PORT is included in your environment variables.
CORS errors in browser console
You have hardcoded URLs in your frontend (like http://localhost:3001/api/…).
Change them to relative paths (/api/…).
Relative paths avoid CORS issues entirely.
CSS, images, or static files missing
Vercel ignores express.static() in production and serves static files from the build output directory.
If CSS or images are missing, verify they are included in the dist/ folder after running npm run build.
For images, make sure they are in the public/ folder or imported in your React code.
"Module not found" errors
A dependency is missing from package.json.
Run npm install in Codespaces and push the updated package-lock.json to the main branch.
Login page doesn't appear
Verify that your Supabase Auth redirect URLs include your new Vercel URL.
Go to Supabase dashboard → Authentication → URL Configuration and add your .vercel.app URL.
Auth redirect goes to Codespaces URL or localhost
Update Site URL and Redirect URLs in Supabase Auth settings to your Vercel URL.
Keep your Codespaces URL in the list so development still works.
Deployment succeeds but app shows blank page
Your build output directory in Vercel settings doesn’t match where npm run build puts files.
Check:
- Vite uses dist/,
- Create React App uses build/.
Update the Output Directory in Vercel’s Build & Output Settings.
Vercel can't detect your framework
Make sure your vercel.json file exists in the project root (you created this in Activity 1).
If API routes still don’t work, try adding a builds section:
					{
    "builds": [{
        "src": "api/index.js"
        "use": "@vercel/node"
    }],
    "rewrites": [{
        "source": "/api/(.*)",
        "destination": "/api"
    }]
}
Vercel function times out
With Fluid Compute (enabled by default on new projects), functions can run up to 300 seconds (5 minutes) on the Hobby plan.
Without Fluid Compute, the limit is 60 seconds.
If your AI calls are still timing out, consider simplifying the prompt or adding a loading indicator and timeout message for the user.
Auto-deployment
In building your MVP using GIthub, you learned about branches for organizing your work. Now branches have real consequences: pushing to main means your live app changes instantly.
The typical Github production workflow is as follows:
- main branch = production. Connected to Vercel. Every push auto-deploys.
- feature branches = safe space for new work. Experiment here.
Never push untested code directly to main once it’s connected to your deployment platform.
A bad push breaks your live app for every user.
ACTIVITY 3
Test Auto-Deployment
Estimated Time: 15 Minutes
1. Create a New Branch and Codespace
- Go to GitHub and navigate to your MVP repository
- Click on the main dropdown at the top left of the repository and view all branches.
- Create a New branch.
- You can name it: test-auto-deploy
- Create a new Codespace for this branch and open it.
2. Make a Small Change to Your App
- Make any small visible change like update a heading or button text so you can easily test that it worked.
We will update the Page title from “TutorMatch” to “TutorMatch – TESTING AUTODEPLOY”.
We found it in the App.jsx file.

3. Commit Change
- Commit your change in Codepsace with a descriptive message and push to your test-auto-deploy branch.
- Go back to GitHub. You should see a button that tells you that there was a push done.
- Click on the button to create a Pull Request or simply navigate to the Pull Requests tab.

- Add a title and description
- Click Create pull request.
- Click Merge pull request and confirm.
Once your confirm the merge in Github, you should see
- the history
- more information specific to Vercel This was added because of the Vercel integration.
Hopefully there are no conflicts and you’re able to successfully merge the pull request.
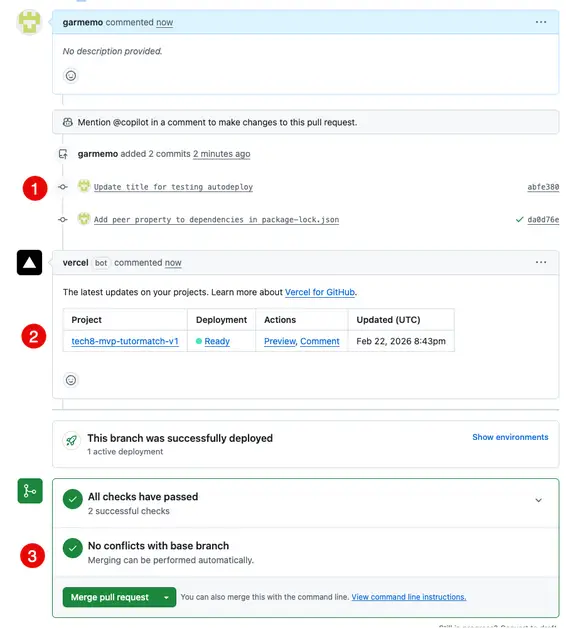
4. Check Update in Vercel
- Go to your Vercel dashboard.
- Click on Deployments for your project.
You should be able to see two new rows:
- One that previews a change done
- One for the Production build. The production build may have a status of “building” or “ready”.
Once “ready” you can go to your URL and see the changes done.
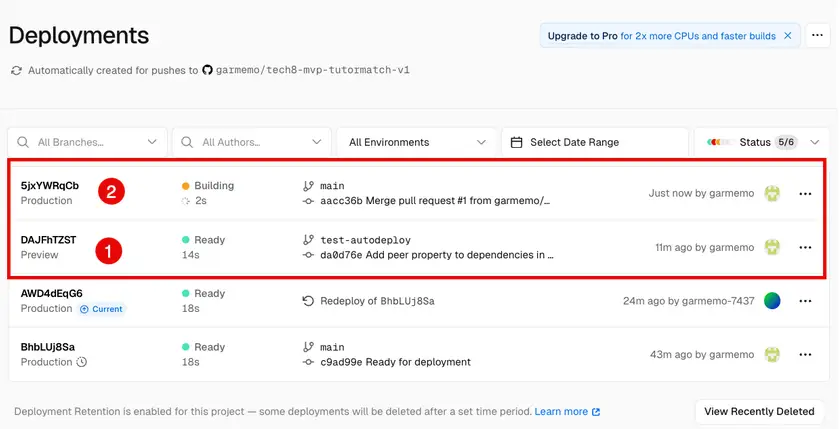
- Once it finishes, refresh your live URL to see the change
4. Update Again to Back Out the Change
We don’t really want a title with TESTING DEPLOYMENT. Although there is a rollback option in Vercel, it is still going to look to the GIthub repo and pull the current main branch, so you have to go through the same steps to back out the change.
- Go back to Codespace, change the title back.
- Commit and push the change.
- Create a pull request and merge.
- Check again in Vercel that the title has changed back to the original.
Secure Your App for Production
You’ve been building security progressively in your app throughout the program, such as:
- Storing API keys in GitHub Secrets (keeping it out of your code and commit history)
- Making API calls server-side (keeping the key off the browser entirely)
- Adding user authentication using Supabase so only logged-in users can access your app
- Added API middleware security so no one besides your app can make API calls.
These are important protections, but they don’t cover everything.
An authorized app user could still write a script that calls your AI feature 500 times in a minute, using up all your your Groq / Gemini / Hugging Face API credits or worse, costing you a lot of money.
Or your API key could expire, and without safe error handling, your users would see a raw message that will be very technical instead of a helpful message.
Vercel secures your app at the infrastructure level, protecting against things like distributed attacks, network floods, and basic web threats. These are blocked automatically.
But Vercel doesn’t know that your AI APIs route costs money per call, or that your error responses contain internal details. These are application-level concerns that only you know and can address.
The next activity adds two more layers of protection:
- rate limiting: putting a limit how many requests each user can make
- safe error handling: replacing technical errors with user-friendly messages
There are different ways to add rate limiting. Here’s how they compare:
Approach
How It Works
Tradeoff
In-memory (express-rate-limit)
Stores request counts in your server’s memory
Simple to set up. Resets when serverless functions restart. Catches rapid-fire abuse.
External store (like in the database)
Stores counts in a separate database that persists across restarts
More reliable under heavy traffic, but requires setting up and paying for an additional service.
It’s also the most complex but we highly recommend it once you have many users.
Edge middleware
Blocks requests at Vercel’s network edge before they reach your code
Fastest response, but requires learning a different coding pattern (Vercel Edge Runtime)
For your MVP, in-memory rate limiting is the practical choice. It catches the most common abuse pattern (someone clicking your AI button repeatedly or a script firing rapid requests) with minimal setup. If your app grows beyond the competition and you need rate limiting that never resets, upgrading to database storage is natural safe next step.
ACTIVITY 4
Add Rate Limiting and Safe Error Handling
Estimated Time: 20 Minutes
1. Create a New Branch and Codespace
- Go to GitHub and navigate to your MVP repository
- Click on the main dropdown at the top left of the repository and view all branches.
- Create a New branch.
- You can name it: add-security (or another descriptive name).
- Create a new Codespace for this branch and open it.
2. Add Rate Limiting to Your API Routes
In production, anyone who discovers your URL can send requests, including scripts that fire hundreds of AI calls per minute. Rate limiting caps how many requests each user can make.
- Open Copilot Chat in your Codespace and use this prompt:
Role: You’re helping me secure my Express.js app for production deployment.
Goal: Add rate limiting to prevent API abuse on my routes.
Context: My app uses Express.js with API routes under /api/. I already deployed the app using Vercel.
API Limit per user: Limit to 5 requests per minute per user. Return status 429 with “Too many requests. Please wait a moment.”
Storage: Use in-memory storage to track requests.
- Review the generated code. This is what it generated for us in our index.js file.
					const RATE_LIMIT_WINDOW_MS = 60 * 1000
const RATE_LIMIT_MAX_REQUESTS = 5
const requestLog = new Map()

const getUserKey = (req) => {
  const forwardedFor = req.headers['x-forwarded-for']
  if (typeof forwardedFor === 'string' && forwardedFor.length > 0) {
    return forwardedFor.split(',')[0].trim()
  }

  return req.ip || req.socket?.remoteAddress || 'unknown-user'
}

const apiRateLimiter = (req, res, next) => {
  const now = Date.now()
  const userKey = getUserKey(req)
  const userTimestamps = requestLog.get(userKey) || []

  const validTimestamps = userTimestamps.filter(
    (timestamp) => now - timestamp < RATE_LIMIT_WINDOW_MS
  )

  if (validTimestamps.length >= RATE_LIMIT_MAX_REQUESTS) {
    const oldestTimestamp = validTimestamps[0]
    const retryAfterSeconds = Math.max(
      1,
      Math.ceil((RATE_LIMIT_WINDOW_MS - (now - oldestTimestamp)) / 1000)
    )

    return res
      .status(429)
      .set('Retry-After', String(retryAfterSeconds))
      .json({ error: 'Too many requests. Please wait a moment.' })
  }

  validTimestamps.push(now)
  requestLog.set(userKey, validTimestamps)
  next()
}

// Middleware
app.use(cors())
app.use(express.json())
app.use('/api', apiRateLimiter)
You should be able to see a few key pieces added by Copilot. The exact variable names may differ but they should have something like:
- WINDOW_MS variable: to control how long the time window lasts: 60*1000 = 60,000 milliseconds which is one minute
- MAX_REQUESTS variable: to control how many requests are allowed per window. For our app = 5
Copilot may generate these variables as limit or max depending on the version of Express but both should work. - Custom message for when the limit is hit. For our app = “Too many requests. Please wait a moment”.
3. Test Rate Limit in Codespace
You can test the rate limit either in Codespaces or by merging the code and then testing it in production. Since we’re still validating the feature, it’s better to test it in Codespaces.
- Start your app in Codespaces (npm run dev) and preview it in a browser tab.
- Log in and navigate to your AI feature.
- Click the AI feature button 20+ times in quick succession.
- You should see “Too many requests. Please wait a moment.” after hitting the limit.
- Wait one minute and try again. It should work normally.
If the message doesn’t appear, you can debug it in Copilot.
NOTE: Vercel runs your backend as serverless functions, so the in-memory rate limiter resets when instances restart. This is fine for MVP traffic. It can catch rapid-fire abuse like someone clicking a button 50 times.
4. Add Safe Error Handling
In Codespaces, detailed error messages help you debug. In production, those same details tell an attacker how your code is structured.
Safe error handling shows users a friendly message while logging technical details on the server. You are not removing the error messages, you are just redirecting them so attackers cannot see them.
- Prompt Copilot to add try/catch exception handling. Here is a sample prompt:
Help me add production-ready error handling to my Express.js API.
Replace raw error messages with safe, user-friendly responses.
Context: My app calls the Groq API from Express routes. In production, I don’t want users seeing stack traces or internal details.
Wrap route handlers in try/catch. Log full errors with console.error() server-side. Send users the message “Something went wrong. Please try again.” Keep any Groq API errors helpful to user without displaying any internal details.
- Review the generated code.
You should see a try/catch block where the catch logs the full error with:
- console.error() (server-side only)
- a generic message to the user.
Known errors like Groq or Gemini API failures get specific, helpful messages instead.
5. Test Error Handling
Since we are using Codepsace secrets for all our API keys, we’ll make a direct edit in our code.
- Find the server code calling the Groq (or other LLM) API.
- Change GROQ_API_KEY (or equivalent variable) to GROQ_APIKEY.
- Try your AI feature.
- You should see an error message that the API failed. You should NOT see a stack trace.
- Check your terminal. The full error details should be logged there.
- Change the code back to GROQ_API_KEY and try again to make sure it works again.
6. Commit and Deploy Changes
- In your Codespace, commit your rate limiting and error handling changes with a descriptive message.
- Push to your add-security branch.
- Go to GitHub. You should see a banner suggesting to create a Pull Request.
- Click Compare & pull request.
- Add a title describing your changes (e.g., “Add rate limiting and safe error handling”).
- Click Create pull request.
- Review the changes, then click Merge pull request and confirm.
- Go to your Vercel dashboard. You should see a new deployment building automatically.
7. Verify on Your App
After the deployment finishes, verify on your live URL.
- Log in and use your AI feature normally. It should work.
- Click the AI feature rapidly 20+ times. You should eventually see “Too many requests”.
- Wait a minute, try again. It should work normally.
Troubleshooting
Check below for some issues you might encounter when adding security to your app. Click on each issue to see how you might resolve it.
Rate limiting doesn't trigger
Make sure the middleware is applied to your API routes, not just the static file routes. The express-rate-limit middleware should be added before your route handlers
express-rate-limit is not defined
Run npm install express-rate-limit in your Codespace terminal and push the updated package.json and package-lock.json.
Rate limiting works locally but not on Vercel
Serverless functions may restart between requests. The rate limiter still works against rapid-fire abuse (many requests in quick succession). This is expected behavior for an MVP
Error messages still show stack traces
Make sure your catch block sends a generic message to res.json() and logs the full error with console.error(). Check that you don’t have another error handler that overrides yours.
Monitoring Your App
Your app is deployed and secured. Before you share your URL with the world, you need to do two more things:
- Set up monitoring so you can see what happens after launch
- Verify that your security is actually working. Don’t just assume it is.
AI calls are different from regular API requests because they cost money per call, take variable amounts of time, and can produce unexpected outputs. A standard “request succeeded” log doesn’t tell you whether the AI response was useful, how long the user waited, or how much the call cost. Structured logging captures these details so you can answer those questions from your Vercel dashboard.
Vercel Dashboard
Your Vercel dashboard is your window into how your app is performing in production. Navigate to your project on vercel.com and explore three areas.
Every deployment is listed with a timestamp and status (success or failure). Click into any deployment to see the full build log. This is where you debug deployment failures. If a build broke, the logs tell you why.
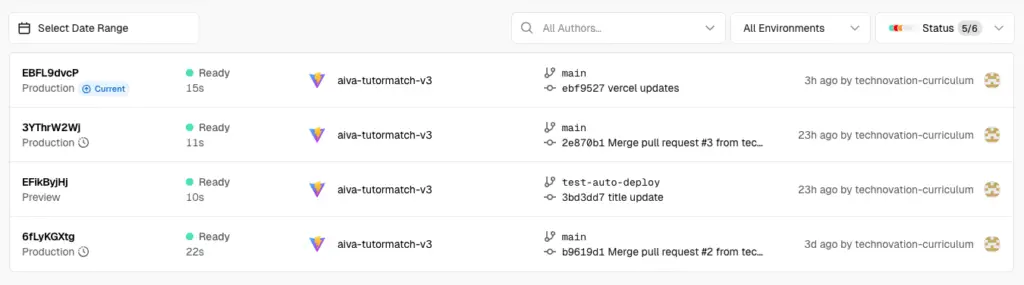
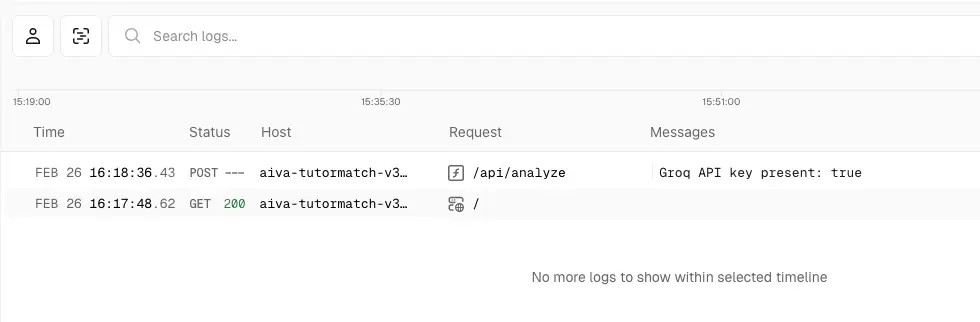
Server-side logs appear here in real time. These show requests to your API routes, including console output and errors.
Click on any log entry to see details: the request URL, response status code, and execution time. Use the filters on the left to narrow by status code (find all 500 errors), by route (see only AI requests), or by time range.
You can also click the “Live” toggle to watch logs stream in real time. This is useful when you’re testing your app and want to see what’s happening on the server as you click.
Log retention: As of February 2026, the runtime logs are available for approximately 1 hour on the Hobby (free) plan. This is long enough to test and debug, but logs won’t be there tomorrow. Check the Logs tab shortly after testing your AI feature.
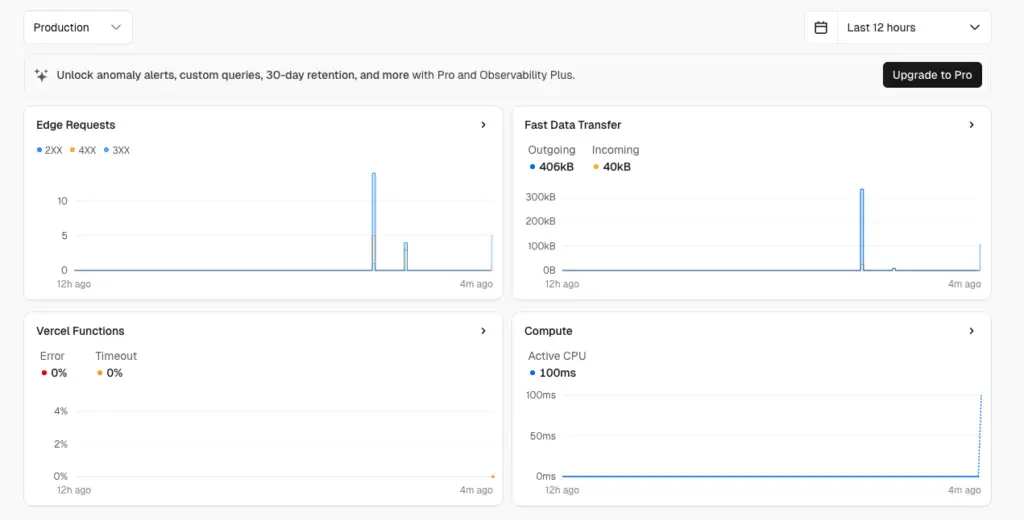
The Observability section goes beyond individual logs., showing you patterns across all your requests: which routes are slowest, which have the highest error rates, and how your function performance changes over time.
This tab is available on all plans, including the free Hobby plan.
Observability Pro and Plus plans unlock custom queries and anomaly alerts.
You don’t need it for your MVP; the default views are enough.
Vercel tracks the following event types for Observability:
- Edge Requests
- Vercel Function Invocations
- External API Requests
- Routing Middleware Invocations
- AI Gateway Requests
ACTIVITY 5
Monitor, Verify, and Launch
Estimated Time: 25 Minutes
1. Create a New Branch and Codespace
- Go to GitHub and navigate to your MVP repository
- Click on the main dropdown at the top left of the repository and view all branches.
- Create a New branch.
- You can name it: add-monitoring (or another descriptive name).
- Create a new Codespace for this branch and open it.
2. Add a Timing Wrapper to Your AI Route
The first thing you want to know about AI calls in production is how long they take. A user waiting 15 seconds may assume the app is broken.
Ask Copilot to help you add the timing wrapper.
I want to add monitoring to my Express.js AI route.
I want to track how long each Groq API call takes in production.
My AI route is in [index.js] and calls the Groq API. I’m deploying to Vercel.
Record Date.now() before and after the AI call. Calculate response time in milliseconds. Log it with console.log() including the route name.
3. Test Timing Logging in Codespace
- Start your app in Codespaces and trigger an AI call.
- Check your terminal output for the response time log.
- Don’t deploy yet. You’ll add more logging in the next step and deploy once.
4. Expand to Structured JSON Logging
Now expand your timing code to capture the full picture. Structured logs use JSON format so you can search and filter them in Vercel’s dashboard. Prompt Copilot to generate the necessary code.
Replace basic console.log with structured JSON logs I can search in Vercel’s dashboard.
I already have a timing wrapper that measures responseTime for my Groq API call.
Log one JSON object per AI call using console.log(JSON.stringify(data)) with:
timestamp (ISO),
action name,
inputLength (character count, not content),
responseTime (ms),
success (true/false),
error (message or null)
Example (for TutorMatch):
When a student searches for tutor recommendations, the log might look like this. Your app will have different action names. Adapt to whatever your AI feature does.
					{
  "timestamp": "2026-02-16T14:32:01Z",
  "action": "get_tutor_recommendations",
  "inputLength": 145,
  "responseTime": 2340,
  "success": true,
  "error": null
}
Each field serves a specific purpose:
- timestamp – Lets you correlate user-reported issues (“it broke at 3 PM”) with what happened in the logs
- action – Shows which AI features are used most, and which ones are ignored
- inputLength – Unusually large inputs may indicate abuse. Logging length (not content) protects user privacy
- responseTime – Helps you spot performance issues before users complain. Consistent times over 10 seconds may need attention
- success – Tells you your AI failure rate at a glance. 5% is normal, 50% is a crisis
- error – When calls fail, the error message tells you why without needing to reproduce the issue
5. Test Expanded Logs
- Run your app again in Codespace.
- Trigger an AI call.
- Check the terminal for the JSON logging.
6. Commit and Deploy Changes
Now commit an deploy both your timing and structured logging changes together:
- Commit your logging changes with a descriptive message.
- Push to your add-monitoring branch.
- Go to GitHub. You should see a banner suggesting to create a Pull Request.
- Click Compare & pull request.
- Add a title describing your changes.
- Click Create pull request.
- Review the changes, then click Merge pull request and confirm.
- Go to your Vercel dashboard and confirm a new deployment starts in the Deployments tab.
- Once the deployment finishes, open your live app, log in, and trigger 2-3 AI calls.
- Go to Vercel → Logs and look for your structured JSON entries
- Verify the timestamp, action, responseTime, and success fields appear correctly
- Each log entry should appear as rows. Click the arrow to expand and see your JSON fields.
- If you see [Object object] instead of JSON, update your code to use console.log(JSON.stringify(logData)) instead of console.log(logData).
Remember, logs are available for about 1 hour on the free tier, so check them shortly after testing.
7. Enable Web Analytics
Vercel offers free Web Analytics that track page views and visitor data. Setup takes a few minutes and gives you real visitor metrics you can reference in your project pitch.
- Go to your Vercel project dashboard
- Click the Analytics tab.
- Click Enable for Web Analytics.
7. Add Analytics in Codespace
- If you still have your add-monitoring branch, open the associated codespace. Otherwise, create a new branch for your repo and open a new codespace.
- In your codespace, install the analytics package by running npm install @vercel/analytics in the terminal.
- Add the analytics component to your app.
- If you’re using React or Next.js,
- add import { Analytics } from ‘@vercel/analytics/react’import to App.jsx
- Add <Analytics /> as a component inside your App.jsx return, typically just before the closing tag.
- For plain HTML/JS apps, follow the instructions Vercel shows after you click Enable
Commit.
- If you’re using React or Next.js,
- Commit, push and merge your changes. The next deployment will start collecting data.
Note: Simply enabling analytics in the dashboard is not enough. You also need the @vercel/analytics package in your code for data to flow. If you skip steps 3 and 4, the Analytics tab will stay empty.
The Hobby plan includes 2,500 events per month for free (as of February 2026), more than enough for an MVP. After setup, you’ll be able to see how many people visit your app, which pages they view, and where they come from.
8. Verify Security with DevTools
Now use DevTools to confirm your production app is actually secure. Don’t just assume it is.
- Open your deployed app (the .vercel.app URL, not your Codespace) in the browser.
- Press F12 to open DevTools (or right-click Inspect).
- Switch to the Network tab.
- Clear the network log (click the clear icon).
- Log in to your app and use your AI feature.
- Watch the network requests appear.
Inspect each of the following. These are the three security checks every deployed app should pass.
Check 1: Are your API keys hidden?
Click on the request that triggers your AI feature.
- The Request URL should go to YOUR backend: https://your-app.vercel.app/api/ai-query. It should NOT go directly to api.groq.com or any external API. If it does, your frontend is calling the AI API directly and your API key may be exposed.
- Click the Headers tab and look at the Request Headers. Your Groq API key should NOT appear in any header. Your backend makes the external call server-side. The browser never sees the key.
- Check the URL query parameters. There should be no ?key=AIza… in the URL.
If your API key appears anywhere in the browser request, stop. Your key is exposed and anyone inspecting your site can steal it. Go back to your code and make sure all external API calls happen on the server side.
Check 2: Is the authentication token being sent?
On the same request, look at the Request Headers again. You should see:
Authorization: Bearer eyJhbGciOiJIUzI1NiIs…
This is the Supabase session token your frontend sends. It proves the request came from a logged-in user. The long string of characters is a JSON Web Token (JWT), a standard format for transmitting authentication information securely.
If the Authorization header is missing, go back to your auth code and verify your frontend is calling getSession() and including the token with each API request.
Check 3: Does rate limiting work in production?
- Keep DevTools open on the Network tab.
- Rapidly click your AI feature button 10+ times.
- Watch the Network tab: the first several requests should return status 200 (success).
- After hitting the limit, requests should return status 429 (Too Many Requests).
- Your app should display the “Too many requests. Please wait a moment.” message.
If all 20+ requests return 200 with no rate limiting, the serverless function may have restarted between requests. Try clicking faster. The rate limiter works best against rapid-fire bursts. For an MVP, this level of protection is appropriate.
Reviewing Production Costs
Your app uses services that have free tiers with limits. Knowing those limits prevents surprise charges.
Set up billing alerts where available. Some free tiers won’t let you set alerts until you are on a paid plan.
Vercel
Free Tier – 100GB bandwidth, 4 hours Active CPU, 1M function invocations per month
Cost – If exceeding bandwidth or function limits
Where to Check – Vercel dashboard → Usage
Billing Alert – Project → Settings → Usage. Review the Hobby tier limits. Vercel notifies you when you approach them.
Supabase
Free Tier – 500MB database, 1GB file storage, 50,000 monthly active users
Cost – If exceeding storage or user limits
Where to Check – Supabase dashboard → Settings → Billing
Billing Alert –Go to Settings → Billing. Set usage alerts for database and storage.
Groq API
Free Tier – Free tier with rate limits (varies by model)
Cost – High-volume API calls beyond free tier
Where to Check – Groq dashboard → Usage
Billing Alert – Go to Settings → Billing → Limits in your Groq Console.
Pre-launch Checklist
Before sharing your app with the world, walk through this checklist. It’s organized into three groups: does your app work, is it safe, and can you see what’s happening after launch.
✅ Does it work?
- Live URL loads correctly
- Login and signup work (create account, log in, log out)
- AI feature works in production after logging in
- App works on a different device or browser (share the URL with a teammate to double-check)
✅ Is it safe?
- API keys are NOT visible in DevTools Network tab
- Authorization header is present on API requests
- Rate limiting triggers after rapid requests
- Environment variables are set in Vercel, not hardcoded in your code
✅ Can you see what’s happening?
- Structured JSON logs appear in Vercel Logs tab when you trigger an AI call
- Web Analytics enabled
- Cost dashboards checked for Vercel, Supabase, and Groq
If any item fails, fix it before sharing your URL.
If all items pass, your app is ready to share.
Troubleshooting
Logs aren't showing in Vercel
Make sure you’re using console.log() in your server-side API routes, not in client-side code. Client-side logs appear in the browser, not in Vercel.
Structured logs appear as [Object object]
Use console.log (JSON.stringify (logData) ) instead of console.log(logData).
AI calls are slow in production
Check the responseTime in your logs. If consistently over 10 seconds, consider adding a loading message and splitting the request,
Vercel function times out
With Fluid Compute (enabled by default on new projects), functions can run up to 300 seconds (5 minutes) on the Hobby plan. Without Fluid Compute, the limit is 60 seconds. If your AI calls are still timing out, add a loading indicator and timeout message for the user.
API key appears in browser requests
Your frontend is calling the external API directly instead of going through your backend. Update your frontend to call your Express route (e.g., /api/ai-query).
Web Analytics not showing data
Data appears after the next deployment and a few page visits. Wait a few minutes after enabling and visiting your site
Your app is live at your-app-name.vercel.app. That works for the competition, for user testing, and for your pitch. But if you want your app to feel like a real business, a custom domain makes a difference. tutormatch.app communicates professionalism in a way that tutormatch-mvp.vercel.app doesn’t.
Vercel’s free tier supports custom domains at no extra charge (up to 50 per project, with automatic HTTPS). The only cost is the domain name itself.
ACTIVITY 6
(OPTIONAL) - Connect a Custom Domain
Estimated Time: 15 Minutes
1. Get a Domain nName
Choose one of these options to get your own domain.
Option
Cost
Process
GitHub Student Developer Pack
Domain registrar
If you have a school email, you can sign up through your GitHub account. Apply at education.github.com/pack. Includes free domains from Namecheap (.me), Name.com (.live, .studio, .app, .dev, and 20+ others), and .tech domains.
GitHub Student Developer Pack
~US$10-15/year
Purchase from Namecheap, Cloudflare, or Google Domains. Prices vary by extension. .com costs more than .site or .tech
Purchase from Namecheap, Cloudflare, or Google Domains. Prices vary by extension. .com costs more than .site or .tech
~US$10-20/year
Search and purchase directly in your Vercel dashboard (Settings → Domains). Vercel configures DNS automatically. The simplest option if you’re willing to pay.
2. Connect Your Domain to Vercel
- Go to your Vercel project → Settings → Domains
- Click Add Domain and type your domain name (e.g., tutormatch.app)
- Vercel shows the DNS records you need. You’ll see either:
- An A record pointing to Vercel’s IP address (for root domains like tutormatch.app).
- A CNAME record pointing to cname.vercel-dns.com (for subdomains like www.tutormatch.app).
- Go to your domain registrar’s DNS settings and add the records Vercel provided.
- Wait for DNS to propagate. This usually takes under 30 minutes but can take up to 48 hours.
3. Update Your Supabase Auth Settings
Don’t skip this step. If you do, login will break on your custom domain.
- Go to Supabase dashboard → Authentication → URL Configuration.
- Add your custom domain URL (e.g., https://tutormatch.app) to both the Site URL and Redirect URLs.
- Keep your .vercel.app URL in the list too. It still works as a backup.
4. Verify Everything Works
- Visit your custom domain in a browser. Your app should load with HTTPS (look for the lock icon).
- Try logging in. If it redirects to your Codespaces URL or your .vercel.app URL, you missed Step 3.
- Test your AI feature (and other API integrations) to confirm everything works end-to-end.
Troubleshooting
Domain shows "DNS not configured"
Double-check the A record or CNAME record in your registrar’s DNS settings. Make sure you copied the values from Vercel exactly.
SSL certificate not working
Wait. Vercel provisions SSL automatically once DNS propagates, but this can take up to an hour.
Login redirects to wrong URL
Update Supabase Auth redirect URLs to include your custom domain. Keep both the .vercel.app and custom domain URLs in the list.
Reflection
Well, you did it! Your app is deployed and live! Congraulations! Take a few moments to think about these questions:

Monitoring
The Journey
Next Steps
Key Terms
- Deployment: Making your app available on the internet at a permanent URL. Unlike a preview link, a deployed app stays live even when your computer is off.
- Production Environment: The live version of your app that real users interact with, as opposed to the development environment where you write and test code.
- Environment Variables (Production): API keys and secrets stored in your hosting platform’s settings instead of in your code. In Vercel, these are set in the project dashboard.
- Auto-Deploy: Vercel automatically rebuilds and redeploys your app whenever you push code to your main branch on GitHub.
- Rate Limiting: Restricting how many requests a user can make in a given time period. Prevents abuse and controls API costs.
- Safe Error Handling: Returning generic, friendly error messages to users while logging the full technical details on the server. Prevents internal details from being exposed to potential attackers.
- Structured Logging: Recording events in your app as organized JSON data instead of plain text. Makes it possible to search, filter, and analyze what happens in production.
- Observability: The ability to understand what’s happening inside your running app from the outside, through logs, metrics, and monitoring dashboards.
- Serverless Functions: Backend code that runs on-demand in response to requests, without you managing a server. Vercel converts your Express.js API routes into serverless functions automatically.
- Custom Domain: A personalized web address (like tutormatch.app) that you own and point to your Vercel deployment, replacing the default .vercel.app URL.
- DNS (Domain Name System): The system that translates domain names (like tutormatch.app) into IP addresses that computers use to find servers. When you connect a custom domain, you configure DNS records to point to Vercel.
Additional Resources
Deployment
- Vercel Documentation: Getting started, environment variables, and deployment configuration
- Vercel Environment Variables Guide: How to configure secrets for production
- Adding a Custom Domain: Connect your own domain to your Vercel project
Security
- express-rate-limit: Rate limiting middleware for Express.js
- Vercel Firewall Documentation: Built-in DDoS and WAF protections
Monitoring
- Vercel Runtime Logs: Understanding function logs and runtime output
- Vercel Observability: Dashboard for monitoring performance and errors
- Vercel Web Analytics: Track page views and visitor data
Cost Management
- Groq API: API pricing
- Supabase Pricing: Free tier details and limits
- Vercel Pricing: Free tier details and limits