- Turn user feedback into an actionable test and bug-fixing plan using a systematic framework
- Use AI-assisted debugging and apply the “teach me” pattern to understand fixes
- Write simple tests to verify fixes work and catch potential regression issues
- Use browser DevTools to identify and diagnose problems
- Frontend: A React app with all screens, navigation, and AI features
- Secure Backend: API key protected with GitHub Secrets, not exposed in code
- Students have completed MVP scope, wireframes, and have user testing feedback
In earlier lessons, you used GitHub Codespaces and Copilot to vibe-code your Founder’s Toolkit. You described what you wanted, Copilot generated the code, and you iterated until it worked. You may have even used Copilot to help you with some AI-assisted debugging. That approach taught you the fundamentals. In Tech Foundations, you explored using Google AI Studio Build Mode as an alternative approach.
The Founder’s Toolkit helped you learn and store your research. Now you’re building your MVP for actual users. Your research carries forward, but the toolkit code stays behind.
Building Your Front End
In MVP and Prototypes, you created a prototype that could have different levels of fidelity. It could be a paper sketch, sticky notes, or basic wireframes in tools like Figma or Miro. You tested it with real users and gathered feedback on your core flow and value proposition.
Now you’re ready to turn it into working code so you can test whether the actual experience delivers on that promise.
Since your prototype exists as a visual representation, you need to translate visual elements into descriptions that AI tools can understand (which you’ve already learned).
Choosing a Prototype Tool
Since the term “vibe-coding” became popular last year (2025), new platforms have exploded. These tools let anyone go from idea description to deployed app in minutes.

Reached over $100M in annual recurring revenue in just eight months, becoming the fastest software company to do this.

Replit's revenue also grew by 10x when they launched their AI coding Agent (like GitHub’s Copilot)

is another popular AI-assisted code editor that you run locally on your computer

has over 7M developers using it to develop apps
All these platforms specialize in different areas and are good options. We are going to continue using Github codespaces and Copilot, for these reasons:
- You already know it.
- It’s free. Unlike Lovable ($20-100/month) or Cursor ($20/month), Codespaces is (mostly) free with generous credits
- Pushing changes to Github is seamless
- You have control over the code and architecture of your app
You are certainly welcome to use a different platform. If you are following the activities in this lesson, you might have to adapt to fit the particular platform you are using.
The Iterative Approach with Vibe-coding
When vibe-coding, you need to resist the temptation to describe everything at once. While platforms like Google AI Studio have powerful models available like Gemini 3 Pro that can reason and break long instructions into structured steps, there is a big possibility that the AI may still decide to move in a separate direction. Additionally, if you ask the LLM to create your entire app in one step, chances are that something won’t work exactly as you want it. It can be difficult to pinpoint where the problem is when you’ve got an entire app to debug. Coders generally work on apps in chunks – add a feature, test it, then move on to the next feature. Working with AI assistance should be no different.

We recommend to do this step-by-step such as:
- Build the UI shell first and do screen by screen and then move to navigation
- Test the screens and flow before adding more advanced features. Can you click through the app? If not, then debug.
- Add your top feature that will most likely be the AI integration.
- Test it. Does the feature work? If not debug.
- Repeat, adding more features one at a time.
This approach catches problems as they are added and makes debugging easier. If something breaks, you know which change caused it. With long prompts, it’s hard to trace where the bug happened.
In addition to adding features and testing them one at a time, we are going to be pushing our changes to our Github repository frequently. Not only does it store updates safely and securely, it also shows the progression of the project. This can be helpful for team members and collaborators, but also AI assistants.
The “AI Context” Benefit
One thing most people forget: When you use AI tools (like Gemini in AI Studio or Copilot), the AI often “looks” at your Git history to understand how the project has evolved.
- If you have three distinct pushes, the AI can see: “Oh, we moved from basic HTML to a React-based component structure in the second commit.”
- If you have one massive push, the AI just sees a wall of code and is more likely to suggest changes that conflict with your original intent.
For this reason, we’re going to push our changes to Github as we complete each step, or chunk of work, rather than building the entire app and pushing the changes then.
ACTIVITY 1
Build Your Frontend in Github Codespaces
Estimated Time: 30 Minutes
In this activity, you will begin to translate your prototype into a working application using Github Codespace and Copilot.
1. Identify your primary features (MUST-HAVES)
- Open your MVP Document from the MVP and Prototypes lesson.
- Review your MUST-HAVE column
- Choose ONE feature to build first. Ask yourself:
- Which feature represents the core value?
- To which features did my users respond better?
2. Prepare your Prototype Images for Upload
Find the screen in your prototype (from that lesson) that shows this feature. You will upload this image to AI Studio AND describe what you want. This combination of showing and telling gives the AI the best chance of generating what you need.
- Prepare your mocks ( digital wireframes or pictures):
- If your prototype is on paper, take a clear photo of that screen
- If your prototype is digital (Figma, Canva, etc.), export or screenshot that screen
- Save the image somewhere you can easily find it
- Prepare the description of your feature.
While the AI can see your prototype, it helps to explain what you want first. Look at your prototype and note:- What is the user flow?
- What does the user do first?
- What happens when they take action?
- What is NOT visible in your prototype but matters?
- Color scheme or branding preferences
- Mobile-friendly requirements
- Any behavior that happens “behind the scenes”
- What is the user flow?
- Write a few sentences describing these two points. You will use both the mocks and this written description in the next steps.
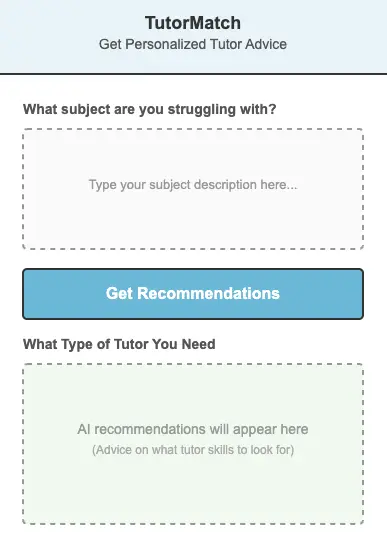
Here’s what our mock image looks like:
3. Review Your User Testing Feedback
Before building, look at the feedback from your prototype testing. This should inform you what you need to update from your original mocks.
Your coded prototype should address the critical feedback you received from users. It should not just rebuild what you showed to them and that it didn’t work.
4. Create your Repository on Github and Open Codespace
- Sign into github.com.
- Click the New button to create a new repository.
- Name it appropriately for your app.
- Set visibility to private.
- No template.
- Add Readme.
- Add .gitignore, choose Node.
- Add license, choose MIT license.
- Once it is created, you can add a description to your Readme file if you want. You can also wait and fill that out later.
- Create a new branch by clicking on main, select View all branches, then click New branch. Name it appropriately.
- Click on the branch name to ensure you are in that branch, then click on Code and then click on Create codespace on your new branch.
- Wait for the codespace to load.
5. Instruct Copilot to Start Building your UI Shell
Instead of asking for everything at once, start with ONLY the visual structure.
- To add an image of your wireframe or sketch of your screen(s):
- Drag the image into the file manager in codespaces so it is added as a file in your project.
- In the chat area, click the paper clip to attach context.
- You should see a Paste button. Click that.
- It should then allow you to select files from your file manager. Click on the image you want to attach.
- Enter a prompt in the same chat box and replace with your own MVP values. Note that Copilot can create the UI with the image alone but the more details you give, the better the result.
Here is an prompt template on the left, following by an example using our TutorMatch app.
Your goal is to help me build a React mobile friendly web app called [your app name] based on the image I have attached.
Build ONLY the UI shell for now so only do the visual structure without any functionality yet.
– [Describe the header/title]
– [Describe the input fields or form elements]
– [Describe the button(s)]
– [Describe where results will appear (placeholder for now)]
Color scheme: [describe: professional blues, warm oranges, etc.]
Layout: [single column, two columns, etc.]
For now, when the user clicks the button, just show placeholder text like “Results will appear here.” We will add real functionality in the next step.
DO NOT ADD ANY AI FUNCTIONALITY AT THIS TIME!
We will add real functionality in the next step.
Your goal is to help me build a React mobile friendly web app called TutorMatch based on the image I have attached.
Build ONLY the UI shell for now so only do the visual structure without any functionality yet.
– A header that says “TutorMatch – Get Personalized Tutor Advice”
– A text area where students can describe what subject they’re struggling with
– A button that says “Get Recommendations”
– A results section below the button (placeholder for now)
Color scheme: calming blues and greens
Layout: single column, centered
For now, when the user clicks the button, just show placeholder text saying “AI recommendations will appear here.”
DO NOT ADD ANY AI FUNCTIONALITY AT THIS TIME!
We will add real functionality in the next step.
The AI sees both your visual prototype AND your written description, giving it the full picture of what you want to build.
6. Test and Refine the Code as Necessary
Once Copilot generates the code, you can run it. Copilot should prompt you, but In the terminal window in codespaces, you will need to type:
- npm install (to install all the dependencies in package.json)
- npm run dev (to run the app itself in a browser window)
If something isn’t right, you can describe to the AI any changes or fixes necessary, such as:
- Make the header text larger
- Change the button color to green
- Add more spacing between these fields
Understand that each message will instruct Copilot to refine the code, and there is a possibility that the AI may change other things that you didn’t precisely specify. So it’s important to always be precise. This is the conversation part of vibe-coding.
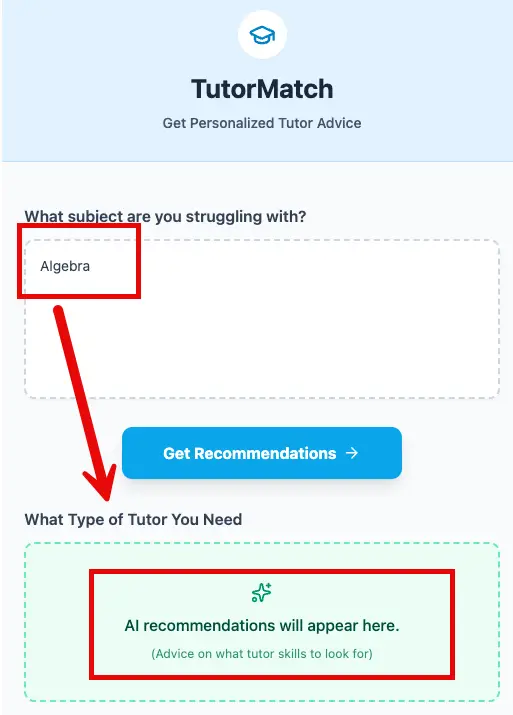
In our case, we asked the AI to add placeholders. You can see that after entering “Algebra”, it added in the results “AI Recommendations” as a placeholder because we asked it to.
Can you think of ways to improve the prompts to ask the LLM to make the fixes above?
7. Stage and Commit Changes to Repository
Using either the Codespace source control or git commands in the terminal, stage, commit, and push your changes to your GIthub repository branch.
Source control automates the steps for your If you want to type the git commands yourself, here are the commands.
git status
git add .
git commit -m “What I changed”
git push -u origin your-branch-name
This will store your initial files safely in Github, and also mark this as a first commit. This is helpful to see the incremental changes made in the project.
8. Add Basic Interactivity (still no AI)
Once your UI shell looks good, add the next chunk: basic user interaction WITHOUT AI or APIs yet. Testing with placeholder data confirms your interaction flow works before adding AI.
if something breaks later, you know it is an AI issue, not a UI issue.
In the chat, describe the next layer
For example, if building a tutoring match app with uploaded wireframes:
Now add basic interactivity:
When the user types in the input field and clicks the button:
- Clear any previous results
- Show a loading message: “Analyzing your needs…”
- After 1 second, show placeholder/mock data like:
– Look for a tutor with strong subject knowledge
– Find someone who uses visual teaching methods
– Consider a tutor experienced with your learning style
This is just to test the interaction flow.
DO NOT ADD ANY API CALLS OR ANY ACTUAL AI INTEGRATION.

9. Save your Progress to Github
Once satisfied with the entire UI and interaction for that first screen/feature, stage, commit and push your changes to your Github branch again.
Getting Unstuck:
- If Copilot does not understand your request, be more specific about your functionality and specific layouts like:
- If colors are wrong, specify exact colors: “Use #4A90A4 for the header”
- If the preview is blank, try refreshing or starting a new session
- If you get errors, describe them to the AI: “I see an error. Please explain what is wrong and fix it.”
Explanation of React code
Take a moment to look at the files generated and the code structure in Codespace. We looked at the React files briefly when learning about tech stacks. Let’s look a little closer now.
Copilot should have generated React code, which uses a component-based structure where your app is broken into reusable pieces.
Here’s the key: you don’t need to understand every line of React to build your MVP.
Think of it like driving a car—you don’t need to understand the engine to get where you’re going. Focus on describing WHAT you want to the AI, and let it handle the React implementation details. When you need to make changes, use natural language to tell the AI what to adjust (“make this button bigger,” “change the color to blue”) rather than editing the code directly. If you’re curious and want to learn React properly, that’s great—but save it for after your MVP launches and you’ve validated your idea with real users. For now, your goal is to build something testable quickly, not to become a React expert.
Chances are that Copilot has generated a simple MVP skeleton structure. For our example, it generated these files:
src/ – Folder containing the main React files
App.jsx – Main app component (most of your UI)
main.jsx – React entry point. You will see index.html loads this script
index.css – Global styles
index.html – The single page your app lives on
vite.config.js – build/dev server configuration file
package.json – Think of this as the supplies List. It lists every library your app needs to run (like react, express, or lucide-react). If this file is missing, the app won’t know how to start.
.gitignore – This is the privacy Screen. It tells GitHub which files to “ignore” (like your .env file containing your API keys). This is crucial for security.
node_modules/ – This folder contains the actual code for all the libraries listed in your package.json. It is usually huge, so you never upload it to GitHub.
This is currently a flat, simple structure. As you add more complexity to your app, you can add more organization using React features.
Here is a walkthrough of the file and folder structure of a complete React app.
components/ – Reusable UI building blocks.
- Buttons, cards, tabs, modals, etc.
- Each file usually represents one visual idea
pages/ or views/ – Screens or sections of the app. Pages organize app features; components build them.
server/ or api/ – Where external APIs live, where your app talks to the outside world.
- Gemini API calls
- Supabase uploads
- Hugging Face inference
utils/ Helper functions.
- Formatting text
- Parsing responses
- Reusable logic
We will force Copilot to add these folders with our prompting, as we add more complexity to our app.
ACTIVITY 2
Add All App Screens
Estimated Time: 30 Minutes
1. Add Second Screen, Test, and Iterate
If your app includes more than one screen, you can repeat the steps until you have built all the screens, focusing only on the UI for now.
Start with one additional screen, and add this important piece to your prompt:
Add a seconds screen, [Screen Name].
Create a pages folder and add a .jsx file for each separate screen.
Also a add components folder for shared UI (nav bar, buttons, cards)
This is a standard structure for React apps. The pages folder contains the code for each screen in the app. The components folder contains reusable blocks for UI components.
Once Copilot generates code, check that Copilot has created the folders and added the appropriate files. Check out the code to see if you can see what it is doing.
Ensure you test both the new screen and how each screen interacts with the other screen.
2. Add Remaining Screens, Test, and Iterate
Follow the same steps to add any remaining screens. Ask Copilot to generate the UI first, then add basic functionality.
Check that Copilot is adding a new .jsx file in your pages folder. You might need to remind it. Also remind it to add reusable components in the components folder.
Test each new screen as you add it.
3. Add Basic Navigation (still no AI)
Once your UI looks good, you’re ready to start adding interactivity that may be missing such as page navigation, success messages, and other. This is especially important if your app involves several screens. Chances are good that Copilot already added some of the interactions because it’s trying to anticipate, so ensure to check first what’s missing, what can be improved, and iterate on it.
4. Test App Completely
You’ve already tested each change incrementally and iterated on it, but it’s always good to take another pass to ensure that all the screens, buttons, and navigation works.
To test your app fully, we recommend you use your app as a user would.
Here’s a sample checklist that may be applicable to you:
- Does it require a Home screen and does it load correctly?
- Can you input text or numbers correctly?
- Can I submit an empty form? If so, think about adding error messages
- Can you navigate between all screens?
5. Commit Your Changes
Once you are satisfied with the UI and basic functionality, stage, commit, and push your changes to your repository branch.
AI Integration
You now have a working app with screens and navigation but no AI yet. In the Founder’s Toolki you built a Feedback Analyzer that sent stakeholder data to Gemini and displayed insights. You also learned how to use Predictive AI. Now you’ll apply those same skills to your own MVP.
For both of these cases, Generative AI and Predictive AI, the principle remains the same: AI is a layer on top of working functionality. Your app should function (navigate, display screens) before AI is added. This makes debugging much easier and if something breaks after adding AI, you know the AI integration is the problem.
Which LLM?
Outside of AI Studio, the Gemini APi is no longer free to use without signing up with a credit card. If you have that ability, you can sign up, but set alerts for hitting quotas so you don’t run up costs for development.
Because of that, we need to look for alternatives.
There are several free LLM APIs that are available for free that will work well enough for your MVP. We are going to use Groq in the activity below. You can sign up on their website without a credit card, and they give a generous daily request amount.
Here are some other free APIs you can explore for your MVP.
Provider
Registration
Best Model
(as of February, 2026)
Protocol
Groq
Email (No CC)
llama-3.3-70b-versatile
OpenAI SDK
GitHub
Uses GitHub Account
gpt-4o-mini
Azure/OpenAI SDK
OpenRouter
Email (No CC)
google/gemma-2-9b-it:free
OpenAI SDK
Hugging Face
Email (No CC)
DeepSeek-R1-Distill-Llama-8B
Hugging Face Inference API
ACTIVITY 3
Add AI Feature
Estimated Time: 30 Minutes
In this activity, you will add AI functionality to your MVP using Groq. Most MVPs benefit from generative AI features like text generation, analysis, summarization, or conversational responses.
If your MVP requires classification or prediction (sentiment analysis, categorization, etc.), the integration pattern is the same. You need to add an API.
1. Define your API behavior
Before writing any prompts, get clear on what your API should do. In the Github Workflow lesson, you learned that vague instructions produce vague results. The same applies here.
Given that many team apps will contain a LLM API call, here is a template to clarify a LLM feature. If your app is using a different AI model, you will have different parameters to give it. Update the following list, based on your MVP. This will help you fill out the prompt in step 4.
My LLM Feature:
- What users provide: [what input does the user need to give]
- What should the AI do: [generate, summarize, analyze, recommend, chat]
- What users see: [what output]
- Content Style and Tone: [ Friendly, Educational, short, detailed?]
- Temperature:
- Low temperature (0.1-0.3): consistent and predictable responses
- High temperature (0.7-1.0): more varied and creative responses
- Length of Output: Remember output tokens cost money, so keeping responses short will help keep AI API costs down.
- Example Interaction:
- User enters: [example input]
- AI responses: [example of output]
Writing out a concrete input/output pair forces you to think through exactly what “good” looks like for your app.
2. SIgn up for Groq and Get and API Key
- Go to groq.com and sign up.
- Click on API Keys and then Create API Key. Give it an appropriate name and then copy the API key and store it somewhere safe.
3. Add API Call with the Help of Copilot
- Ask Copilot to add the API integration, or ask another LLM to generate the code you can copy and paste into your codespace.
Here’s a template you can use and replace with features/APIs for your own app. Note that we are requiring a backend server for API calls.
On the left is template you can use and replace with features/APIs for your own app. Note that we are requiring a backend server for API calls.
On the right is an example using the template for our TutorMatch app.
Right now when the user does X the app displays placeholder data. You are to replace that with a real AI API call.
When the user clicks on the button:
- Take the user input text
- Send it to [AI service] with this instruction: “xxx”
- Replace the existing placeholder data and display the AI response in the results area
Keep the loading message while waiting for the AI response
Content Style and Tone:
Style: [ content style like professional?]
Tone: [respectful, friendly?]
Length [keep it under 200 words]
Technical Requirements:
Backend:
– Node.js + Express server
– API route POST /api/analyze that calls the API.
– Use environment variable from .env file
Frontend:
– Should call the backend route
– show the result in the UI
– handle loading/errors.
Right now when the user presses the button the app displays placeholder data. You are to replace that with a real AI API call.
When the user clicks “Get Recommendations”:
- Take the text from the subject description input
- Send it to Groq with this instruction: “Based on what this student is struggling with, recommend what TYPE of tutor they should look for. Provide 3 specific characteristics or skills the ideal tutor should have. Focus on tutor qualifications, not actual tutor names.” Respond in a helpful, encouraging way. Responses should be 3 bullet points, each with 2-3 sentences describing tutor characteristics to look for.
- Display the AI response in the results area (replace the placeholder recommendations)
Keep the “Analyzing your needs…” loading message while waiting for the AI response.
Technical Requirements:
Backend:
– Node.js + Express server
– API route POST /api/analyze that calls the API.
– Use process.env.API_KEY.
Frontend:
– Should call the backend route
– show the result in the UI
– handle loading/errors
4. Add API Key to .env File
Copilot should instruct you to add your API key to the .env file, which it should also create. If it does not, create .env yourself in the File Manager, in the server or api folder (depending on which folder Copilot created for the backend). Make sure NOT to add it to the root .env file, as that is not secure (and your backend cannot see it there).
Add this line to your server/.env file:
API_KEY=your_api_key
5. Test with Real User Inputs
Once Copilot completes the coding, follow any installation instructions. It should add the proper package requirements to package.json for you. To test:
- In the terminal window, type:
npm run dev
This starts your app running in a new browser window.
- You also need to run the backend server. In the terminal window, click on the + icon and open a second terminal window.
- Type npm run dev in the second terminal window to start the backend server. This will run in a second browser window.
- Go to the browser window running the app.
- Enter a user query (like what real users would type).
- Click your action button.
- Confirm the loading message appears.
- Wait for the AI response.
- Determine if you get a response. Check what is returned and check that it meets your requirements.
- If you get an error message, troubleshoot with the help of Copilot to determine the error and fix it. Here are some common errors when adding a LLM API call:
- Missing/invalid API key – Wrong env variable name or key not loaded
- CORS errors – Calling API directly from frontend instead of backend
- Wrong model name – Typo or unsupported model for that API
- Rate limit hit – Too many requests too fast
- Malformed request – Wrong parameter names or structure
- Server not running – Frontend works but backend isn’t started
Quick debug checklist:
- Check terminal console for backend server for error messages.
- Check network tab in dev tools for frontend (actual app) to see the request/response.
- Wrap the API call in try-catch and log the full error.
6. Commit Your Changes
Once you are satisfied with the the AI (or other) API call is working and sending appropriate responses, stage and commit your changes to your repository branch.
Configuring the AI Prompt
Most of the AI industry (OpenAI, Anthropic, Mistral, Groq) uses this format for prompting:
messages: [{role, content}]
By splitting out the standard prompt from the user-specific content (in our case, which subject they need help with), you can save on token usage, which ultimately leads to savings on API costs.
Setting a system role also makes your AI respond consistently every time, so users know what to expect from your app. Without it, responses may vary unpredictably between sessions.
Understanding System Instructions and Token Costs:
When you make an API call to Groq, you can send two roles:
- System – Defines HOW the AI should behave
- User – The actual question or input
Both are sent on EVERY request.
Groq treats system instructions exactly the same as user prompts—they are billed as input tokens.
- System Prompt: Every word in your system instructions is tokenized and added to the “input” bill.
- User Prompt: Added to the total.
- Calculation: Total Input Tokens = (System Tokens) + (User Tokens) + (Chat History Tokens).
Groq recently introduced Automatic Prompt Caching (as of late 2025/early 2026).
If multiple requests start with the exact same system prompt, Groq “caches” that part of the message.
- On the paid tier, cached tokens are often 50% cheaper.
- On the free tier, cached tokens do not count against your rate limits in the same way. This means if you use a long, complex system prompt, only the unique “user” question “uses up” your limited free quota.
Securing your API Keys
So far, you have ensured that your API keys are safe by storing them in the .env file in your project. That .env file is kept locally on your computer and is not part of your Github repository. That is on purpose, and is a good security measure.
However, .env works in your local development environment, but won’t work when you go to deploy it. Or if other teammates are working on the project, on a separate branch. They don’t have access to your key or your .env file (unless you share it some other way).
GitHub Secrets solves this sharing issue by storing sensitive values separately from your code. The key is encrypted and only loads when you run your app in Codespaces. Your code can use the key without ever containing it. Anyone accessing your repository will have access to the key, although they will never be able to view it, as it is encrypted. As long as you keep your repository private, and only team members have access, your key can be used by your team, but not to the outside world (yet)! You’ll learn more about where you will store your API keys when you get to deploying your app. It will depend on your deployment platform.
Here are some reasons to use GIthub Secrets:
- Keys never appear in your code files or commit history
- Team members can deploy without seeing the actual key values
- You can change keys without changing code
- Required for automated deployments (GitHub Actions, cloud platforms)
While this may be overkill for your MVP, it’s good to put it in practice. Also it will make your development and debugging much faster.
How GitHub Secrets Work in Codespaces:
When you open a Codespace for this repository, GitHub automatically loads your secrets as environment variables. You don’t need a .env file. The secret will appear in your server-side code. However, since you created a .env file, keep using that while you are developing your app. Codespace will use the Codespace secret key, but also look for .env if the secret key does not exist. This way, if you ever decide to work on your project locally (not in Codespaces) it will still work.
For your project, you will use two layers of security:
- GitHub Secrets – Keep keys out of your code files
- API Restrictions – Limit what keys can do and where they work
You will set up both, in addition to configuring your AI system prompt in Activity 4.
ACTIVITY 4
Configure AI Prompt and Secure API Keys
Estimated Time: 30 Minutes
In this activity, we will first configure a system prompt to ensure consistency and save on token use. Then we’ll add our key to GIthub Secrets.
1. Find and Review the AI API Prompt
For our example, we will set a system role with content on how to respond, followed by the user role, with the specific request from that particular user. For your particular AI prompt, it will be different.
Groq will cache the system prompt, seeing it appear in subsequent prompts, and not count it towards your token usage.
- Check the code in server.js (or whatever Copilot named your backend server file) to see how it is sending the prompt. Here is what it sent for our example:
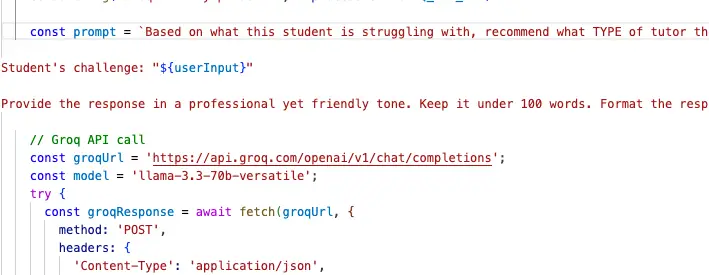
In our case, userInput is embedded in the middle of a single prompt. Anything after the userInput is counted in every API call.
- See how Copilot has set up your AI prompt.
2. Split the Prompt into System and User Roles
- Ask Copilot to split the prompt into two roles, system and user. Put the standard language about how to respond in the system role and just the user prompt in the user role. Here is a sample prompt.
please separate out the standard prompt to the system role and the student’s challenge with user input to the user role when prompting.
- Check the code that Copilot generates. It should have split out the prompt to two roles, each with their own prompt. Your user prompt should be very concise, which helps keep down API costs.
Here is the resulting code Copilot generated for us.
					const systemPrompt = `You are an expert tutor advisor. Based on what a student is struggling with, recommend what TYPE of tutor they should look for. Provide 3 specific characteristics or skills the ideal tutor should have. Focus on tutor qualifications, not actual tutor names. Provide the response in a professional yet friendly tone. Keep it under 100 words. Format the response as a numbered list of 3 characteristics.`;
   const userPrompt = `Student's challenge: "${userInput}"`;


   // Groq API call
   const groqUrl = 'https://api.groq.com/openai/v1/chat/completions';
   const model = 'llama-3.3-70b-versatile';
   try {
     const groqResponse = await fetch(groqUrl, {
       method: 'POST',
       headers: {
         'Content-Type': 'application/json',
         'Authorization': `Bearer ${process.env.GROQ_API_KEY}`,
       },
       body: JSON.stringify({
         model,
         messages: [
           { role: 'system', content: systemPrompt },
           { role: 'user', content: userPrompt },
         ],
         max_tokens: 300,
       }),
     })
The systemPrompt and userPrompt are each set separately at the start. Our userPrompt will be very short, just containing “Student’s challenge: ” followed by whatever the user types in the form.
3. Refine Based on Results
Now that you have dealt with the prompt format, check the actual responses that Groq gives you.
Your first attempts will very likely not produce perfect results. That’s normal and expected. App development, especially if it involves AI, is iterative.
If responses aren’t quite right, refine the system prompt for Groq. You can update it to ask for things such as:
- “Keep responses under 100 words.”
- “Make sure the tone is friendly and encouraging.”
- “Add a call-to-action at the end of each response.”
- “The bullet points should be numbered.”
Each refinement should build on your existing app. You can also add a temperature setting to ensure the response fits your needs.
4. Test Edge Cases
Users will type unexpected things. You need to test these edge cases now so once real users come in, your app can handle them without crashing or looking broken. This builds trust with your early users.
- Test edge cases to make sure your app handles problems gracefully:
- Empty input – Submit without typing anything. Does the app handle it?
- Very long input – Type a lot of text. Does it still work?
- Unexpected input – Try random text. What happens?
- Fast clicks – Click the button multiple times quickly. Does it send multiple requests
- If you find issues, you can describe those issues to Copilot like:
- “When the user submits empty input, show a message asking them to enter something.”
- “When the input is very long, truncate it to 500 characters before sending it to AI.”
- “Disable the button while waiting for an AI response, and re-enable it when the response arrives. This prevents users from accidentally sending multiple requests.”
This pattern to disable the button can be important: it prevents wasted API calls and shows users that something is happening. During demos, this also prevents awkward moments where multiple responses can appear at once.
5. Find API Key(s) in your Code
Now that the AI prompt and API call is looking good, let’s shift to the API key and securing it better.
It’s a good idea to be able to look and and understand how your backend server is accessing your API key.
Look for code like:
const API_KEY = process.env.API_KEY;
Look in server.js , or whatever file Copilot added your backend code to. In our case, we used GROQ_API_KEY as our environment variable, which we added to .env and the server uses process.env.GROQ_API_KEY to pull the key from .env.

6. Add your Groq API key to GitHub Secrets
GitHub Secrets keep your keys out of version control and allow your app to be deployed without exposing credentials. This prevents keys from appearing in your commit history, where they could be discovered even after you delete them.
- Go to GitHub -> Click on your Profile in the top right of screen -> Settings (the gear icon).
- In the left sidebar, click on Codespaces.
- Click New Secret.
- For Name, enter: GROQ_API_KEY (or appropriate name for the API you are using)
- Copy and paste your GROQ (or other) API key, either from where you safely stored it on your computer, or from your project’s .env file.
- Select your repository.
- Click Add secret.

7. Test the API Key Still Works
- Run your app again, remembering to start the backend server AND your app using npm run dev.
- Test with a call to the API to make sure it works.
- If you really want to check that the Github Secret works, you can temporarily remove the line from .env, and run the app again. Chance are, it will not work. You might need to rebuild the Codespace container:
- In Codespace, ctrl+shift+P or cmd+shift+P to get the Command Palette.
- Type in Codespaces: Rebuild Container to find it in the list.
- Choose Full Rebuild.
- Make sure to add the key back into your .env file for best practices while in development.
8. Verify Your API Key is Actually Protected
This is the most important step because it confirms your security actually works.
- Run your app (and backend server).
- Open Developer Tools in the window the app is running (F12 or right-click → Inspect)
- Go to the Network tab.
- Clear any existing requests.
- Make an AI request in your app.
- Look at the requests that appear.
You should see a request to something like localhost:3001/api/generate. The request body should contain your prompt, NOT your API key. If you see your API key in any request headers or body, something is wrong!
9. Final Test
Before committing the API call and API key changes, make a final pass to test everything works as expected.
- Check:
- UI Shell: Does your UI display correctly?
- Interaction Flow: Do buttons and inputs work?
- AI Integration: Does your AI feature work?
- Edge Cases: Did you test empty input, long input, etc.?
- If you find issues, fix them with the help of Copilot and/or other LLMs.
10. Update the README documentation
When the app was created for the first time in GitHub, you added a simple description for the README file.
It’s good practice to go ahead and update the README file. Also this is especially important if you’re using AI for code generation because the AI always looks at this documentation before making changes.
- Go the a main root folder and find the README.md file.
- Add more details to the file, explaining what features are in the app, the AI integration, etc.
11. Commit and Merge Your Changes
- Once you’re confident the code works as intended, stage and commit to the branch.
- Go to Github, make a pull request, and merge your branch back to the main branch.
You have made a lot of progress on your MVP, starting from your first screen’s UI, adding functionality, more screens, morefunctionality, and eventually, your AI API call.
You may have more to add to your app, but remember to only include your MVP features. Make sure those features work without error and as expected. You are going to have real users using your app, so what you publish should be in good working shape.
You may need to add additional API calls to your app, if you have anything like user signin or cloud storage to your app. Just remember to take it step-by-step and test as you add each new part.
Reflection
You spent a good amount of time vibe-coding to create your first draft of your MVP! Here are some questions to consider:

Screen by Screen
Iterative Testing
AI as a Layer
Prototype to Reality
Next Steps
Key Terms
- Iterative Approach: Building software in small pieces (screen by screen), testing after each piece, rather than building everything at once. Catches problems early and makes debugging easier.
- Screen-by-Screen Building: Adding one screen at a time, testing navigation before adding the next. Each screen is a “chunk” in the iterative approach.
- System Prompt: Instructions that shape how an LLM responds—its tone, format, length, and constraints. You practiced this in Tech 2 with the Feedback Analyzer.
- Frontend: The part of your app users see and interact with. Runs in the browser. Everything you built in Activity 1 is frontend.
- GitHub Secrets: Encrypted storage for API keys on GitHub. Keys never appear in code or commit history. They load automatically when you open Codespaces.
- Loading State: Visual feedback (like “Finding your perfect tutor match…”) shown while waiting for AI response. Essential because AI calls take several seconds.
- Edge Case: Unusual inputs (empty, very long, off-topic) that test how well your app handles unexpected situations. Testing these prevents embarrassing failures during demos.
Additional Resources
- GitHub Codespaces: Cloud development environments
- GitHub Secrets Documentation: Secure API key storage
- Hugging Face Inference API: Access to ML models for prediction
- Groq API Documentation
- Tailwind CSS Documentation: Styling reference for generated code
- React Documentation: Framework reference for understanding generated code
- Git for Beginners: Commit and Push to GitHub