- Integrate Payment Checkout Sessions to collect one-time payments in your app
- Implement subscription billing for recurring revenue models
- Configure webhook handlers for reliable payment verification
- Apply payment security best practices
- Payment Checkout Flow: A “Pay” button that opens a secure payment page
- Subscription Payment: one-time and recurring payment options
- Webhook Handler – secure and reliable payment handler in your MVP
- Students have developed a pricing strategy and Simple Budget for their project.
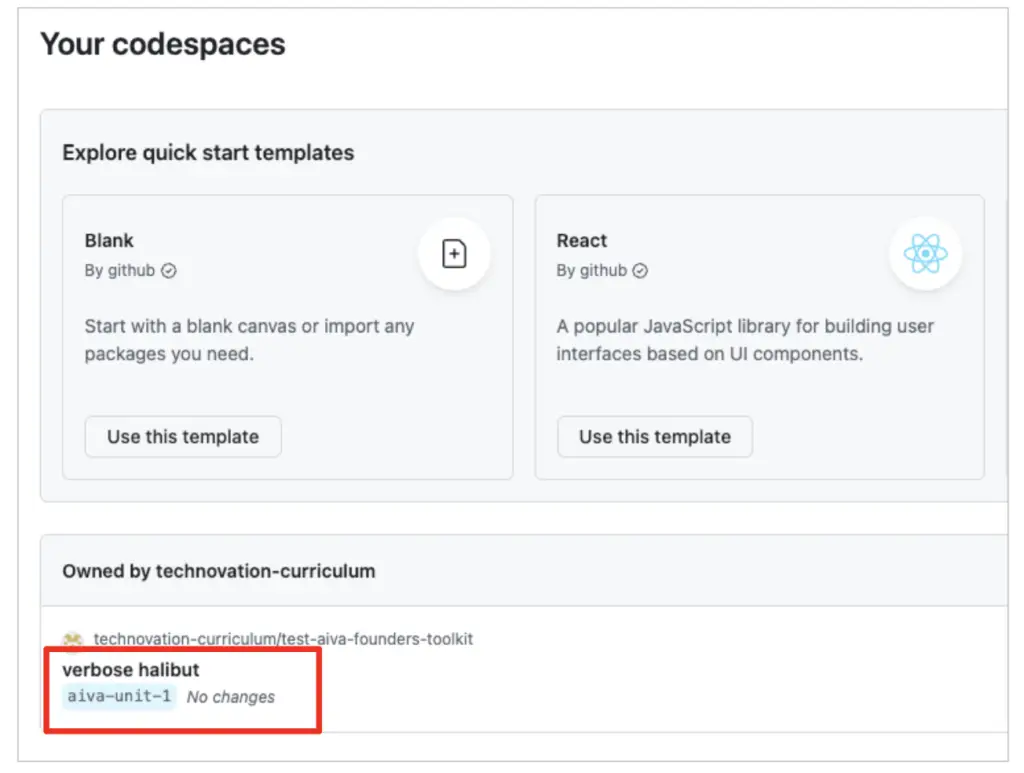
- Students have an MVP GitHub repository with a Codespaces environment.
- Students have implemented user authentication in their MVP.
Your app works. Users have tested it and you have fixed the bugs. You have deployed it on a platform like Vercel so it is publicly available. Now comes a question every startup faces:
How do we get paid?
In the Financial Literacy lesson, you created a Simple Budget with revenue projections and chose a pricing strategy for your venture. You estimated how many users you need, what to charge, and when you expect to break even. Those numbers were estimates. In this unit, you turn those estimates into a real payment system.
Note: Taking payments is not required for this accelerator. However, this is something that should be considered as a necessary next step.
We will use Stripe, a payment platform used by businesses in over 40 countries. Stripe handles the complex and sensitive parts of payment processing which are the card validation, fraud detection, currency conversion, and regulatory compliance and security— so you do not have to. Your job is to connect your app to Stripe, tell it what to charge, and handle the result.
Stripe supports businesses in over 40 countries, but availability varies by region. If Stripe is not available in your country, you have other options. Check your region for availability and alternatives that work well. Here are a few suggestions:
- Nigeria: Use Paystack — it uses the same concepts (checkout sessions, webhooks, subscriptions) with a similar API. See their Accept Payments quickstart.
- India: Stripe is available but requires business verification. If that is not possible for your MVP, use Razorpay instead — see their Standard Checkout quickstart.
- Mexico: Stripe works well here, but Conekta is a strong local alternative that handles OXXO (cash) payments better.
The code patterns in this unit – creating checkout sessions, webhooks, and subscription billing — work the same way across most payment platforms, so what you learn here transfers directly. Follow along with the activities to learn the concepts, then adapt them using your platform’s documentation.
Throughout this unit, we will continue to use TutorMatch as our guided example. In this unit, TutorMatch adds the ability to pay for a single tutoring session or subscribe to a monthly plan.
You will follow the TutorMatch examples, adapting the patterns for your own MVP.
By the end of this unit, your MVP will be able to collect real payments. You will use test mode throughout, so no actual money changes hands, but the code you write can be used be used if you decide to collect payments later on.
Getting Started with Your Payment Platform
In previous lessons, you set up GitHub as your home for code. You also set up Supabase as your cloud database. Now you will set up Stripe (or alternate, depending on country) as your payment platform. The pattern is the same:
- create an account
- get API keys
- connect it to your app

Stripe is to payments what Supabase is to database storage — it handles the hard parts so you can focus on your product. When a user pays through Stripe, Stripe:
- Validates the card number and checks for fraud
- Encrypts the payment details so they are never exposed
- Sends the money to your account (minus a transaction fee)
- Handles currency conversion if your user pays in a different currency
- Manages regulatory compliance in each country
Without a platform like Stripe, you would need to build all of this yourself, which would take months and require security certifications. Stripe handles these complexities so you can add payments to your app with a manageable amount of code.
There are several payment platforms available. Here is how they compare for someone building an MVP:
Platform
Setup
Free to Start
Transaction Fee
Best For
Stripe
Simple
Yes
~2.9% + fee per transaction (varies by country)
MVPs, web apps, subscriptions
Paypal
Simple
Yes
~3.49% + fee
Marketplaces, buyer protection
Square
Simple
Yes
~2.6% + fee
In-person payments, retail
Build Your Own
Very Complex
N/A
None (but server costs)
Never recommended for MVPs
For these activities, we will use Stripe because:
- It is designed for developers and integrates with Express.js (your backend from previous lessons)
- The free tier works for testing and early-stage MVPs with no monthly fees
- You only pay transaction fees when you collect real payments
- The same code works across 40+ countries and 135+ currencies
- It offers built-in subscription billing for recurring revenue models
Again, check out the best payment processing option in your region or country, and apply the same process for your chosen platform.
Connecting a Payment Platform to Your App
There are several ways to integrate payment processing. Understanding the options helps you make the right choice for your MVP.
Approach
What It Means
Setup Time
Security
Customization
Best For
Hosted Checkout
Platform hosts the payment page. You redirect users there.
~30 min
Highest — Platform handles everything
Low — Platform controls the look
MVPs and startups (our choice)
Embedded Checkout
Platform UI appears inside your page as a component
~1 hour
High — Platform still handles card data
Medium — fits your page layout
Apps that need brand consistency
Payment Element
Secure, pre-built UI component (an iframe) provided by the payment platform that you “drop” into your own frontend code.
~2 hours
High — but more code to manage
High — full layout control
Apps needing a unique checkout flow
Custom Form
Build everything from scratch
Days
You handle PCI compliance
Complete control
Not recommended for MVPs
You will use Hosted Checkout. Here is why:
Fastest to Build
You create a Checkout Session on your server, and the payment platform handles the rest — the payment page, card validation, error messages, and receipt.
Most Secure
Your app never touches card numbers. The platform collects them on their own page, which means you are PCI-compliant automatically.
Trusted by Users
The payment platform checkout page shows their branding, which users recognize and trust.
Built-in Features
Stripe's hosted page automatically supports multiple currencies, Apple Pay, Google Pay, UPI, and other payment methods based on the customer's location. Most payment platforms have similar features.
Taking Your First Payment
Every payment system starts with a single transaction. In this first activity, you will build a checkout flow into your app.
The following activities will take you through how to add a Pay button in your app that redirects users to Stripe’s hosted checkout page — a professional, secure page where users enter their payment details.
When they complete the payment, they return to your success page that confirms their purchase.
Mapping out what happens before, during, and after payment saves rework later. If you skip this, you may build a checkout flow that does not match your pricing model from your simple budget, and you will need to redo it.
For those of you using an alternative payment platform, you may adjust to how your platform works, but following their documentation.
Open your Simple Budget from the Financial Literacy lesson, and look at your pricing strategy.
Answer these questions:
- What are you charging for? (A product, a service, access to a feature?)
- Is it a one-time payment or recurring? (We start with one-time in this activity, then add subscriptions in Activity 3)
- How much? (Use the price from your Simple Budget revenue projections)
- What happens after payment? (Does the user get immediate access? A confirmation email? A download?)
For our TutorMatch example, the answers are:
- Charging for: a single payment for a tutoring session
- Type: one-time payment (we’ll add subscriptions added in Activity 3)
- Price: adjust for your market
Write your answers down. You will use them in the activity below.
NOTE: To use Stripe, you must provide a URL for any website, social media profile, or mobile application you use to promote your business or sell products. In addition, you will need to provide a bank account, and verify your identity. For the activity below, you can skip this, but you will need to take these steps to take actual payments.
ACTIVITY 1
Setup Stripe to Take Payments
Estimated Time: 20 Minutes
1. Create Your Stripe Account
- Go to stripe.com and click Start now to create a free account using your email.
- Verify your email and log in to the Stripe Dashboard.
- Choose non-recurring payments for your payment options. You can change this at any time.
- Choose sandbox for now. To activate your account and actually take payments, you will have to provide a bank account, website or mobile app URL, and verify your identity.
- You will land on the Dashboard home page — take a moment to look around.
The Stripe Dashboard is your control center for payments. Here are the key areas you will use:
- Payments: See all transactions (test and live)
- Subscriptions: Manage recurring billing (you will use this in Activity 3)
- Developers → API keys: Your API credentials
- Developers → Webhooks: Payment notifications to your server (you will set this up in Activity 2)
2. Get Your API Keys
Stripe gives you two sets of API keys — similar to the Supabase publishable and secret keys. The pubishable key is safe to use in the frontend, and the secret key should only be used in the backend.
- In the Stripe Dashboard, click Developers in the left sidebar
- Click API keys
- Copy both keys — you will need both of them.
The test in the key prefix means you are in test mode. No real money will be charged. When you are ready to accept real payments, you switch to live keys (pk_live_, sk_live_).
3. Add Your Products and Prices
We’ll add products for the things you plan to charge for in your app.
For TutorMatch, we are going to add a single payment for a tutoring sessions and a recurring payment for the app subscription.
- Go to Product Catalog from the main menu.
- Click Create a Product.
- Name your product
- Add a description
- Choose recurring or one-off
- Type in a price, and select your currency
- Add the product.
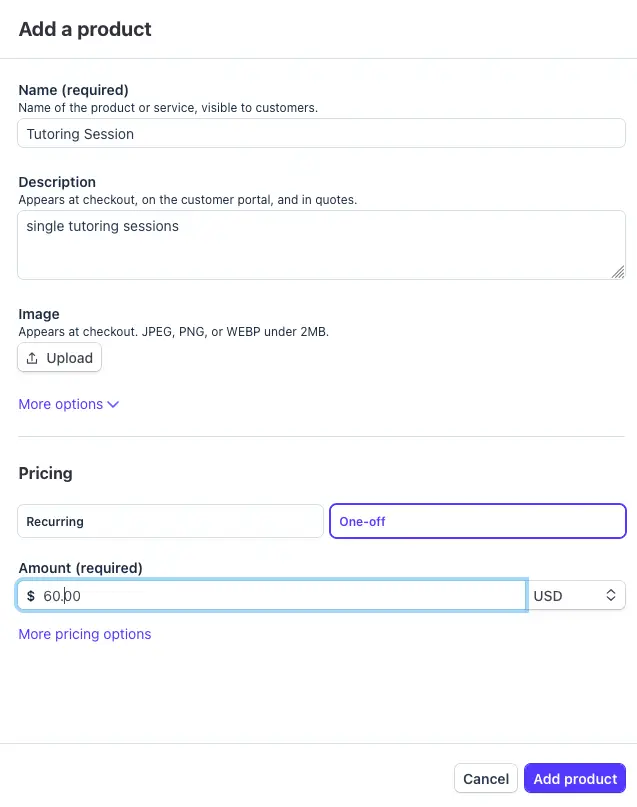
- Once the product appears in the list, click on it to view the product.
- On the price line, click on the 3 dots, and select Copy Price Id.
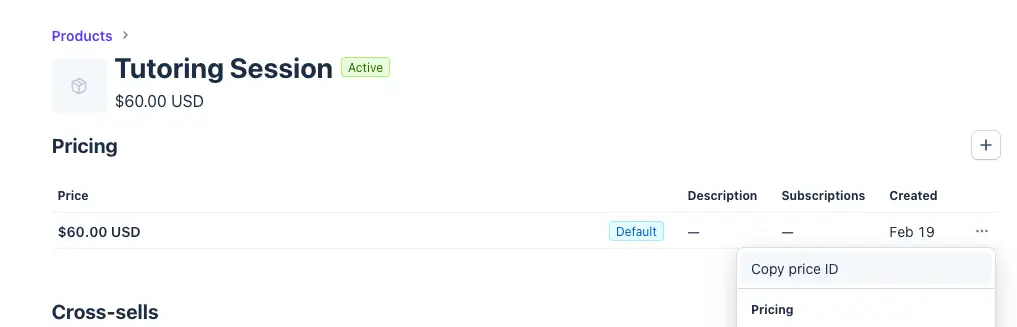
- Save the Price ID. You will need it when coding your app.
3. Repeat For Other Products
Add any other things you are charging for, making sure to copy the price id, and marking which product it is used for.
Now that you have your Stripe account and product(s) set up, you can work on adding the payment process to your app.
First, you should consider the user flow in your app.
In our app, we are going to follow this process:
- User signs up or logs in.
- On the main screen, a new button Pay for Tutoring Session appears.
- User clicks the button, and is taken to the Stripe platform.
- User enters payment information.
- User is returned to the app.
- User receives a message that payment is confirmed.
- If user cancels payment within Stripe platform:
- They are returned to the app
- A cancellation message appears
For the following activities, we are making the assumption that you have deployed your app with Vercel. That means there is a new serverless architecture, so editing code and running it in Codespace will be a little different. In the past, we’ve run the frontend separately from the Express backend in Codespaces. Two processes, two environments.
With Vercel serverless:
- There is no persistent server process
- Each function in api/index.js starts up on-demand when a request hits it
- Vercel injects the environment variables from root .env (locally) or from the Vercel dashboard (production) directly into each function invocation
- The frontend (Vite) also reads from the same root .env but only variables prefixed with VITE_ are exposed to the browser. All other environment variables are protected.
ACTIVITY 2
Take Payment in Your App
Estimated Time: 45 Minutes
1. Study the Accept-a-Payment Sample Architecture
Before writing any code, you will study Stripe’s own open-source sample applications. These are reference implementations published at github.com/stripe-samples — the same code patterns that Stripe recommends for production apps. Studying these samples gives you an architectural map of how payment integration works, making your own implementation faster and giving you a debugging baseline if something goes wrong.
Before writing any code, study how Stripe’s own engineers build a payment integration.
- Open this repository in your browser: github.com/stripe-samples/accept-a-payment
- Navigate to the prebuilt-checkout-page folder and look at two files:
- The server (server/node/server.js) — about 100 lines total. The core pattern is:
					// The sample creates a Checkout Session on the server
app.post('/create-checkout-session', async (req, res) => {
  const session = await stripe.checkout.sessions.create({
    mode: 'payment',
    line_items: [{ price: process.env.PRICE, quantity: 1 }],
    success_url: `${domainURL}/success.html?session_id={CHECKOUT_SESSION_ID}`,
    cancel_url: `${domainURL}/canceled.html`,
  });
  return res.redirect(303, session.url);
});
- The client — two different parts
- The payment trigger is a single form button.
- The client — two different parts
					<form  action="/zh/create-checkout-session/" method="POST">
  <button id="submit">Buy</button>
</form>
- The main App.jsx has to route the responses from Stripe.
function App() {
  return (
    <BrowserRouter>
      <Routes>
        <Route path="/success.html" element={<Success />} />
        <Route path="/canceled.html" element={<Canceled />} />
        <Route path="/" element={<Checkout />} />
      </Routes>
    </BrowserRouter>
  );
}
That is the entire client-side code for a payment button. The flow is:
- your app sends a request to your server →
- your server creates a Checkout Session →
- Stripe generates a hosted payment page →
- the user is redirected there →
- after paying, they return to your app →
- the app routes the user appropriately based on success or cancellation
Notice three things about this architecture:
- Your app never touches card data. Stripe’s hosted checkout page collects payment details. This keeps you PCI-compliant automatically — you never need to worry about credit card security standards.
- The server controls what to charge. The product, price, and currency are set server-side where users cannot tamper with them.
- The success URL includes a session ID. This lets your success page retrieve the payment details and show a proper confirmation.
This is your reference code. If something does not work when you build your own Stripe integration, you can compare your code to this sample to find the difference.
2. Add Keys and Price to Codespace Secrets
While you can add your keys to your .env files in Codespace, add what you can to Codespace Secrets for your repo.
- Go to Github and click on your profile in the top right corner.
- Click on Settings
- On the left menu, click on Codespaces.
- Click New Secret.
- Add your STRIPE_SECRET_KEY, copying the key you got from Stripe.
- Add another secret for your PRICE_ID. Label it descriptively. For example, for Tutormatch, our secret name is STRIPE_PRICE_ID_TUTOR.
3. Open a New Branch in Your Repository
- Go to your Github repository and create a new branch. Remember, now that you have deployed via Vercel, you want to do any new development on a branch separate from the main branch.
- Open your Codespace (or a new one) and switch to your new branch.
4. Update vite.config.js
When you deployed your app, you added a vite.config.js file to allow for local development with both a frontend and backend server. Now that we’ve moved to a serverless architecture with Vercel, we will remove the proxy code in vite.config.js.
Update the file. Here is all the code needed now:
					import { defineConfig } from 'vite'
import react from '@vitejs/plugin-react'

export default defineConfig({
    plugins: [react()],
})
5. Configure App and Add Environment Variables
There are some environment variables you will need for payment. Stripe needs to know the URL to return to on a successful payment. That is our main frontend URL.
- Install vercel so you can run the vercel development environment. In the terminal window, type:
npm install -g vercel
vercel link - You will be prompted to link your github account and repo.
Say yes to link the project and pull environment variables. - You might also need to run npm install to re-install your node modules in your codespace.
- in your root .env file, add this line:FRONTEND_URL=your_github_URL
We can use the root .env because we’ve moved to the Vercel serverless architecture. Run the app to grab the github URL to insert here.IMPORTANT: Remove any trailing / at the end of the URL!
- Even though we added the Stripe key and price_id in Codespace Secrets, let’s add them to .env as well, for testing. Also add
STRIPE_SECRET_KEY=your_stripe_secret_key
STRIPE_PRICE_ID_TUTOR=your_payment_price_id
to .env. Name your PRICE_ID appropriately.It is safe to add your Stripe key and price_id to the root .env. As long as the variable does not contain VITE_, it remains protected.
Make sure the environment values match in Codespace Secrets and .env. Codespace Secrets takes precedence over .env. If you update a key in one place, update it in the other too — mismatched values are a common source of hard-to-debug errors.
6. Add Router Library
To ensure that the app routes the user to the correct page, depending on whether they are logged in, whether they are already paid, and if the payment is successful or not, we will use the Router library.
- In your terminal window, type npm install react-router-dom
7. Ask Copilot to Help Integrate Stripe into Your App
There is a lot involved here, so we are going to take it step by step, especially asking Copilot (or another LLM) to generate the code for you.
- Ask the LLM to update the backend api/index.js (or whatever your backend server file is). Remember, when moving to production, we move the backend code here.
We will ask the LLM to write the POST request to Stripe, giving it the specifications for your particular payment structure.
Add a Stripe payment checkout endpoint to my Express server in api/index.js.
- Use the STRIPE_SECRET_KEY from .env
- Create a POST route /api/create-checkout-session.
- It should use a priceid, using STRIPE_PRICE_ID_TUTOR from .env
- Use stripe.checkout.sessions.create with:
- line_items: An array containing STRIPE_PRICE_ID_TUTOR from .env and quantity: 1.
- mode: Set this to ‘payment’ (since this is a one-time tutoring session).
- success_url: Construct the base URL using:
const baseURL = process.env.FRONTEND_URL || `https://${process.env.VERCEL_URL}`
Then use baseURL + ‘/success’ for the success_url - cancel_url: Use baseURL (the same base URL, no path)
- Return the session URL as JSON so the frontend can redirect the user. Do not update any frontend code yet.
Note: Keep it simple—no database or Supabase code yet.
Important: Do NOT include payment_method_types (let Stripe choose dynamically)
The LLM should update the code in index.js.
- View the changes and accept them (or ask for edits or clarification if needed).
- Ask the LLM to update the main App.jsx frontend file to handle payments.
- Copilot may do this for you, but you must install stripe, npm install stripe.
Note: Check how we prompted Copilot to create a baseURL for the redirect URLs for success and cancellation. We designatated it to use FRONTEND_URL or process.env.VERCEL_URL. FRONTEND_URL is our environment variable, and is used here in Codespaces for testing. When we move to production, the redirect needs to be our Vercel app URL. Vercel automatically creates that variable. We just have to add it in our code so it works in both testing and in production.
Check your index.js file to ensure that it included FRONTEND_URL and VERCEL_URL.
The LLM should update the code in index.js.
- View the changes and accept them (or ask for edits or clarification if needed).
- Ask the LLM to update the main App.jsx frontend file to handle payments.
- Copilot may do this for you, but you must install stripe, npm install stripe.
Update my App.jsx to handle payments. Please add the following:
- Update my App.jsx to handle basic routing and the payment trigger.
- Set up two routes: / (Home) and /success (Success Page).
- On the / route, if a user is logged in, show a ‘Book a Session ($60)’ button.
- Create a handlePay function for that button. It should:
- Fetch the Stripe URL from my backend (/api/create-checkout-session).
- Redirect to the URL returned by the server.
- If the user is not logged in, show the default AuthForm.
- Prompt the LLM to create the Success and Cancel pages upon return from Stripe.
Create a simple React page called Success.jsx and make that the success route.
- It should display a heading: ‘Payment Successful!’.
- Include a short message: ‘Thank you for booking your tutoring session. We will email you the details shortly.’
- Add a ‘Return to Dashboard’ button that uses useNavigate from react-router-dom to send the user back to the / route
Create a simple React page called Cancel.jsx.
- It should display a message like: ‘Payment Cancelled. Your card was not charged.’
- Add a ‘Try Again’ button that uses useNavigate to send the user back to the main dashboard (/).
- Keep the styling friendly so the user doesn’t feel like they did something wrong.
8. Test the Payment Process
- Start your app with vercel dev in your terminal window. This replaces previous npm run dev commands, running both your frontend and backends together in one port.
- Click your “Pay Now” button. You should be redirected to a Stripe-hosted checkout page that shows your product name and price.
- Use Stripe’s test card to complete the payment:
- Card number: 4242 4242 4242 4242
- Expiry Date: Any future date (e.g., 12/30)
- CVC: Any 3 digits (e.g. 123)
- Name: Any name
After submitting, you should land on your success page thanking your for your payment.
To verify the payment went through, go to the Stripe Dashboard and click Payments. You should see your test payment listed there.
- Test again. This time, cancel the payment while on the Stripe payment page.
- It should take you to your cancel page, allowing you to try again.
9. Commit Your Code
Once you have tested your payment process works correctly, commit your work — this is a good checkpoint before adding webhooks.
You can commit using the Source Control panel (click the Source Control icon in the left sidebar, add a commit message, and click the checkmark) or using the terminal:
Webhooks
Your checkout flow works, and the success page shows payment details. But here is the problem: the success page is not a reliable way to confirm payment.
Consider what can go wrong:
- The user closes the browser before the success page loads
- The network drops during the redirect
- The user navigates away from the success page
In all these cases, Stripe processed the payment, but your app never found out. The user paid, but your server has no record of it.
Webhooks solve this. A webhook is a message that Stripe sends directly to your server when something happens — like a payment completing. Your server does not need to ask Stripe “did they pay?” — Stripe tells your server proactively.
Understand the webhook flow
Preventing fake payment confirmations is critical. Without webhook verification, someone could send a request to your server claiming a payment was made when it was not.
Here is how webhooks work in your payment flow:
User clicks “Pay” → Stripe Checkout → User pays → Two things happen:
- User sees success page (unreliable)
- Stripe sends webhook to your server (reliable)
Your server receives the webhook regardless of what the user does with their browser. This is why webhooks are the reliable source of truth for payment confirmation.
ACTIVITY 3
Build a Webhook Handler
Estimated Time: 30 Minutes
You will create an endpoint on your Express server that receives payment confirmations from Stripe, verify they are authentic, and test both successful and failed payment scenarios.
1. Prompt Copilot to Add Webhook Endpoint
You need to add the webhook endpoint to your backend server. The webhook endpoint has a specific requirement: it needs the raw request body for signature verification. If Express parses the body as JSON first, the signature check will fail.
Important: If your server has app.use(express.json()) , the webhook route must be defined before that line. Otherwise, Express will parse the body as JSON before the webhook handler sees it, and signature verification will fail.
- Open the Copilot Chat panel and ask:
Add a Stripe webhook endpoint to my Express server in api/index.js.
Requirements:
– POST endpoint at /webhook
– Use express.raw() middleware for this route only (not express.json())
– Verify the webhook signature using STRIPE_WEBHOOK_SECRET
– Handle the checkout.session.completed and checkout.session.expired events
– Console log the payment details (session ID, amount, customer email)
– Return 200 to acknowledge receipt
– Important: This route must use raw body parsing, not JSON parsing
- Check your index.js file and reorder if needed. Your webhook route should come first.
					// 1. Webhook route FIRST (needs raw body)
app.post('/webhook', express.raw({ type: 'application/json' }), webhookHandler);

// 2. JSON parsing for all other routes AFTER
app.use(express.json());

// 3. Your other routes
app.post('/create-checkout-session', ...);
app.get('/success', ...);
2. Run Stripe CLI
Running a webhook from Codespaces is tricky. You have to make your server port public, and even with that, it can sometimes still generate errors. To make things simpler for testing, we’ll use the Stripe CLI (Command Line Interface). It creates a tunnel from your app to Stripe to allow direct communication.
- Install stripe in a new Codespaces terminal
brew install stripe/stripe-cli/stripe
orIf that doesn’t work (The Manual Way):
Add the key: curl -s https://packages.stripe.dev/api/security/keypair/stripe-cli-gpg/public | gpg –dearmor | sudo tee /usr/share/keyrings/stripe.gpg > /dev/null
Add the repository: echo “deb [signed-by=/usr/share/keyrings/stripe.gpg] https://packages.stripe.dev/stripe-cli-debian-local stable main” | sudo tee /etc/apt/sources.list.d/stripe.list
Install: sudo apt update && sudo apt install stripe
Login. Type
stripe loginIt will give you a pairing code and link. Click the link, login to Stripe, and allow the connection
- Check which port you are running on. Go to the Ports tab and see the one listed for your app. It most likely is 3000, but could be a different port.
Start listening. Type:
stripe listen –forward-to localhost:[YOUR_PORT]/api/webhookOnce it starts listening, you will see a message:
Ready! Your webhook signing secret is whsec_xxxxxxxxCopy the signing secret and copy it immediately in your root .env file, for STRIPE_WEBHOOK_SECRET.
- Restart your app for changes to take effect.
4. Test a New Payment
- Test by clicking the “Pay Now” button in your app.
- Complete the payment with test card 4242 4242 4242 4242.
- Check your Codespace terminal for the console logging— you should see:
Payment confirmed!
Session ID: cs_test_…
Amount: 1500
Customer email: [email protected] - If that doesn’t appear, check for any errors, and ask Copilot to make sure the console.log code is there and works.
4. Test a Declined Card
Real users sometimes have cards that get declined. Testing this scenario helps you understand what happens when a payment fails.
- Go through the checkout flow again, but this time use the decline test card:
- Card number: 4000 0000 0000 0002
- Other values: the same as for valid payment
Stripe will show the user a “Your card was declined” message on the checkout page. The user stays on the Stripe checkout page and can try a different card.
Notice what happens on your server: no webhook fires. The checkout.session.completed event only fires when payment succeeds. This is the correct behavior — your server only needs to act on successful payments
5. Commit Your Changes
Commit using the Source Control panel or the terminal. This keeps each step of the payment implementation in separate commits.
IMPORTANT: We used the Stripe CLI for testing in Codespaces. When moving to your production app, you need to set the webhook up in the Stripe dashboard. You will have a different secret signing key assigned that you will have to add to your production platform secrets, and redirect the webhook to your production URL. Instructions are below.
1. Set Up the Webhook in Stripe for Production
- Go to your Stripe Dashboard.
- Search at the top for Webhooks. Click on Webhooks. It should take you to the Workbench.
- Inside Workbench, go to the Webhooks tab.
- Click the + Add destination button.
- Events from: Find Checkout in the dropdown
- Select events: Choose checkout.session.completed and checkout.session.expired
- Destination type: Select Webhook endpoint.
- Endpoint URL: Paste your production URL (e.g., https://your-vercel.app/api/webhook).
- After creating the endpoint, click Reveal under Signing secret to get your webhook secret (starts with whsec_)
- Add the key to your production Secrets (same process as your Stripe API keys):
- Name: STRIPE_WEBHOOK_SECRET
- Value: paste your whsec_… secret
None of your code needs to change.

Subscription Billing
Not every business charges once. If your pricing strategy includes recurring revenue — monthly subscriptions, annual plans, or membership fees — then you need subscription billing.
The good news is that converting from one-time payments to subscriptions in Stripe requires only a few changes to the code you already wrote. The checkout experience for the user looks almost identical. In this part, you will also study how Stripe’s own subscription sample app presents pricing options and manages subscriptions.
In the next activity, you will learn how to add a subscription payment option in your app. We will keep the single payment option, in our case for a tutoring session, but will add a second payment type for an annual subscription to the app features.
ACTIVITY 4
Add Subcription Payment
Estimated Time: 45 Minutes
You will add a second payment type, a recurring subscription, in your app. Upon success, you will update your Supabase database to mark that user as paid.
1. Study the checkout-single-subscription Sample
- Open this repository in your browser: github.com/stripe-samples/checkout-single-subscription
The server code (~120 lines) is very similar to what you built in Activity 1. The key differences are:- mode is ‘subscription’ instead of ‘payment’
- The sample also includes a Customer Portal endpoint — this lets subscribers manage their own subscription (cancel, change plan) without contacting you.
Add a Stripe webhook endpoint to my Express server.
Requirements:
– POST endpoint at /webhook
– Use express.raw() middleware for this route only (not express.json())
– Verify the webhook signature using STRIPE_WEBHOOK_SECRET
– Handle the checkout.session.completed and checkout.session.expired events
– Console log the payment details (session ID, amount, customer email)
– Return 200 to acknowledge receipt
– Important: This route must use raw body parsing, not JSON parsing
- Check your server.js file and reorder if needed. Your webhook route should come first.
					// 1. Webhook route FIRST (needs raw body)
app.post('/webhook', express.raw({ type: 'application/json' }), webhookHandler);

// 2. JSON parsing for all other routes AFTER
app.use(express.json());

// 3. Your other routes
app.post('/create-checkout-session', ...);
app.get('/success', ...);
2. Add Product to Stripe
- If you haven’t already, add a subscription product to your Stripe account.
Go to Product Catalog from the main menu.
- Click Create a Product
- Name your product
- Add a description
- Choose recurring
- Type in a price, and select your currency
- Add the product.
- Once the product appears in the list, click on it to view the product.
- On the price line, click on the 3 dots, and select Copy Price Id.
3. Add New Price ID to Codespace and .env
- Go back to Github account, and add a new Codespace secret.
- From your profile, click on Settings → Codespaces.
- Add a new secret, name it STRIPE_PRICE_ID_SUBSCRIPTION or some other appropriate name.
- Paste in the Price ID you copied from Stripe.
- Also go to your Codespace and add it to the .env file. This backup prevents you from having to rebuild the codespace to integrate the new Codespace Secret. See note below.
NOTE: You may have to rebuild your Codespace container for it to recognize the new secret. You can do this from Codespace, by pressing F1 for the Command Palette and search for Codespaces: Rebuild Container. You can also add it to server/.env as a backup, so you don’t have to rebuild the container for this session.
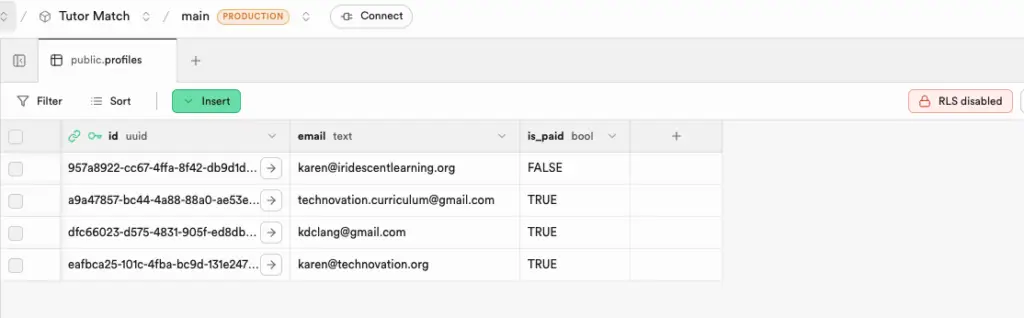
4. Add Profiles Table to Supabase
If we are going to have users pay to use our app, we want to track that in Supabase. Currently, users can sign up based on Supabase authentication and Google login.
We cannot mess with the Supabase User authentication process, so we will add a new profiles table to hold the payment information.
- Go to your Supabase project → Authentication → Users.
You will see any users who have signed up for your app. - Go to the SQL Editor from the main menu.
- Paste in this SQL command to create the profiles table. It links to the user authentication table with the userid from that table.
					create table profiles (
  id uuid references auth.users not null primary key,
  email text,
  is_paid boolean default false
);
The profiles table should be created.
- Go to the Table Editor and you should see an empty profiles table.
If you have users already, we need to run a command to add those existing users to the profiles table. - Go back to the SQL Editor and run this command.
					INSERT INTO public.profiles (id, email)
SELECT id, email
FROM auth.users
ON CONFLICT (id) DO NOTHING;
- Go back to the Table Editor.
- Check that any users have been added to the profiles table.
- Check at the top of the screen for a button that says RLS Policy or RLS disabled.
- If it says, RLS Disabled, click on the button, and select Enable RLS for this table.
- If it says RLS Policy, click on it. It should say, Users can update own profile.
5. Add Function and Trigger For New Users
Supabase needs to know that, when a new user registers, it has to trigger a new row in the profiles table. You can do this by setting up a trigger in Supabase.
- Go to the SQL Editor in Supabase and paste the following code in.
					create or replace function public.handle_new_user()
returns trigger as $$
begin
  insert into public.profiles (id, email)
  values (new.id, new.email);
  return new;
end;
$$ language plpgsql security definer;

create trigger on_auth_user_created
  after insert on auth.users
  for each row execute procedure public.handle_new_user();
The trigger should be created.
- To check it exists, To check it exists, go to Database → Functions . You should see handle_new_user listed there.
6. Add Supabase Secret Key to App
Your user authentication with Supabase ran from the frontend and used the publishable key. Updating the profiles table will happen from the backend, and we will use the Supabase secret key for this. That means we need to add it to our app as an environment variable.
- Go to your Supabase project, and click on Project Settings.
- Click on API keys.
- Scroll down and find the secret key. Copy it.
- In your Github dashboard, go to your Profile → Codespaces.
- Add a new secret, naming it SUPABASE_SERVICE_ROLE_KEY, and pasting the key as the value.
- Now add the SUPABASE_URL as another Codespace secret. You might have this already in your root .env file, but you can find it again in the Supabase dashboard.
- Go to Project Settings → Data API.
- Copy the API URL and paste is as your Codespace secret value.
- To prevent having to rebuild your Codespace container (see note below), also add both of these variables to your root .env file in Codespace.
NOTE: You may have to rebuild your Codespace container for it to recognize any new secrets. You can do this from Codespace, by pressing F1 for the Command Palette and search for Codespaces: Rebuild Container. You can also add it to server/.env as a backup, so you don’t have to rebuild the container for this session.
7. Add Subscription Payment to App
We are going to take this step by step to get Copilot to add the necessary code.
- Go back to your Codespace environment. Make sure previous updates are committed, so you are starting with a fresh commit.
- Prompt Copilot to update the backend server. Here is a sample prompt:
Keep my existing tutoring session Stripe payment endpoint and add a new one for a subscription to api/index.js.
Mode is subscription and price is STRIPE_PRICE_ID_SUBSCRIPTION
Copilot should generate a new app/post to api/index.js. Click below to see the code it generated for Tutormatch.
See code
					app.post('/api/create-subscription-session', async (req, res) => {
  try {
    const priceId = process.env.STRIPE_PRICE_ID_SUBSCRIPTION;
    if (!priceId) {
      return res.status(400).json({ error: 'Subscription Price ID not configured' });
    }
    if (!process.env.FRONTEND_URL) {
      return res.status(500).json({ error: 'FRONTEND_URL not configured' });
    }
    const session = await stripe.checkout.sessions.create({
      line_items: [
        {
          price: priceId,
          quantity: 1,
        },
      ],
      mode: 'subscription',
      success_url: process.env.FRONTEND_URL + '/success',
      cancel_url: process.env.FRONTEND_URL,
    });
    res.json({ url: session.url });
  } catch (error) {
    console.error('Stripe subscription error:', error);
    res.status(500).json({ error: error.message });
  }
});
- Ask Copilot to add the subscription option to the webhook handler, so it updates Supabase for a paid subscription.
Here is a sample prompt:
Add to my webhook handler so it handles the payment mode as it currently does.
If it is subscription mode, update the profiles table in supabase for that user. Set is_paid to true. SUPABASE_URL is the project URL and the secret key is SUPABASE_SERVICE_ROLE_KEY
Also handle subscription.deleted, and update profiles for that user so is_paid is false.
Click below to see the code for Tutormatch webhook handler. Note, we have a lot of console.log code, to ensure the webhook is working and the payments are being received.
See code
					app.post('/api/webhook', express.raw({ type: 'application/json' }), (req, res) => {
    const sig = req.headers['stripe-signature'];
    let event;

    try {
        // This verifies the message actually came from Stripe
        event = stripe.webhooks.constructEvent(
            req.body,
            sig,
            process.env.STRIPE_WEBHOOK_SECRET // This is your whsec_ key
        );
    } catch (err) {
        console.error(`Webhook Error: ${err.message}`);
        return res.status(400).send(`Webhook Error: ${err.message}`);
    }

    // 2. HANDLE THE EVENT
      if (event.type === 'checkout.session.completed') {
          const session = event.data.object;
          const mode = session.mode;
          const email = session.customer_details?.email;

          console.log('Session mode:', mode);
          console.log('Session email:', email);
          console.log('Session details:', session);

          if (mode === 'payment') {
              console.log('Payment Successful!');
              console.log('Customer Email:', email);
              console.log('Amount Paid:', session.amount_total / 100); // Stripe uses cents
              // This is where you would update your database (e.g., User.paid = true)
          } else if (mode === 'subscription') {
              console.log('Subscription Successful!');
              console.log('Customer Email:', email);
              // Update Supabase profiles table: set is_paid true for this user
              if (email) {
                  const supabaseUrl = `${process.env.SUPABASE_URL}/rest/v1/profiles?email=eq.${encodeURIComponent(email)}`;
                  const supabaseHeaders = {
                      'Content-Type': 'application/json',
                      'apikey': process.env.SUPABASE_SERVICE_ROLE_KEY,
                      'Authorization': `Bearer ${process.env.SUPABASE_SERVICE_ROLE_KEY}`,
                  };
                  const supabaseBody = JSON.stringify({ is_paid: true });
                  console.log('Supabase PATCH URL:', supabaseUrl);
                  console.log('Supabase PATCH Headers:', supabaseHeaders);
                  console.log('Supabase PATCH Body:', supabaseBody);
                  fetch(supabaseUrl, {
                      method: 'PATCH',
                      headers: supabaseHeaders,
                      body: supabaseBody
                  })
                  .then(res => {
                      console.log('Supabase PATCH response status:', res.status);
                      return res.json();
                  })
                  .then(data => {
                      console.log('Supabase update (is_paid true):', data);
                  })
                  .catch(err => {
                      console.error('Supabase update error:', err);
                  });
              } else {
                  console.log('No email found for subscription session. Supabase not updated.');
              }
          }
      } else if (event.type === 'checkout.session.expired') {
          const session = event.data.object;
          console.log('Session expired. Releasing the tutor slot for:', session.id);
      } else if (event.type === 'subscription.deleted') {
          const subscription = event.data.object;
          const email = subscription.customer_email || subscription.customer?.email;
          console.log('Subscription deleted. Email:', email);
          console.log('Subscription details:', subscription);
          // Update Supabase profiles table: set is_paid false for this user
          if (email) {
              const supabaseUrl = `${process.env.SUPABASE_URL}/rest/v1/profiles?email=eq.${encodeURIComponent(email)}`;
              const supabaseHeaders = {
                  'Content-Type': 'application/json',
                  'apikey': process.env.SUPABASE_SERVICE_ROLE_KEY,
                  'Authorization': `Bearer ${process.env.SUPABASE_SERVICE_ROLE_KEY}`,
              };
              const supabaseBody = JSON.stringify({ is_paid: false });
              console.log('Supabase PATCH URL:', supabaseUrl);
              console.log('Supabase PATCH Headers:', supabaseHeaders);
              console.log('Supabase PATCH Body:', supabaseBody);
              fetch(supabaseUrl, {
                  method: 'PATCH',
                  headers: supabaseHeaders,
                  body: supabaseBody
              })
              .then(res => {
                  console.log('Supabase PATCH response status:', res.status);
                  return res.json();
              })
              .then(data => {
                  console.log('Supabase update (is_paid false):', data);
              })
              .catch(err => {
                  console.error('Supabase update error:', err);
              });
          } else {
              console.log('No email found for deleted subscription. Supabase not updated.');
          }
      }

    // Return a 200 response to acknowledge receipt
    res.json({ received: true });
});
Now for the frontend. We split the prompt into 2 parts. First to add the button for subscription paymend, and then to add the logic for enabling/disabling features based on subscription being paid or not.
- Ask Copilot to add a new subscription payment button. Here is a sample prompt.
In the frontend, in App.jsx, add a new button, Subscribe for $9.99/year.
Clicking the button should trigger the create_subscription_session post.
- Ask Copilot to add the logic for disabling features if user is not paid, and enabling if user is paid.
The Get Advice and Find a Tutor buttons should be disabled if user is_paid if false, enabled if true.
Add an information label – “Unlock these features by subscribing” and place it above the 2 feature buttons.
Click below to see the frontend code for Tutormatch.
See code
					function Home({ user, setUser }) {
  const [screen, setScreen] = useState('advice');
  const [isPaid, setIsPaid] = useState(false);
  const navigate = useNavigate();

  useEffect(() => {
    async function fetchProfile() {
      if (user && user.email) {
        try {
          const res = await fetch(`${import.meta.env.VITE_SUPABASE_URL}/rest/v1/profiles?email=eq.${encodeURIComponent(user.email)}`, {
            headers: {
              'apikey': import.meta.env.VITE_SUPABASE_KEY,
              'Authorization': `Bearer ${import.meta.env.VITE_SUPABASE_KEY}`,
            },
          });
          if (res.ok) {
            const data = await res.json();
            // Supabase may return booleans or truthy strings; normalize to boolean
            setIsPaid(Boolean(data[0]?.is_paid));
          } else {
            setIsPaid(false);
          }
        } catch {
          setIsPaid(false);
        }
      } else {
        setIsPaid(false);
      }
    }
    fetchProfile();
  }, [user]);

  const handlePay = async () => {
    try {
      const res = await fetch('/api/create-checkout-session', {
        method: 'POST',
        headers: { 'Content-Type': 'application/json' },
      });
      if (!res.ok) {
        const text = await res.text();
        alert('Payment error: ' + text);
        return;
      }
      const data = await res.json();
      if (data.url) {
        window.location.href = data.url;
      } else {
        alert('Could not start payment session.');
      }
    } catch (err) {
      alert('Payment error: ' + err.message);
    }
  };

    const handleSubscribe = async () => {
      try {
        const res = await fetch('/api/create-subscription-session', {
          method: 'POST',
          headers: { 'Content-Type': 'application/json' },
        });
        if (!res.ok) {
          const text = await res.text();
          alert('Subscription error: ' + text);
          return;
        }
        const data = await res.json();
        if (data.url) {
          window.location.href = data.url;
        } else {
          alert('Could not start subscription session.');
        }
      } catch (err) {
        alert('Subscription error: ' + err.message);
      }
    };

  const handleLogout = async () => {
    await supabase.auth.signOut();
    setUser(null);
  };

  return (
    <div className="app">
      <header className="header">
        <h1 className="title">TutorMatch</h1>
        <p className="subtitle">Get Personalized Tutor Advice</p>
      </header>
      {!user ? (
        <AuthForm onLogin={() => {
          supabase.auth.getSession().then(({ data }) => {
            setUser(data?.session?.user || null);
          });
        }} />
      ) : (
        <>
          <button onClick={handlePay} style={{ margin: '1rem', padding: '0.75rem 1.5rem', fontSize: '1.1rem', background: '#635bff', color: '#fff', border: 'none', borderRadius: '6px', cursor: 'pointer' }}>
            Book a Session ($60)
          </button>
          <button onClick={handleSubscribe} style={{ margin: '1rem', padding: '0.75rem 1.5rem', fontSize: '1.1rem', background: '#00b386', color: '#fff', border: 'none', borderRadius: '6px', cursor: 'pointer' }}>
            Subscribe for $9.99/year
          </button>
          {!isPaid && (
            <div style={{ margin: '1.5rem 0 0.5rem 0', color: '#b00', fontWeight: 500, fontSize: '1.05rem', textAlign: 'center' }}>
              Unlock these features by subscribing
            </div>
          )}
          <NavTabs
            screen={screen}
            setScreen={setScreen}
            onLogout={handleLogout}
            adviceDisabled={!isPaid}
            findTutorDisabled={!isPaid}
          />
          <main className="container">
            {screen === 'advice' ? <GetAdvice disabled={!isPaid} /> : <FindTutor disabled={!isPaid} />}
          </main>
        </>
      )}
    </div>
  );
}


function App() {
  const [user, setUser] = useState(null);

  useEffect(() => {
    const { subscription } = supabase.auth.onAuthStateChange((event, session) => {
      setUser(session?.user || null);
    });
    supabase.auth.getSession().then(({ data }) => {
      setUser(data?.session?.user || null);
    });
    return () => {
      subscription?.unsubscribe && subscription.unsubscribe();
    };
  }, []);

  return (
    <Routes>
      <Route path="/" element={<Home user={user} setUser={setUser} />} />
      <Route path="/success" element={<Success />} />
      <Route path="/cancel" element={<Cancel />} />
    </Routes>
  );
}

export default App
8. Test Payment Process
- Test one-time payment: click the one-time option, use test card 4242 4242 4242 4242, complete payment
- Test subscription: click the subscription option, use the same test card, complete payment
- Check your terminal — the webhook should log different messages for each mode
- In the Stripe Dashboard, go to:
- Payments to see your one-time payment
- Subscriptions to see your new subscription (this section appears after you create a subscription)
- Go to Supabase and check the profiles table. Your user that paid should have is_paid set to true.
- Check in your app that a paid user has access to the unlocked features.
- Log out and log in again. Check they still have access to the full features.
- Log out and log in as an unpaid users. Check that the features are locked.
9. Commit your Changes
Once you are satisfied that your code works correctly for both types of payments, commit the changes to your repository branch.
You can then go back to Github, and merge your payment processing code with the main branch. This should immediately deploy your changes to Vercel.
10. Update Vercel Secrets
You added several new env variables in Codespace secrets. You need to add them in Vercel so they continue to work in production.
- Go your Vercel project dashboard.
- Click on Settings → Environment Variables.
- Add the following environment variables with corresponding values:
- STRIPE_SECRET_KEY
- STRIPE_PRICE_ID_TUTOR (or what you named your price id)
- STRIPE_PRICE_ID_SUBSCRIPTION (or your price id name)
- STRIPE_WEBHOOK_SECRET
- SUPABASE_URL
- SUPABASE_SERVICE_ROLE_KEY
You do not need to add FRONTEND_URL to Vercel, The env variable VERCEL_URL is automatically set by Vercel, and we’ve added that to the code for our Success and Cancel pages (Activity 2).
11. Check Supabase Redirect URL
If you haven’t already done so in the deployment lesson, make sure your Vercel URL is added to Supabase’s allowed redirect URLs — see the deployment lesson for instructions.
Reflection
Payment processing is an important piece of your business success, so you want to make sure it works correctly. Consider these questions:

Pricing Strategy
Sample Code
Business Model
Key Terms
Hosted Checkout — A Stripe-provided payment page that your app redirects users to, where Stripe collects payment details so your app never touches card data.
Checkout Session — A server-side object you create in Stripe that defines what to charge, how much, and where to redirect the user after payment.
Webhook — An HTTP request Stripe sends directly to your server when a payment event occurs, providing reliable payment confirmation independent of what the user does in their browser.
express.raw() — Express middleware that preserves the unmodified request body, required for webhook signature verification to work correctly.
Business Sandbox— A Stripe environment where payments are simulated using test card numbers so no real money is charged during development.