team at pitch event

Preparing to Pitch

This lesson is for Beginner teams who are attending a Regional Pitch Event, and who will be pitching.

LIVE PITCHING

If you will participate in a regional pitch event or celebration event, your team will pitch live to a panel of judges.  

The goal of a live pitch is to get investors (or judges, in this case) interested enough to want another meeting for more information (or invite you to the next round, in this case).

Your pitch is like a movie trailer that highlights the main parts of your project and inspires people to go see the full movie. 

Your live pitch can be up to four minutes long and then will be followed by a question and answer section with judges. 

team at pitch event

Your pitch should make judges very interested in your Technovation project.

“First and foremost, you will need to work on standing out”

THE PITCH DECK

A pitch deck is a brief and engaging visual presentation that gives an overview of your project. It’s often created with Google slides, PowerPoint, Prezi, or other presentation tools. 

The 10/20/30 Rule, originated by Venture Capitalist Guy Kawasaki suggests:  

  • no more than 10 slides
  • last no longer than 20 minutes (for you, 4 minutes!), 
  • no smaller than 30 pt. font so people can easily read the slides

Use your pitch deck as a guide for what you will say. Don’t put everything you will say into the slides. Focus on only the essential information.

Here are suggested topics for a 8 slide deck. 

Title Slide
Include:
Project logo or picture
Team Name
Team Members
Problem
Use your hook.
Describe the problem.
An image showing the problem could be helpful.
Solution
Explain your solution to the problem.
Technology
Describe the technology used.
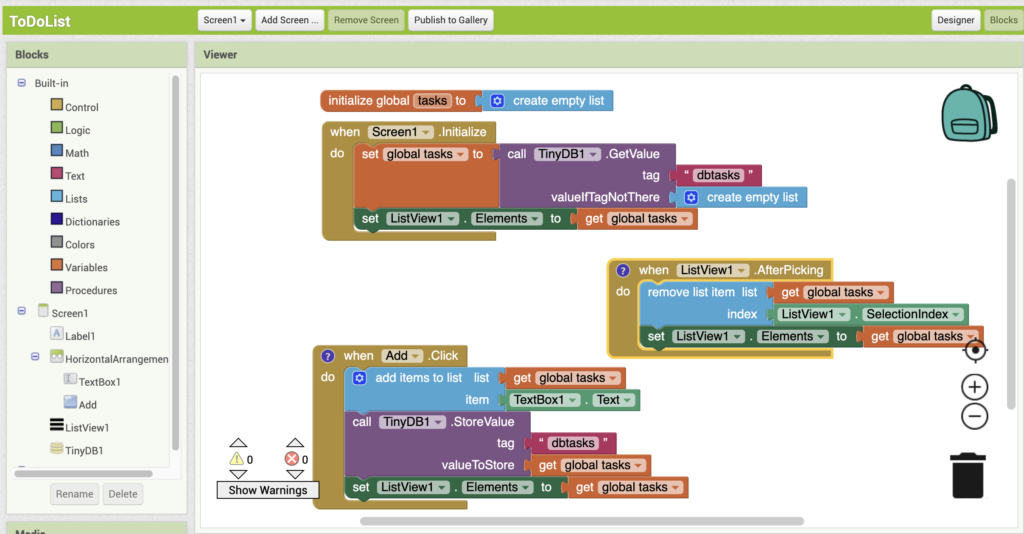
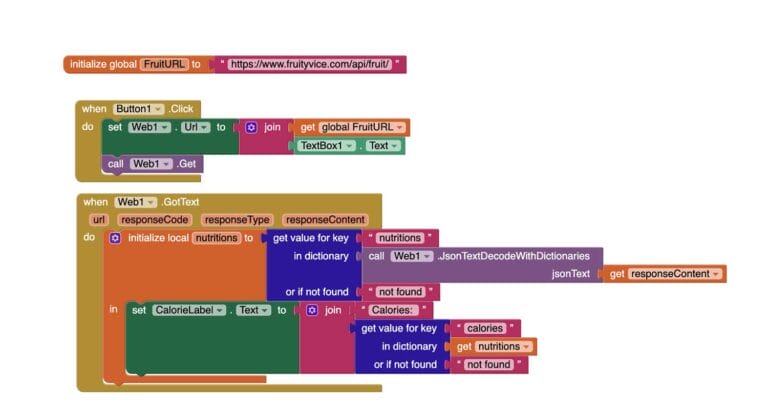
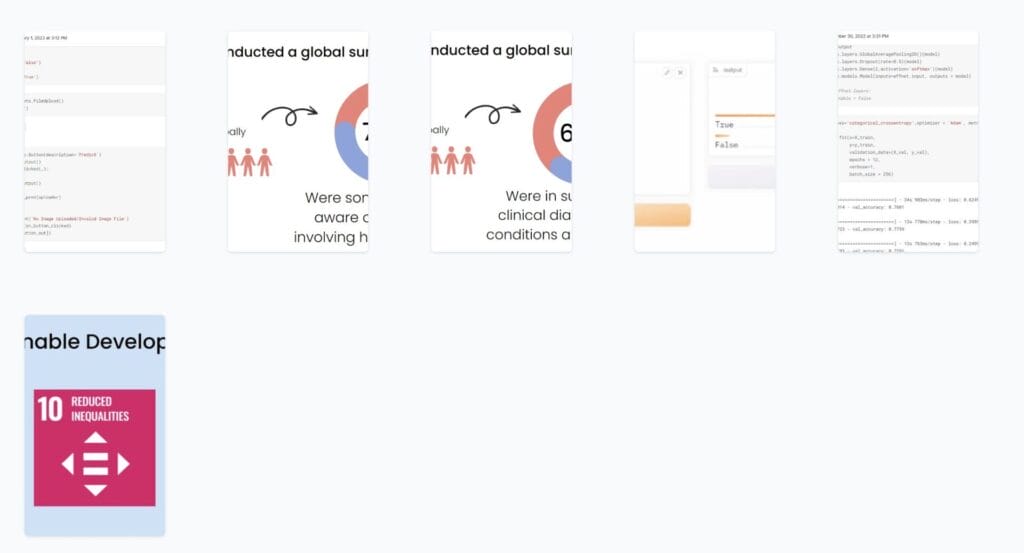
Show images or a demo of your app or Scratch project.
Users
Share who your users are and how they tested your app or Scratch project.
Explain how they gave your feedback on your project.
Competitors
Provide an overview of competitors and how your solution is different and better.
Future Plans
Explain how you intend to keep improving your app or Scratch project.
Wrapup
Restate how your solution successfully solves the problem.
Previous slide
Next slide

Here is a good way to make your presentation slides.

  1. Draft on paper first.
    1. Write down the main points you want to make.
    2. Write down points for each slide.
    3. Ask your mentor or parents for feedback.
  2. Make your slides.
    1. Make your slides based on your outline.
    2. Try to use more than just text.  Images, charts, and quotes can all help you tell your story.
    3. Ask for feedback from your mentor or parents.
    4. Update your slides based on feedback until you are satisfied.

ACTIVITY 1: MAKE YOUR SLIDE DECK

Follow the steps above to make a presentation for your Regional Pitch Event.

REHEARSING

“For preparing for the live pitch, I think it’s most important to practice a lot to build confidence. It’s also important to describe the app and all of its functions clearly so that the judges can really understand why it is new/special/exciting.”

Below are some tips for answering questions during the pitch.

Remember, your team is in control!  

  • Decide before the event who on the team will answer certain questions, for example questions about coding or about how the project works.
  • Slow down, take a deep breath and pause before answering to show confidence.
  • Keep your responses to 30 seconds or less.
  • Listen closely to make sure you hear the question correctly.
  • If you are unsure about the question, you can always repeat it back to make sure you have it right.
  • Don’t interrupt the person asking the question, even if you have heard it many times before.  


  • Show judges respect when you listen to their questions.
  • Even if the judge asks you something you already covered in your pitch, respond politely without becoming defensive.  

If a judge asks a confusing question, don’t be afraid to ask them to explain what they mean. You can also ask them to repeat the question, or ask them for more detail.

First, look to your team mates to see if anyone else can answer the question.

If not, it’s okay to say you don’t know the answer to a question, but try to say what you do know. For example:

  • I don’t know the answer to that; but, what I can tell you is…
  • I don’t know the answer to that. Here is the main idea…

You can also simply say, I don’t know the answer to that right now, but I can find that out for you.

Prepare by making  a list of all the questions you think you might get asked. Write down your answers to those questions.

Here are some steps you can take to rehearse your pitch.

  • Start by pitching to your mentor or a parent.
  • Then, find different people and larger groups to rehearse in front to.
  • Make sure to time yourself each rehearsal to stay within the 3 minute time limit!
  • When rehearsing, remember to:
    • Stand up straight, relax your shoulders and jaw, and take a deep breath.
    • Look at your audience. You may use notes, but try not to read them word for word.
    • Hold your hands in front of you naturally. Use your hands for emphasis when needed, pointing to visual aids or raising and lowering them slightly in time with main points.
  • Have your audience ask you questions so you can practice for the question and answer section.
  • Ask for feedback each time, and think about this before you practice your pitch to another audience.
  • Try recording your rehearsal, then watch it and discuss with your team to improve.

ACTIVITY 2: REHEARSE YOUR PITCH

Follow the steps above to make sure you are prepared for the Regional Pitch Event.
girls jumping on hill

Submitting your Project

IT’S TIME TO SUBMIT!

We’ll go through all the parts of the submission but it’s a good idea to start by uploading your videos.

You should get some help from your parent or mentor with this step!
 
You can upload your videos to:

Make sure you set your videos as “unlisted” or “public” so judges can judge them!

Now that you have your videos uploaded, let’s walk through all the parts of your submission!

You’ll need to log into your Technovation Girls account and submit there.

For a detailed description of each of the submission parts, see this document.

Here’s a checklist to get organized!


Click on each item below to learn more about that part of the submission.

Project name and problem/ project description

Think back to the problem statement you did in unit 3. What was your solution to the problem? Why did you choose that solution? Must be in English.

Pitch Video

Link the pitch video you uploaded on either YouTube or Vimeo. Make sure you set your videos as "unlisted" or "public" so judges can judge them

Technical Video

Link the technical video you uploaded on either YouTube or Vimeo. Make sure you set your videos as "unlisted" or "public" so judges can judge them

Technical Additions

Depending on your coding language and platform, you will either submit a project page link or upload a file.

Your Learning Journey

Maximum 200 words about your learning journey, must be in English. 2-6 pictures that describe your journey.

Team Photo and Summary

Let us know who you are and what your team looks like!

CHECK OUT THIS EXAMPLE SUBMISSION!

REVIEW AND SUBMIT BUTTON

Once your team has uploaded all the parts of your submission, click the “Review and submit” button.

You’ll have until the deadline to edit your submission.

Then, when you are ready, click the final “Submit now” button!

You will see a screen that says,
“Your project has been successfully submitted.”

submission confirmation

And that’s it! You did it!

Congratulations on completing the Technovation Girls season!

Learning Journey

Wow! You’ve worked very hard for many weeks!
Your project is almost complete!

Now it’s time to look back on what you have learned and what you have accomplished over the past few months.
You will be amazed at how much you have grown!

girl with computer

Think:

  • What new things have you learned?
  • Did you face any challenges?
  • How did you overcome them?

Pictures to help tell the story:

  • Of the team working on the project
  • Of any research you did (survey results, datasets)
  • Of your project
    • Screenshot of the app or project
    • Picture of people using it

Part of your project submission is writing about your learning journey.

This will be a maximum of 200 words in length.

Remember to include 2-6 pictures to help tell the story.

ACTIVITY: YOUR LEARNING JOURNEY

Fill out the worksheet to get you started writing your learning journey.

Editing your Videos

Now that you have recorded footage for your pitch and technical videos, it’s time to put the clips together and polish them into final versions.

Let’s start with a little inspiration from team ELIST.

Think about the ELIST video and answer these questions:

  • What makes their video editing stand out?
  • What effects did they use to help pass on information?
  • How did they use titles and text?
  • Would you change anything to improve their video?

NEED MORE INSPIRATION?

Check out the Technovation App Gallery for more pitch video examples.

girl jumping in the air

STEP 1: VIEW YOUR RECORDINGS

phone recording
  • Start with the pitch video.
  • Go through all the video clips you have recorded.
  • Make sure you’ve got all your answers covered!
  • Select the video clips you will include in your pitch video.

STEP 2: CHOOSE YOUR VIDEO EDITOR

There are many free video editing software programs available:

STEP 3: EDIT YOUR VIDEOS

ACTIVITY: EDIT YOUR VIDEOS

Using video editing software, edit your pitch and technical videos.

MORE TIPS AND RESOURCES

If you need more help getting started with editing your videos:

phone recording

Recording your Videos

lights camera action

READY TO RECORD?

  • Focus on gathering all of the footage that you want in your video.
  • Use your storyboards and scripts to determine WHERE you will record and WHAT you will say in the videos.

Remember to answer these questions in your videos!

PITCH VIDEO

  • What is the problem and why is it important?
  • How did you solve the problem?
  • What technology did you use? Why?
  • Is it similar to other solutions? How is yours different?

TECHNICAL VIDEO

  • What did you build?
  • How does it work?
  • How did you build it?
  • Who tested it?
  • What feedback did you get?
  • What doesn’t work yet?
  • What will you add in the future?

TIPS FOR RECORDING

Make sure everyone is loud and clear!

Good audio is important so viewers can understand your video.

Avoid background noise.

girl talking in megaphone to 2 men
girl making eye contact

Make eye contact with the camera!

Talk to your audience directly! Use cue cards to help you say your words.

Voiceovers, animations, and visuals can help tell your story!

These might be added when you get to editing your video!

girl speaking into microphone

Record more than one take!

Try different angles and lighting.

More recordings will make editing your video easier.

Use lots of light!

Try to record in daylight, or in a room with lots of natural light!

If recording outside, make sure it doesn’t affect the sound of your recording.

Don’t have light behind your subject, or they will appear dark in the video.

window with light shining through
smartphone on a tripod

Use landscape mode!

Don’t record vertically with your camera or phone.

Try to use a tripod or flat surface to keep your camera stable.

Protect privacy!

Don’t show names, numbers, or accounts.

If others appear in your videos, get a release form for their permission. Here is a sample.

privacy on keyboard

SPECIAL TIPS FOR TECHNICAL VIDEO

If you are recording your mobile app or Scratch project running on a computer, try using screen recording software.

Here are some free suggestions:

REQUIREMENTS

  • Everyone is involved!
    • All members of the team should be shown and speak during the video.
  • Videos can be 2-3 minutes long.
  • English and/or English subtitles must be included.
  • You need to have the consent of everyone you show in your videos.
  • Give credit for all images and information you use in the videos.
    • Ask for consent or give acknowledgment to the person who created it.
    • You can learn more about copyright, fair use, and public domain here.

ACTIVITY: RECORD YOUR VIDEOS

Using your storyboards and scripts, record footage for your pitch and technical videos.

Planning your Videos

Your final project should include 2 different videos.
 
We’ll go over what they are, and what each of them should cover in this lesson.

There can be a lot to think about when planning your videos! So many ideas can fly around so it’s best to organize and write down your thoughts

 
Let’s start with the Pitch Video by breaking it down into six main parts:
  1. The Hook
  2. The Problem
  3. The Solution
  4. The Technology
  5. The Competition
  6. The End

THE PITCH VIDEO

crochet hooks

THE HOOK 

10 seconds

Grab your audience’s attention! 

You have 10 seconds to convince the viewer to watch your video.

Start with a fun fact, a surprise, or just immediately state your problem and solution!

girls in front of poster

THE PROBLEM 

60 seconds

Talk about the problem you are solving.

Set the scene with background on the problem you are solving.

Explain why it’s important to solve.

THE SOLUTION 

40 seconds

Show your solution!

Showcase some key features of your app or project.

Explain why your solution solves the problem.

THE TECHNOLOGY 

30 seconds

Why this solution?

Convince the viewer that this solution is the best way to solve this problem.

different paper airplanes

THE COMPETITION 

30 seconds

Prove that this solution stands out.

Talk about what solutions already exist and explain why yours is better.

woman hiking on trail

THE END 

10 seconds

End with strong inspiration!

Remind the viewer about the main reason for your project and tell them what to do next.

For example, they should use your app when it’s complete!

This video below is an example of a Technovation Pitch Video!

The most important thing in the pitch video is to show why you care about what you’ve done!
 
You and your team have worked so hard on your project, so show the world!
 

THE TECHNICAL VIDEO

Your Technical Video has a different purpose and should follow a different structure:

  1. Introduce your project
  2. Explain how it works
  3. Talk about users and feedback
  4. Explain how you coded it
  5. Look to the future
girl holding finger up

INTRODUCTION 

15 seconds

Restate your problem and solution.

Explain briefly the problem you are solving and what your solution is.

app demo

HOW IT WORKS

60 seconds

Demonstration time!

Show off your app or project! 

Give a demonstration of your app or project in action, so viewers know exactly how each feature works

girls at table with woman using a phone

USERS AND FEEDBACK

30 seconds

It’s important to show you stayed connected to users.

Explain who you asked for feedback and who has tested out your app or project.

Talk about feedback you got and how it affected your project.

App Inventor blocks editor

THE CODE

45 seconds

Show off your technical knowledge.

Choose one or two important parts of your app or project, show the code, and explain how it works. 

If you made an AI model, you can talk about how you built it

THE FUTURE

30 seconds

Explain what you can do better. It’s okay if not everything works yet!

You can really get viewers interested by showing that you have plans to make your project even better!

This video below is an example of a Technovation Technical Video!

The most important thing in the technical video is to show what you made, and how it works!

Even if not everything is done, tell the viewer what your future plans are.

THE OUTLINE

The outline is where you make a list of everything you want to cover in your video.  

This first two activities will help you organize your videos and make sure you answer all the questions in the judging rubric.

ACTIVITY 1: OUTLINE YOUR PITCH VIDEO

Download the file and fill out the worksheet

ACTIVITY 2: OUTLINE YOUR TECHNICAL VIDEO

Download the file and fill out the worksheet

STORYBOARDS

Once you have your big ideas down, you can now start your storyboard.

A storyboard is a set of drawings that show what your video will look like. Kind of like a cartoon or comic strip.

In a storyboard,
you draw out what
you imagine your video will look like.

A storyboard does not need to have fancy drawings or even be in color. It’s just a way for you to visually plan out your video. 

You are telling a story about your project.
 
Here is an example.
storyboard

Phone is on the table

It starts to ring

Jane reads the message

A storyboard can be as simple as this!

Even if this storyboard is simple, we all have a clear idea of what the video will look like now.

In each box, you draw what is happening. You should also write down what’s happening under each box. The box to the right should show what happens next.

TRY IT OUT!

Coco lost one of her shoes!

She looked under the sofa but found a penny instead.

Coco asked her mother but her mother said she hadn’t seen it.

Read the short story above. Imagine what the story would look like and draw it out on a storyboard.

stick figure

Stick figures are ok! The pictures are for you and your team to decide the story you will tell. 

You will turn it into a brilliant video soon!

Now you will make a storyboard for your pitch and technical videos!

ACTIVITY 3: STORYBOARDS

Create 2 storyboards - one for your pitch video and one for your techical video.

Use your PItch and Technical Video outlines to make sure you answer all the outline questions in your storyboards.

SCRIPTS

Once you have your storyboard completed, you can now work on the details of your video with your script.

A script is the written words of your video.
 
Take your storyboard and write down what will be said in your video. Turn the pictures into words.

In a script,
you write down
everything that
happens in your videos.

Here are some parts to include in your script.

park bench
stick figure in crayon
speech bubble with crumpled paper inside

Setting

Where will you record your video? Deciding where your video takes place helps you imagine what your video will look like. You can have more than one setting in your video!

People

Who is talking and what are they doing? Especially if you’re working with a lot of people, you can note down exactly who is present and their actions.

What is said

What exactly are you going to say? By writing it down, you can make sure that you’ll remember all the important points.

TRY IT OUT!

Look at the picture above and try writing a small script! Where are they? Who are these people? What are they saying? 

As you write the scripts for your videos, have your outlines and storyboards by your side and check off each answer as you add it to the script!

You don’t have to follow the order of the questions but make sure you answer them all in your videos.

Your scripts can be used later as the subtitles for your videos!

THE VALUES SANDWICH

The Values Sandwich is a way to help others care about the same things you care about.

sandwich
1

Say why the thing matters in a way that’s easy to understand

2

Then say what the thing is

3

Then explain again in different words why it matters

Here is an example.

1

Everyone deserves to enjoy nature and should learn about protecting the world we live in.

2

Our app, EcoFriend, connects people who care about the environment so that we can work together to solve problems.

3

By working together, we can achieve more to help make our Earth cleaner for years to come.

TRY INCLUDING YOUR VALUES SANDWICH IN YOUR SCRIPT!

girl reading from book

Once you’ve written your script. Try practicing it!

Practicing your script helps you listen to your words, see how they sound when said out loud, and gives you an idea of how long your video will be.

ACTIVITY 4: SCRIPTS

Create 2 scripts - one for your pitch video and one for your technical video.

Use your PItch and Technical Video outlines and storyboards to guide you.

GETTING FEEDBACK

Now that you have your outlinescript, and storyboard, this is a great time to get some feedback on what you’ve done!

feedback bubbles

Feedback is important because it’s useful to know that your materials make sense from an outsider’s point of view.

Find a helper (or two!) to give your materials to.

Let them read through your materials without explaining anything to them.
 

Then ask these questions:

  1. What problem am I trying to solve and why is it important?
  2. How did I solve my problem?
  3. How is my solution unique?

And then ask:

  1. Did everything make sense?
  2. Do the parts flow together?
  3. Do you understand how my app or project works?

Once you’ve gotten your feedback, go back to your materials and update them with the advice in mind. Then ask for feedback again!

Outline Pitch and Technical Videos

  • Learn about the requirements for the pitch and technical videos 
  • Create outlines to plan your videos 
  • Create storyboards and scripts for your pitch and technical videos

PREPRODUCTION

The pre-production phase of the video making are the parts you need to plan before you start to record.

You will have 3 minutes to make a case for your project in your pitch video and 3 minutes to demonstrate the technical aspects of your app in your technical video. Don’t be afraid to show your personality and passion for the problem you are solving!

Let’s first go over what should be included in each of your videos for Technovation Girls.

what's your story

The Pitch Video

Goal: Convince viewers about your project ideas. You will do so by answering the following questions: 

  • What problem are you solving and why is it important to you and the community? 
  • How does your problem relate to the United Nations’ Sustainable Development Goals? 
  • How does your app solve the problem? 
  • Why is this technology  the best way to solve the problem?  
  • Are there any similar solutions that already exist? Why is your solution better?
  • How did our team ensure our app has only positive impact on direct and indirect users?

TIMELINE FOR PITCH

Below is a suggested timeline for the 3 minute pitch video.

10 seconds
10 seconds

The Hook

Grab your audience’s attention! Start with a fun fact, a surprise, or just immediately state your problem and solution!

30 seconds
30 seconds

Introduce the Problem

Clearly state the problem you are solving and explain why it matters to your team.

1 minute
1 minute

Problem In-depth

Talk about research you did on the problem you are solving. Relate it to the UN SDGs.

40 seconds
40 seconds

Technology

Explain why the technology (mobile or web app) is the best solution. Show how your solution solves the problem and is the best solution compared to others.

20 seconds
20 seconds

Positive Impact

Explain how you are ensuring only positive impact for all stakeholders with your solution.

20 seconds
20 seconds

Wrapup

Conclude your video with a quick summary. Remind the viewer why your project is the best solution to the problem.

INSPIRATION

Below are pitch videos from past Technovation seasons that can help you get started.

As you watch them, think about what you like and how you’d incorporate that into your pitch video. 

Consider the following questions: 

  • What makes their pitch stand out? Is there a personal story that explains why they care about the problem? 
  • Do they use visuals? Are they well used?
  • Is their problem statement and explanation of the technology solution strong? Is it clear?
  • Do you understand how the app functions?
  • Do the future plans for their idea make you excited about its impact on the world?
  • Was their video easy to understand and clearly organized? Why? 

Click each app name to view the video. 

Note: Some of the requirements and video lengths may be different in other Technovation seasons.

Connects users with opportunities in technology, learning, and innovation.

Helps players change their behavior to become more eco-conscious.

Teaches young people about puberty.

The Technical Video

Goal: Show how you built your app and how it works. You will do so by answering the following questions. 

  • What app have you built? What parts work successfully so far?

  • How did you test your app with users? What was the feedback? How did feedbacj affect the app featuers? 

  • What coding and/or machine learning training did you do to make the app? Can you explain some significant part of your code and how it works? 

  • What doesn’t work yet? What future app features do you hope to build?

TIMELINE FOR TECHNICAL VIDEO

Below is a suggested timeline for the 3 minute technical video.

15 seconds
15 seconds

Introduction

Briefly introduce your app and explain how it solves the problem.

45 seconds
45 seconds

How it Works

Demonstrate your app in action. Show how the key features of the app work.

1 minute
1 minute

How You Built It

Convince the viewer you know your technology! Explain how you built your app by explaining some key code from your app  how the code works. If you included AI, you can show your dataset and how your trained your machine learning model.

30 seconds
30 seconds

Feedback

Explain how you got people to test your app, what feedback you got, and how you incorporated the feedback into the app.

30 seconds
30 seconds

The Future

Explain what doesn’t work yet and what plans you have in store to improve your project. What features do you hope to add?

INSPIRATION

Below are technical videos from past Technovation seasons that can help you get started.

As you watch them, think about what you like and how you’d incorporate that into your technical video. 

Consider the following questions: 

  • Do you understand how the app works? 
  • Do you understand the steps taken to code the project? 
  • If machine learning was included, do you understand how they trained their model? 
  • Did you see evidence of user testing and feedback?
  • Do the future plans for their idea make you excited about its impact on the world? 
  • Was their video easy to understand and clearly organized? Why?

Click each app name to view the video. 

Note: Some of the requirements and video lengths may be different in other Technovation seasons.

Raises eco-awareness through user challenges

Provides real-time database on school dropout, which makes it easy to identify disadvantaged youths and children.

Uses AI and bird song to monitor water quality.

CREATING THE OUTLINE

The outline is where you start making a list of all the points you need to address in the video.

Use the judging rubric to create a list of questions you will answer in the video. 

Click each box below to see an example outline question, possible answer, along with supporting materials. 

question
Question
How did you get user feedback on your problem and solution?
my answer
My Answer
  • We sent out polls to the local neighborhood online group.
  • We ran individual user tests with community members and our prototype.
  • We interviewed experts in the field for their insight to the problem we chose.
materials to help me make my point
Materials
  • A visual summary of poll results
  • Recordings of our user testing sessions
  • A quote from the expert we interviewed .

ACTIVITY 1: OUTLINE PITCH VIDEO

Estimated time: 30 minutes

Use the worksheet to organize your video

  1. Address each part of the judging rubric by answering each question.
  2. Refer to past lessons and identify materials you can use for the video.
Note you can make a copy of the worksheet and edit as needed.
Open worksheet

ACTIVITY 2: OUTLINE TECHNICAL VIDEO

Estimated time: 30 minutes

Use the worksheet to organize your video

  1. Address each part of the judging rubric by answering each question.
  2. Refer to past lessons and identify materials you can use for the video.
Note you can make a copy of the worksheet and edit as needed.
Open worksheet

STORYBOARDS & SCRIPTS

Now that you have your outline, you can create your script and storyboard.

These two elements are very important in the preparation or pre-production phase of your video making.

They both help to clearly convey important information and ideas to everyone (including yourself!) involved in the filming process. You can create the script or storyboard in any order you wish, but it’s helpful to do both! 

The Storyboard

The storyboard is the visual method of organizing your video creation thoughts.

It looks similar to a comic book. You also don’t have to be an artist to make a storyboard though!

Creating a storyboard isn’t about drawing really well, it’s just for you to get your thoughts down visually to lay out the flow of the video. 

The Script

The script is where you write out exactly what will be said in the video. If you have already created your storyboard, then you should work from that to fill in the words that will be spoken during each scene, or box, in the storyboard. 

If you prefer to start with the script, use your outline as a starting point.

Make sure to cover everything you wrote down in the outline. However, don’t just restate everything in the outline! Make it compelling! How can you hook your audience to make them want to listen to your message?

PARTS OF THE SCRIPT


PLACE-TIME:

This is where the action on the screen happens. Describe what happens on screen and any important movement that should be noted.


CHARACTER NAME:

This is the dialogue or exact words that the character would say. 


TRANSITION

EXAMPLE SCRIPT

OUTSIDE SCHOOL, AT PICNIC TABLE

Two girls sit, eating their lunch and talking.

LAURA:

I have been having trouble waking up to my alarm every morning. I am late for class all they time!

MARISA:

That’s not good. I’ve been taking a coding class. Maybe I could make a mobile app that could solve your problem.

FADE TO NEXT SCENE

ACTIVITY 3: STORYBOARD YOUR VIDEOS

Estimated time: 30 minutes

Use the worksheet to organize your videos visually

  1. Tell the story of each video by drawing each part of the video (stick figures work!).
  2. Under each picture, describe what happens in that scene.
  3. Use multiple pieces of paper if necessary.
  4. Do a separate storyboard for the pitch and technical videos.
You can also use an online storyboard platform if you prefer.

Note you can make a copy of the worksheet and edit as needed.
Open worksheet

ACTIVITY 4: WRITE YOUR VIDEO SCRIPTS

Estimated time: 30 minutes

Write the dialogue for your videos

  1. Check your outlines to make sure you cover all points in your videos.
  2. If you have made your storyboards, use them to guide your scripts.
  3. Do a separate script for the pitch and technical videos.

GET FEEDBACK

As always, ask a mentor, a parent, or a friend to give you feedback on your outlines, scripts, and storyboards.

Remove anything that is unnecessary or extra.

Be sure to ask these questions for each video: 

  • Does it make sense?
  • How does it flow?
  • Is the core story being delivered?
  • Are we telling the story and the main messages in the best way possible?
feedback bubbles

REFLECTION

You have created outlines, storyboards, and scripts for your pitch and technical videos!

That’s a lot! But it pays to be prepared when you start recording your videos. 

Make one final check that you have covered all the necessary parts in your video.

Hold onto the documents you created in this lesson. You will use them when you record your video .

REVIEW OF KEY TERMS

  • Pre-production – planning elements of a video before starting to record 
  • Pitch video  its purpose is to get people excited about your idea, by explaining the problem, showing your solution, and taking viewers through the process of your entire project 
  • Technical video its purpose is to show off your technical skills by showing how your product works, and how you built it 
  • Storyboard – a visual outline of your video that helps you design a compelling story about your idea 
  • Script – the written words that will be spoken during a video

ADDITIONAL RESOURCES

Here are some of our favorite resources for how to craft a great pitch:


Check out some tips from past Technovation participants below on creating your pitch.

Zinab RamlawiPast Technovation Student Ambassador

Video Diaries – Technovation Girls talk about making their pitch videos

Recording Videos

  • Record a pitch video to share your idea with the world  
  • Record a technical video to demonstrate your technical skills 
  • Record screenshots and/or screen recordings to add to your video

LIGHTS, CAMERA, ACTION!

You are ready to produce, or create, your pitch and technical videos. Start by gathering all the footage you want in your videos.  

For the Technical video, this includes screenshots and screen recordings of your project.

phone recording

You may also want to record some  B-roll footage

  • also known as alternative footage. 
  • footage that goes with a voiceover
  • example: busy street scene playing while you talk about traffic issues

Below are some suggested recording tips.

man listening

VOLUME

Make sure everyone is loud and clear. Good audio is critical for someone to understand your videos.

Make sure there is minimal background noise.

woman looking at camera

EYE CONTACT

Look at the camera when speaking.

You can use cue cards to read your part of the script.

VOICEOVERS

Voiceovers with animations and visuals can help tell your story in an interesting way.

You will learn more about how to edit your videos and add in these items in the next lesson.

horizontal phone

LANDSCAPE

Shoot videos in landscape mode instead of vertical.

Keep your recording device stable using either a tripod or flat surface.

eiffel tower different angle

MULTIPLE TAKES

Record multiple takes of the same scene. This will give you plenty of material for editing.

Try capturing some different angles and shots.

LIGHT

Film during the daytime either outside or in a room with lots of natural light.

If filming outside, be aware how it may affect the quality of your audio.

Do not film with a bright window or light source behind your subject. This will make your subject look too dark.

PROTECT PRIVACY

When recording, do NOT show identifying

  • names,
  • numbers
  • accounts

You must have the consent of everyone  who appears in your videos. 

Have people appearing in your video  sign a release form 

Here is a template for a photo or  video release form that you can use.

sign - we respect your privacy

COPYRIGHT, FAIR USE, AND PUBLIC DOMAIN

You might want to use images, music, or video you find online in your videos.

You must see if it’s free to use, or you need permission.

It can be tricky to figure out, but this video can help.

RECORDING YOUR SCREEN

You may want to use screenshots and/or screen recordings in your videos. Here are some useful programs/apps that you can use to record your screen: 

ACTIVITY 1: RECORD PITCH VIDEO

Estimated time: 60 minutes

Use your outline, script, and storyboard as guides

Remember these requirements as you record:
  1. Videos must be uploaded and set to unlisted or publicly viewable when published to YouTube or Vimeo.
  2. All members of the team should appear and speak.
  3. Pitch videos are a max of 3 minutes
  4. English and/or English subtitles must be included.
  5. Protect privacy: Do not show identifying names, numbers or accounts. You must have the consent of everyone who appears in your video.
  6. Cite images and information. Ask for consent or give acknowledgment to the person who created it.

ACTIVITY 2: RECORD TECHNICAL VIDEO

Estimated time: 45 minutes

Use your outline, script, and storyboard as guides

Remember these requirements as you record:
  1. Videos must be uploaded and set to unlisted or publicly viewable when published to YouTube or Vimeo.
  2. All members of the team should appear and speak.
  3. Technical videos are a max of 3 minutes
  4. English and/or English subtitles must be included.
  5. Protect privacy: Do not show identifying names, numbers or accounts. You must have the consent of everyone who appears in your video.
  6. Cite images and information. Ask for consent or give acknowledgment to the person who created it.

REFLECTION

Congratulations, you’re getting close to finishing your videos! In the next lesson, you’ll learn ways to edit them to make them shine! Take a moment to consider the following:

What recording techniques were new to you?
Which techniques were most helpful for your videos?
How did your technical video differ from your pitch?
Which video was more difficult to produce?
What challenges did you face throughout the video making process?
Previous slide
Next slide

REVIEW OF KEY TERMS

  • Production – the act of creating, in this case, recording video footage for your videos
  • B-roll footage – recording that is not of the main subject, possibly to add context and enhance the message
  • Screenshots/screengrabs – static (non-moving) images of a computer or phone screen
  • Screen recording – video recording of a computer or phone screen, usually with narration added later
  • Voiceover – adding narration to a video

Editing Videos

  • Edit your videos to make them polished, viewable, and engaging 

  • Upload your videos and add them to your submission

POST-PRODUCTION

The last step to finish your videos is called  post-production

This includes:  

  • adding effects, titles, and sound to make it  more engaging 
  • removing parts that aren’t needed 
  •  adding in screenshots 
  • adding English subtitles (required if you don’t speak English in your video) 
  • adding narration and possibly other special effects into the videos.

Remember, you have 3 minutes for your pitch video and 3 minutes for your technical video. 

Keep the judging rubric in mind so that you can include the most important parts of your story.

girl editing video

You can use many techniques to edit your videos, and it can become involved.

Below are the steps you should take to edit each video.

INSPIRATION

Below is a pitch video from a past Technovation Girls team. As you watch it, think about what you like about the editing and what you want to incorporate into your pitch video.

As you watch the video, consider these questions: 

  • What makes their view stand out? 
  • What effects did they use to communicate information? 
  • Would you have added anything to better understand their project?

Need more inspiration. Click on this button! –>

Note: Previous years of Technovation Girls may have different rules, that’s why you’ll see different video lengths.

ACTIVITY 1: EDIT PITCH VIDEO

Estimated time: 60 minutes+

Using your script/storyboard to guide your edits

  1. Gather and organize additional images, graphs, music to add to video.
  2. Prioritize the most important edits you need to make to your video to submit them.
  3. Choose a video editing software.
  4. Edit your pitch video.
  5. Get feedback from your team members and mentor.
  6. Check that the video is 3 minutes or less.
  7. Incorporate feedback and refine until you are satisfied with the end result.

ACTIVITY 2: EDIT TECHNICAL VIDEO

Estimated time: 60 minutes+

Using your script/storyboard to guide your edits

  1. Gather and organize additional images, graphs, music to add to video.
  2. Prioritize the most important edits you need to make to your video to submit them.
  3. Edit your pitch video.
  4. Get feedback from your team members and mentor.
  5. Check that the video is 3 minutes or less.
  6. Incorporate feedback and refine until you are satisfied with the end result.

ACTIVITY 3: UPLOAD VIDEOS

Estimated time: 20 minutes

Upload completed videos for submission

  1. Choose Youtube or Vimeo to upload.
  2. Follow instructions below to upload your pitch and technical videos..
  3. Set your video as unlisted or public so judges can judge it!
  4. Upload the video links to the Technovation submission platform.

REFLECTION

Congratulations, you’ve polished your videos, uploaded and submitted them!

You should be proud of what you have created. Now you can really celebrate with your team! Take some time to reflect:

girls jumping on hill
How did your videos change from when you storyboarded them to the final versions?
What challenges did you face while editing?
Previous slide
Next slide

REVIEW OF KEY TERMS

  • Post-productionediting your recorded video and adding effects, titles, and sound

ADDITIONAL RESOURCES

Here are some helpful resources for video editing:


Learning Journey

  • Reflect on what you’ve learned and your accomplishments on your Technovation journey 

  • Write your Learning Journey response for your submission

These are the activities for this lesson:

REFLECT

Think back to where you and your team started and everything that has happened as you’ve worked to get your Technovation project working and completed.

You’ve come a long way! 

The judges want to understand what you’ve accomplished too.

Tell them all about the highs and lows of your project – what new skills you have gained, and what obstacles you have overcome to make your project what it is today.

You have 200 words to tell your story.

girls celebrating
Bionic girls team learning journey pictures
Bionic Girls 2023 Learning Journey images

As part of your writeup, you will include 2-6 pictures that help to explain the process for the judges.

Remember, a picture is worth 1000 words!  

You can include screenshots of early sketches and prototypes. You may also include user feedback you received and changes you made to your project as a result.  

EXAMPLES

Below are some examples of Learning Journeys from previous Technovation teams.

TEAM REFLECTION

Take a few moments together to look back and discuss how you and your project have changed. For example:

  • How did you change the project or your ideas after doing user research or testing? 

  • How did you change the project or your ideas after doing competitor research? 

  • What new technical skills have you learned this season? 

  • How has your team grown this season?  

  • Did you have to work together to overcome any challenges?  

  • Have you improved as a team throughout the season? How?

ACTIVITY: LEARNING JOURNEY

Estimated time: 20 minutes

Reflect as a team

  1. Use the questions above generate discussion around what you have learned and overcome.
  2. Spend some time together writing your journey. You could write separately and then combine thoughts, or jot down ideas together as a team. 200 word limit.
  3. Select 2-6 images you think will help tell the story. They should be meaningful and highlight team accomplishments.

REFLECTION

Writing the Learning Journey is, in itself, a reflection of your entire Technovation season. Give yourselves one more pat on the back for all you’ve accomplished over the past several months.  

And get ready, next week you will submit your project!