- Capire cos'è un Prodotto Minimo Vitale (MVP) e perché è essenziale per testare la tua idea in modo efficiente
- Impara le basi della prototipazione, compresi i prototipi cartacei a bassa fedeltà e i wireframe, per rendere tangibili le tue idee.
- Esplora alcuni principi chiave del design UI e UX che migliorano l'usabilità e la chiarezza, anche nei primi prototipi.
- Costruisci un prototipo iniziale per raccogliere il feedback degli utenti attraverso i test.
Dare vita a un'idea può essere super eccitante, ma creare subito un prodotto completo spesso è rischioso, richiede un sacco di risorse e tempo. Ecco perché la prototipazione e la creazione di un prodotto minimo funzionante (MVP) sono importanti: ti aiutano a concentrarti sull'essenziale, a testare velocemente e a imparare dagli utenti reali.
Questo processo di test, ripetizione e perfezionamento fa sì che il tuo prodotto finale risolva il problema giusto e soddisfi le esigenze di chi lo userà. È un modo pratico per sperimentare, raccogliere informazioni e prendere decisioni più intelligenti, proteggendo al contempo le tue risorse limitate.
Prodotto Minimo Vitale
Un prodotto minimo funzionante, o MVP, è la versione più semplice della tua soluzione che comunque offre un valore agli utenti. Include solo le caratteristiche essenziali per risolvere il problema principale. Il vantaggio principale di creare un MVP è che ti permette di testare le ipotesi, raccogliere feedback e fare iterazioni prima di investire tempo o risorse in un prodotto completamente sviluppato.
Il video seguente fornisce un'ulteriore spiegazione degli MVP insieme ad alcuni esempi di MVP di alcune aziende famose, come AirBnb.
Quando decidi cosa includere nel tuo MVP, chiediti: questa funzionalità permette agli utenti di sperimentare il valore fondamentale della tua soluzione e di fornire un feedback significativo? Le funzionalità che non mettono direttamente alla prova il problema principale possono essere rimandate a dopo i test iniziali e l'iterazione. Fortunatamente hai già fatto molte ricerche per identificare le tue caratteristiche chiave. Ecco come collegarle al tuo MVP:
-
: affina il problema e trova i punti più fastidiosi per gli utenti -
Identificazione della soluzione
Definisce le funzionalità principali della soluzione, che dovrebbero essere la tua priorità assoluta. -
Analisi della concorrenza
Mostra le lacune che devono essere colmate. Inizia con il modo in cui ti distingui dagli altri. -
Valutazione dei rischi
Individua le ipotesi che devi verificare. Gli MVP aiutano a testare rapidamente i rischi. -
Il benchmarking di settore
ti dà le metriche che ti servono per testare il tuo MVP con gli utenti. -
Il social listening
scopre i problemi che gli utenti hanno con le soluzioni attuali. -
SWOT (
) Mostra i punti di forza e di debolezza. Gli MVP dovrebbero concentrarsi sui punti di forza mentre provano quelli deboli. -
e Lean Canvas Mette insieme tutto quello che serve per decidere le caratteristiche dell'MVP, le metriche, i canali e i primi utenti.
E se la tua soluzione ha anche una parte non tecnica?
Se la tua soluzione ha sia parti tecniche che non tecniche (tipo un servizio di consegna o una piattaforma per trovare servizi), dovresti creare un MVP per ogni parte. Metti la parte tecnica in un documento e quella non tecnica in un altro. Dovrai testare entrambe le parti con i tuoi utenti.
ATTIVITÀ 1
Pianificare l'ambito dell'MVP
Tempo stimato: 30 minuti
1. Utilizzando la ricerca di cui sopra, elenca le caratteristiche che la tua idea di impresa avrà.
2. Ordina le tue caratteristiche in una delle tre categorie.
|
Must-Have
|
Bello da avere
|
Più tardi
|
|---|---|---|
|
Da riempire
|
Da riempire
|
Da riempire
|
3. Controlla la tua lista dei must-have.
- Si rivolgono ai punti del riquadro dei problemi del Lean Canvas?
- Sei in grado di costruirli nei tempi previsti?
- Puoi testare le tue metriche chiave con questo elenco?
4. Dai un'altra occhiata! Vedi cosa puoi togliere dalla tua lista delle cose indispensabili. Non serve tutto. Pensa agli elementi più essenziali che continueranno a dare valore agli utenti.
L'MVP ha solo ha solo le caratteristiche nella colonna "Must-Have". Questo approccio ti aiuta a evitare una costruzione eccessiva, a risparmiare tempo e risorse e a garantire che l'MVP rimanga focalizzato ed efficace. Ad esempio, se stai costruendo un'app per aiutare le persone a tenere traccia dei loro compiti quotidiani, l'MVP potrebbe consentire agli utenti solo di creare e spuntare i compiti. Le funzioni avanzate come i promemoria, le notifiche o l'integrazione con il calendario possono essere aggiunte in un secondo momento. Per altri esempi, vai alla sezione Risorse aggiuntive e guarda questo video.
In definitiva, il modo in cui creare il tuo MVP varierà a seconda del tuo prodotto, ma la chiave è concentrarsi su ciò che conta davvero: assicurati che affronti il problema principale che stai risolvendo e includi solo le caratteristiche essenziali necessarie per fornire quel valore. Passiamo ora ad analizzare i prototipi.
Prototipi
Un prototipo è come una versione semplificata del tuo MVP. Mentre un MVP definisce le caratteristiche minime, il prototipo mostra come queste caratteristiche funzionano davvero. Proverai diversi prototipi per testare velocemente le caratteristiche del tuo MVP. Inizierai con prototipi molto semplici e poi passerai a quelli più complessi. I prototipi ti aiutano a vedere come gli utenti interagiscono con la tua idea, a scoprire potenziali problemi e a capire cosa migliorare prima di creare un MVP completo.
Pensa all'MVP come alla tua ricetta e al prototipo come al piatto che servirai. La ricetta elenca gli ingredienti o le caratteristiche del tuo piatto e definisce ciò che puoi tralasciare per avere comunque un piatto completo e gustoso. Farai molte iterazioni del piatto, usando la ricetta, testando il gradimento degli utenti e aggiustando il tiro.
I prototipi non necessitano di una grafica raffinata, di funzioni complesse o di un'implementazione tecnica completa. Mantenere la semplicità, anche con uno schizzo di base di schermate, pulsanti o interazioni, può rivelare se gli utenti capiscono e si impegnano con la tua soluzione e consente di apportare modifiche rapide.
Tipi di prototipi
1 Prototipi di carta
La prototipazione su carta è un modo semplice per creare una versione a bassa fedeltà del tuo prodotto. Può essere disegnata su carta, creata con note adesive o costruita con una lavagna. I prototipi cartacei ti permettono di testare le interazioni principali della tua soluzione in modo rapido ed economico. Ad esempio, se stai progettando un'app per la produttività, puoi disegnare le schermate che mostrano come gli utenti aggiungono, visualizzano e completano le attività. I foglietti adesivi o i ritagli possono simulare pulsanti o azioni, consentendo un'interattività di base per i test.
Anche un prototipo digitale cartaceo è accettabile, soprattutto se vuoi condividere il tuo prototipo con utenti remoti. Strumenti come Figma, Miro, Canva, o Google Slides possono aiutarti a creare semplici schermate interattive o diagrammi di flusso che simulano le interazioni principali della tua soluzione. L'obiettivo è lo stesso: permettere agli utenti di sperimentare le funzionalità principali del tuo prodotto e fornire un feedback prima di creare una versione completa.
Ecco una buona spiegazione di come Google utilizza i prototipi cartacei nel suo processo di progettazione:
2 Wireframes
Il wireframe è l'opzione successiva alla prototipazione su carta ed è leggermente più fedele. Un wireframe è un layout strutturato dell'interfaccia del tuo prodotto che mostra come sono organizzate le informazioni e le funzionalità. A differenza dei prototipi cartacei, i wireframe sono solitamente digitali e si concentrano su posizionamento, navigazione e gerarchia piuttosto che sul design visivo. I wireframe aiutano a chiarire la struttura della tua soluzione e a preparare la costruzione di un MVP più funzionale.
Quando crei un wireframe, includi le schermate, i menu, i pulsanti e le interazioni chiave che supportano la tua funzionalità principale. Mantieni la semplicità e la chiarezza, evitando colori, font o grafica che distraggono dal layout.
Puoi utilizzare wireframe statici non cliccabili per testare il layout generale, la navigazione e il flusso delle attività. Come passo successivo, puoi rendere i wireframe cliccabili per simulare le interazioni. Fai dei test con gli utenti per vedere se il flusso ha senso, se riescono a navigare facilmente e per identificare le aree che necessitano di modifiche prima dello sviluppo.
Per una panoramica più pratica sui wireframe, dai un'occhiata a questo video.
3 Mockup digitali
I mockup digitali sono quelli in cui aggiungi il colore e il marchio al tuo wireframe. Non sono ancora funzionali, ma ti permettono di testare la reazione degli utenti al tuo design visivo e all'estetica della tua soluzione.

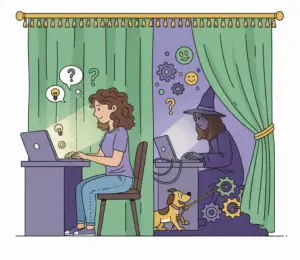
4 Mago di OZ MVP
Si tratta di una versione della tua soluzione in cui gli utenti pensano di interagire con un prodotto completamente funzionale, ma in realtà l'automazione è solo un essere umano dietro le quinte. È utile per testare cose come i chatbot. Invece di utilizzare un vero e proprio modello AI per rispondere, dietro le quinte c'è un umano che risponde. L'MVP del Mago di Oz verifica il valore per l'utente. Ha un valore tale per l'utente da spingerlo a pagare per averlo?
5 Concierge MVP
Per testare il valore per l'utente, puoi utilizzare il Concierge MVP, in cui fornisci la soluzione manualmente ad alcuni clienti (ad esempio, utilizzando un modulo di Google per raccogliere gli ordini ed evadendoli manualmente, invece di creare un sito di e-commerce automatizzato).
6 Prototipi codificati
Nelle fasi successive della prototipazione, aggiungerai effettivamente il codice dietro le quinte, per aggiungere funzionalità e iniziare a testare le tue caratteristiche principali. Nel processo di prototipazione, testerai questi primi MVP con un piccolo gruppo privato, i tuoi early adopters.
E GenAI?
Forse ti starai chiedendo: e se usassimo gli strumenti genAI per creare i nostri prototipi? Una volta arrivati ai prototipi digitali, come wireframe, mockup e infine codifica, puoi sicuramente usare gli strumenti genAI come supporto! Più avanti parleremo in modo più approfondito degli assistenti di codifica AI.
Comunque, non saltare le prime fasi di prototipazione a bassa fedeltà, soprattutto i prototipi su carta. È importante che il tuo team si metta d'accordo sul percorso principale dell'utente, capisca l'architettura di base delle informazioni e rifletta sulla proposta di valore principale. È più facile farlo velocemente con carta e matita piuttosto che usare la tecnologia (e l'IA) troppo presto.
NOTA: se la tua soluzione ha a che fare con cose non tecniche (come consegna, tutoraggio, trasporto), dovrai testare sia il modello di servizio che qualsiasi interfaccia tecnologica.
Inizia provando il servizio a mano – dai un'occhiata al Concierge MVP qui sopra. Questo ti aiuta a capire se la gente è interessata al servizio e se è economicamente fattibile.
Dopo aver provato la parte del modello di servizio della tua soluzione (Attività 3), puoi creare i prototipi per la parte tecnica della tua soluzione.
Prova questi separatamente. Entrambi devono essere verificati prima di procedere con la compilazione.
Livelli di fedeltà del prototipo
Anche se la linea di demarcazione tra un MVP e un prototipo può sembrare confusa, i prototipi sono rappresentazioni successive di quello che sarà il tuo MVP finale. Ogni prototipo successivo diventa un po' più dettagliato e raffinato, testando diversi aspetti della tua soluzione, fino ad arrivare all'MVP che lancerai.
Iniziare a bassa fedeltà
- Più economico e veloce da creare
- Facile da modificare in base al feedback
- Verifica i concetti di base prima di investire in smalto
Aumenta la fedeltà durante la convalida
- Ogni prototipo risponde a domande diverse
- Aumenta i dettagli solo dopo aver convalidato il livello precedente
- Non costruire la versione funzionale finché il flusso/valore non è stato convalidato
Test ad ogni livello
- Ogni prototipo deve essere testato con gli utenti
- Imparare e iterare prima di passare alla fedeltà successiva
- I test sono continui, non si tratta di un singolo passo
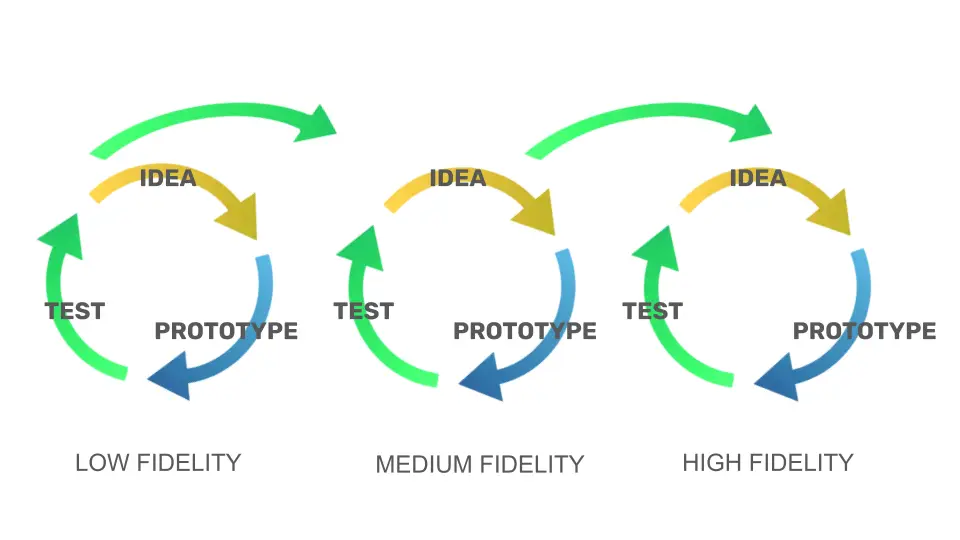
Ecco come di solito va:
Bassa fedeltà:
- Prototipo cartaceo per testare il flusso dell'utente e la chiarezza dell'interfaccia utente
- Un wireframe digitale di base non cliccabile per testare la gerarchia di navigazione
- Storyboard/schizzi per verificare il contesto e la motivazione, aiuta a visualizzare perché l'utente ha bisogno della soluzione e quando la userà.
Media fedeltà:
- Wireframe interattivo cliccabile di base per testare l'usabilità, il layout e il completamento dei compiti.
- Demo del Mago di Oz per testare l'interazione con gli utenti
- Mockup digitale non funzionale per testare il design visivo e del marchio, il colore e la tipografia
Alta fedeltà:
- Un prototipo codificato per testare la fattibilità tecnica, in pratica un MVP per un piccolo gruppo privato.
- Versione pilota/beta per testare il mantenimento e la scalabilità delle funzioni principali
ATTIVITÀ 2
Creare un prototipo cartaceo O un wireframe digitale
Tempo stimato: 1-2 ore
Prima di costruire qualcosa di più dettagliato, inizia a testare la tua idea con un semplice prototipo a bassa fedeltà. Questa attività ti aiuterà a capire rapidamente cosa funziona, cosa crea confusione e cosa devi correggere prima di andare avanti.
1. Crea un prototipo a bassa fedeltà della tua soluzione.
Crea un prototipo di bassa fedeltà della tua soluzione per vedere le interazioni principali e testarne l'usabilità. Se stai sviluppando un'app, clicca sul pulsante qui sotto per scaricare un modello che puoi usare per disegnare i tuoi prototipi cartacei. In questa fase puoi anche usare uno strumento digitale per creare un wireframe.
2. Valuta il tuo lavoro
Valuta il tuo lavoro verificando quanto sei in grado di rispondere alle seguenti domande basandoti solo sul tuo prototipo di carta. Le domande a cui è difficile rispondere o che hanno risposte poco chiare riveleranno dove sarà necessario lavorare di più.
- Qual è la funzionalità principale del tuo prodotto, come mostrato dal tuo prototipo cartaceo?
- Spiega i passaggi chiave che un utente deve compiere per completare un compito o raggiungere un obiettivo. Il processo è chiaro e facile da seguire?
- In che modo ogni elemento del tuo prototipo comunica il suo scopo all'utente? Ci sono parti che creano confusione?
- Quali funzioni, se ci sono, potrebbero essere rimosse senza compromettere la capacità dell'utente di utilizzare il tuo prodotto?
- Quali parti del tuo prototipo guidano l'attenzione dell'utente per prime? Segue la gerarchia visiva che avevi previsto?
3. Perfeziona il tuo prototipo
Affina il tuo prototipo in base alle risposte a queste domande.
Processo di test
Il test iniziale consiste nel valutare il tuo prototipo o MVP con utenti reali per verificare se la tua soluzione risolve il problema principale ed è facile da usare. In questa fase, i test devono essere piccoli, mirati e finalizzati a raccogliere feedback utili all'azione piuttosto che a convalidare ogni dettaglio.
Passi per la conduzione dei test iniziali
1
Scegli i partecipanti
Scegli utenti che assomiglino al tuo pubblico target o agli early adopters. Consulta il tuo Lean Canvas per identificare i partecipanti. Le sezioni Early Adopters, Segmenti di clienti e Canali dovrebbero condurti a persone disposte a testare la tua soluzione. Trova 5-10 tester.
2
Prepara le attività
Progetta compiti semplici e realistici per far testare agli utenti le funzioni principali della tua lista di cose da fare. Evita di dare istruzioni.
3
Osserva e registra
Osserva come gli utenti interagiscono con il tuo prototipo. Nota i punti in cui hanno successo, difficoltà o improvvisazione.
4
Fai domande
Raccogli un feedback qualitativo chiedendo cosa è stato chiaro, confuso o inaspettato. Alcune domande da porre:
- Risolve un problema reale?
- Come lo descriveresti a un amico? (questo metterà alla prova la tua UVP)
- In cosa si differenzia da un concorrente (identificare il concorrente)?
- Lo utilizzeresti di nuovo? Con quale frequenza?
- Cosa manca?
5
Analizzare i risultati
Identifica gli schemi, dai priorità ai problemi e decidi quali elementi necessitano di maggiore attenzione. Chiediti:
- Quali sono le caratteristiche che gli utenti hanno confermato o meno?
- Gli utenti hanno sperimentato la tua UVP?
- Puoi misurare le tue metriche chiave con il tuo prototipo attuale?
6
Pianifica i prossimi passi
Risolvi immediatamente qualsiasi problema o bug e, se possibile, esegui nuovamente il test. Se ti sono sfuggite delle funzionalità indispensabili, pianifica di aggiungerle nella prossima iterazione. Decidi se è il caso di fare un pivot.
Utilizzare l'iterazione rapida nei test
L'iterazione rapida è un modo per condurre i primi test apportando piccoli miglioramenti subito dopo aver osservato le interazioni e i feedback degli utenti. Invece di aspettare di costruire un prodotto completamente rifinito, aggiusti il prototipo sul posto o subito dopo una sessione di test. Poi testate la versione rivista subito dopo con nuovi partecipanti o con utenti che ritornano per convalidare le modifiche.
Questo rapido ciclo di test → feedback → aggiornamento → ripetizione del test ti aiuta a identificare rapidamente i problemi di usabilità, a convalidare le ipotesi e a perfezionare la soluzione prima di investire tempo o risorse significative. Ogni iterazione fornisce informazioni utili e garantisce che il tuo prodotto si evolva in base alle reali esigenze degli utenti piuttosto che alle supposizioni.
L'iterazione rapida enfatizza la velocità, l'apprendimento e il miglioramento continuo, rendendo il testing un processo continuo piuttosto che una singola fase dello sviluppo.
Imparare dai test
I tuoi prototipi sono strumenti di apprendimento estremamente preziosi. Ogni feedback, confusione o ipotesi fallita fornisce indicazioni preziose su come rafforzare la tua soluzione. Esamina i tuoi risultati e cerca degli schemi. Considera quali funzioni hanno risolto chiaramente il problema dell'utente e quali interazioni hanno causato esitazione o confusione. Se itererai sulla base delle intuizioni reali degli utenti, ti avvicinerai alla creazione di una soluzione che soddisfi davvero le esigenze delle persone e che sia in grado di superare la prova dell'uso reale.
ATTIVITÀ 3
Test degli utenti
Tempo stimato: Più giorni
Prova il tuo prototipo dell'Attività 2 con persone vere per vedere se funziona bene, capire quanto la tua soluzione risolva il problema principale e raccogliere feedback utili per migliorarlo.
Se stai provando una parte non tecnica della tua soluzione, puoi comunque seguire i passaggi qui sotto per verificarla con gli utenti e avere un feedback.
1. Seleziona i partecipanti
Scegli utenti che assomigliano al tuo pubblico di riferimento o ai primi utilizzatori, perché il loro comportamento e il loro feedback riflettono meglio l'uso reale.
2. Preparare i compiti
Progetta compiti semplici e realistici che i partecipanti dovranno completare utilizzando il tuo prototipo. Evita di fornire istruzioni passo-passo.
3. Osservare e registrare
Osserva come gli utenti si impegnano con il tuo prototipo, annotando i successi, le difficoltà e le improvvisazioni. Con l'autorizzazione, registra la sessione per riferimenti futuri.
4. Fai domande
Dopo che i partecipanti hanno completato i compiti, fai delle domande per scoprire le intuizioni sull'usabilità, la chiarezza e il valore. Ecco alcuni esempi di domande
- Qual è stata la tua prima impressione del prodotto?
- Quali passaggi sono stati confusi o poco chiari?
- C'è stato qualcosa che ti ha frustrato o rallentato?
- Quali sono le funzioni che hai trovato più utili?
- C'è qualcosa che ti aspettavi accadesse e che invece non è accaduto?
- Come spiegheresti questo prodotto a qualcun altro?
5. Esamina il feedback e pianifica le fasi successive
Analizza i tuoi appunti e le tue registrazioni per identificare gli schemi, i successi e le aree che necessitano di miglioramenti, quindi decidi quali sono gli aspetti critici da affrontare immediatamente e quali possono essere perfezionati in seguito. Utilizza queste informazioni per aggiornare il tuo prototipo o MVP, per modificare il tuo progetto o per affinare le priorità delle funzionalità.
Iterazione
Tieni presente che i tuoi prototipi non devono essere perfetti. Il motivo per cui si itera è che si prototipa, si testa, si aggiusta e si itera. I test stessi riveleranno ciò che deve essere corretto o migliorato. Non stai cercando la perfezione, ma di imparare da questo processo.
Hai effettuato alcuni test iniziali e raccolto feedback. I prossimi passi potrebbero essere:
- Se i test sono andati bene, perfeziona l'MVP e passa a un prototipo più realistico.
- Se i test hanno dato risultati contrastanti, cerca di capire cosa non va, risolvi i problemi più importanti e riprova.
- Se i test hanno trovato problemi grossi, non ti preoccupare! Controlla se il tuo approccio al problema è ancora valido, valuta se cambiare strategia e torna a parlare con chi è coinvolto.
Qualunque sia il risultato, continua ad iterare. I fallimenti servono per imparare! La prototipazione rapida ti aiuterà a risparmiare tempo e ad assicurarti di essere sulla strada giusta per risolvere il problema per gli utenti.
Prendi le informazioni che hai raccolto e usale per decidere i tuoi prossimi passi. Usa quello che hai imparato per migliorare le versioni future e lo sviluppo della tua soluzione.
Riflessione
Con un MVP, dei prototipi e alcuni feedback iniziali in mano, prenditi un po' di tempo per considerare le seguenti domande.

Ipotesi di MVP
Approfondimenti sui prototipi
Prossimi passi
Risorse aggiuntive
Se sei interessato a considerazioni di tipo UI/UX, questi sono siti web utili:
- Tavolozza dei colori del Material Design: https://goo.gl/NP5o44
- Elevazione e ombre: https://goo.gl/OWZzCw
Maggiori informazioni sui tipi di prototipi e su quando utilizzarli sono disponibili qui.