- Learn how to integrate your machine learning model into an app
- Start to code your app integration
These are the activities for this lesson:
INTEGRATING YOUR MODEL
By now, hopefully your team has
- trained its AI model using a healthy dataset.
- tested the model with new and diverse data
But you can’t just leave it there!
You want your model to take action based on the prediction it makes.
You will need to implement your model into an app to make it useful.

CHOOSING A PLATFORM
Which platform you use to code your app will depend on:
- what your mobile app coding platform preference is
- which platform you used to train your model
Below are the machine learning platforms discussed in Unit 5. Click on each one to see some options for integrating the model into an app.
Teachable Machine is a very versatile platform. You can save your model to the cloud or save it as a file, so you have many options for integration with coding platforms.
This video describes how to export your model.
- App Inventor has a Teachable Machine Image Classification extension, contributed by Fabiano Oliveira, that can be downloaded and imported in the Extension drawer.
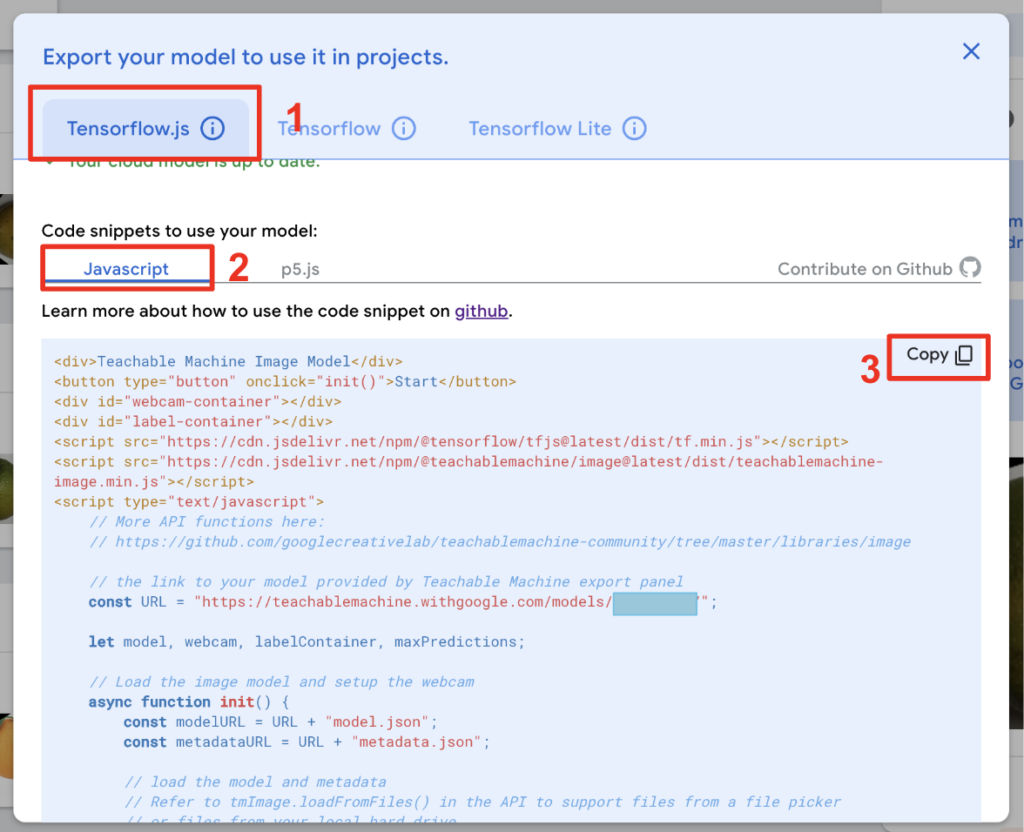
- Teachable Machine provides code snippets to integrate with Tensorflow, a machine learning library. It provides 3 code snippet options:
- Tensorflow.js – Javascript language will allow you to create a webpage or web app.
- Tensorflow – Python language to create web apps.
- Tensorflow Lite – Java language to create mobile apps.
All 3 code snippets provide you with a model file and code to copy. Depending on the language, you might have to install libraries and code editors. Links to instructions are provided with the code snippet.
These are the steps for using the Tensorflow.js option:
- Copy the code and paste it into a new blank text file on your computer.

- Save it as index.html (or something else with a .html extension).
- Open the file in a web browser. It will provide a basic interface where you can classify an image captured with the webcam based on your model.
- If you want to be able to upload an image to classify, instead of the webcam, this code works. (Courtesy Chris Hoyean Song) Just make sure to copy your model URL from your original code snippet to this file.
- Copy the code and paste it into a new blank text file on your computer.
The Tensorflow and Tensorflow Lite options will require different installation of software and coding libraries. Check the github site for further instructions.
Technovation Integrations: Python, App Inventor
Currently the only integration for Machine Learning for Kids that is fully working for Junior and Senior division is Python.
To learn more about integrating your Machine Learning for Kids model to Python, try one of the worksheets on this page. Select Python from the Make Type dropdown.
MIT App Inventor is an option for integration, but not all dataset types are fully working. Check out the Machine Learning for Kids website to make sure your dataset is compatible with App Inventor.
Extensions in App Inventor are external components that add functionality to an app, but are not part of the core App Inventor components.
Once you’ve trained your image or sound model using App Inventor’s classifier websites (image, sound), you’ll use an extension in App Inventor to bring your model to life in your mobile app.
- Click on Extension in the Designer Palette.
- Click on Import extension.
- Click Choose File and choose the extension file you downloaded from the extensions page above.
- Click the Import button to import the extension and its blocks.

You also need to add a WebViewer component to your project. It can be found in the User Interface drawer.
In the example below, we show how to set up the Image Classifier, but it works pretty much the same with the Audio Classifier, if your model involves sounds.
To link your model from the classifier, first download the model from the classifier website, and then,
- Select the PersonalImageClassifer component.
- In the Properties panel, click “None” under Model and upload the downloaded model.mdl file. (The file can be renamed anything, but must have the .mdl extension in its name).
- Click “None” under WebViewer and select the WebViewer component just added to the project.

Note the property “InputMode”, which can be either Video or Image. If you choose video, it will continuously try to classify the video feed that appears in the WebViewer. If you choose Image, you will have to add a Camera or ImagePicker component to get an image to classify. You will still need the WebViewer component for the image classification to work.

Models made with Ximilar can be used with an API to integrate it into an app.
You can use the Web API component in Thunkable to integrate an external model from a platform like Ximilar into an app. Note: We’ll cover APIs in Thunkable in the next unit.
Watch the second part of Pratham’s video to incorporate his coral AI model from Unit 5 into a Thunkable mobile app.
ACTIVITY: INTEGRATE YOUR AI MODEL
Integrate based on your chosen platform
- Review what is needed for your particular platform to add your trained AI model to a project.
- Create a new project in your selected platform and add your model. How you do it will depend on the process for your particular platform.
- Take action! Add components and code to the platform so your project takes an action based on the prediction from your model.
REFLECTION
You’ve started to code the action part of your AI app! Here is where you can see the results of your model and what it can really do!
Now is a good time to check in with your Project Plan/Canvas to see how your project is progressing. You might want to adjust timelines and tasks based on the platform you are using and the steps you will need to achieve the goals for your project.
Once you get your code working, it’s also time to check back in with your users. Find some people to test out your app and provide feedback.

REVIEW OF KEY TERMS
- Software – term for programs or applications that run on a computer or device
- Extensions – software bundles that add functionality to existing programs
ADDITIONAL RESOURCES
Marshmallow sorter using Teachable Machine and Coral.
Check out these videos on more advanced AI tools!
- Google Colab, coding in Python
- DialogFlow – Part 1 with Google AppSheets
- Dialogflow – Part 2 and a Virtual Assistant


