- Identify the layers of a tech stack and explain what each layer does
- Compare different tech stack approaches and choose one appropriate for your MVP
- Distinguish between LLM (Generative AI) and Predictive AI approaches
- Apply the appropriate AI path for your business needs
Based on AI path you choose:
- If LLM Path: Feedback Analyzer optimized with temperature and token settings
- If Predictive Path: A Sentiment Analyzer that classifies feedback with confidence scores
- Students have completed synthesizing stakeholder feedback and done market research for their project
- Students have experience with GitHub, Codespaces, localStorage, and Gemini API integration
You have built two working modules in your Founder’s Toolkit: a Feedback Collector that stores stakeholder interviews and a Feedback Analyzer that uses AI to find patterns across your research.
Now it’s time to step back and understand the bigger picture of how apps are built and which tech and AI approach fits your solution best.
In this unit, we will cover two important choices when building AI-powered apps:
- Tech Stack: the combination of tools and platforms for your app
- AI Path: whether you need text or image generation AI (LLM) or pattern-based AI (Predictive AI)
Tech Stack Foundations
Every app you may use – WhatsApp, YouTube, Instagram, and Google – is built with a tech stack. This is the combination of technologies that work together to make the app function.
Think of it like your smartphone itself: you need a screen to see things, a processor to do the thinking, storage to remember your photos, a battery for power, and apps to actually do useful things. Each part has a different job, but they all work together to create something useful.
As a tech founder, it is important that you have a full understanding of your tech stack, how it works, and why you chose it.

Every AI-powered application has 5 layers:
Frontend
The User Interface (UI) – everything the user sees, clicks, and interacts with in their browser or phone.
Examples:
- Web: HTML/CSS/Javascript, React, Vue, Angular, Svelte, Next.js
- Mobile: React Native, Flutter, Swift (iOS), Kotlin (Android)
- Styling: CSS, Bootstrap, Tailwind
Backend
The Logic and Brains – the server-side code that processes user requests, runs algorithms, and talks to the database
Examples:
- Javascript: Node.js
- Python: Django, FastAPI
- Java: Springboot
Storage
The Memory – where data lives
Examples:
- localStorage
- PostgreSQL
- MongoDB
- Supabase
- Firebase
Deployment Platform
The Infrastructure – the tools and services that take your code and make your app available on the internet
Examples:
- Vercel
- Netlify
- Railway
- Google Cloud
- App & Play Stores (mobile apps)
AI Services
The Intelligence – powers intelligence features
Examples:
- Gemini
- OpenAI
- Anthropic
- HuggingFace
In a previous lesson, we talked about apps like Notion, Duolingo, and Grammarly, which use complex tech stacks with multiple frontend, backend, and storage options. This complexity requires extensive infrastructure because they serve millions of users worldwide.
But you do not need that level of complexity for your MVP, or even post-MVP.
Common MVP Tech Stacks
There’s no single “right” way to build an MVP. Here are three common approaches:
Vanilla JavaScript
Technologies: HTML, CSS, JavaScript, Node.js
React/ Typescript
Technologies: React, TypeScript, Vite or Next.js
Python/ Streamlit
Technologies: Python, Streamlit, pandas
Your Founder’s Toolkit uses the Vanilla JavaScript approach since it’s straightforward, requires minimal setup, and teaches you the fundamentals that apply to any stack.
When choosing a tech stack, it is recommended to start with what you know. Your MVP needs something that works, is easy to learn, and can grow with your idea. You can always change later.
In this activity, you’ll identify the tech stack layers in your Founder’s Toolkit and compare them to Google AI Studio’s Build Mode, which takes a different approach to building AI-powered apps.
ACTIVITY 1
Explore Tech Stacks
Estimated Time: 20 Minutes
1. Open Github and your Founder's Toolkit repository
- Go to GitHub and open your Founder’s Toolkit repo.
- Navigate to the main branch to view the code. There is no need to open it in Codespaces as we are just viewing the files.
- Look for your main files in the code:
- index.html: your HTML structure
- Files ending in .js such as script.js or server.js : this is where your Javascript code lives
- CSS files: the UI of how the app looks
Note that your file structure might be different. For example, Copilot might have included CSS and Javascript in your HTML file. But your project will include HTML, CSS, and Javascript code.
Your Founder’s Toolkit is most likely in a vanilla JavaScript stack that consists of:
- Frontend: HMTL + Javascript + CSS
- Backend: Node.js or Python
- Storage: Browser localStorage
- Deployment: Codespaces sandbox environment
- AI: Gemini AI
This is a great starting point because it runs directly in any browser, requires no complex build tools, and you can modify it easily.
2. See an Alternative Approach using Google AI Studio
- Go to aistudio.google.com, and look for Build in the menu on the left side of the screen. Click on it.
- Enter this prompt in the field under “Build your ideas with Gemini.” This is the same prompt we used in Codespaces.
Create a simple app that helps entrepreneurs collect feedback from 2 stakeholders for my rough business ideas
The app should have:
A title at the top: “AI Founders Toolkit.”
A subtitle: “Start to collect feedback on my problem.”
A text area where I can enter my problem
Text areas where I can enter their feedback for each of these questions below:
Does this problem resonate with them?
What aspects do they think matter most?
What questions or concerns come to mind?
What are you missing about this problem?
A button labeled “Submit Problem and Feedback.”
An output area that displays the problem and the feedback
- Wait for the app to generate the code (it can take a few minutes).
3. Explore the files generated by AIStudio
- Click on the Code button at the top of the screen to view the files and the code generated.
It should look something like the image below.
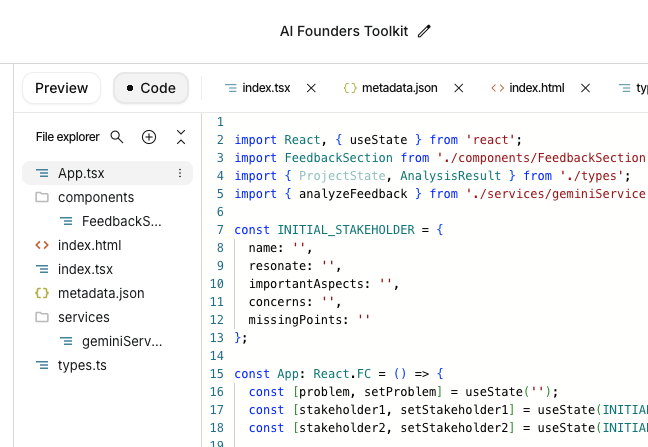
In our app, Gemini took it a step further and already included the API call to Gemini to synthesize and summarize, without any prompting from us.
Here is an explanation of the files generated, which is a React tech stack.
- .tsx files are Typescript, a form of Javascript.
index.html & index.tsx set up the environment and mount the React application.
App.tsx manages the global state, handles interactions, and renders the high-level layout.
components/FeedbackSection.tsx is a UI component for the stakeholder feedback form.
services/geminiService.ts is the logic for communicating with Google’s AI, defining the prompt and aks the model to return a structured JSON object.
types.ts defines the TypeScript interfaces for data in the app.
metadata.json contains app info like the title and description for the environment.
4. Compare the two approaches
- Keep the Code tab open in AIStudio.
- In a different window, open your GitHub Founder’s Toolkit repository and click on Code to view the files.
- Analyze the differences between the two apps’ code.
Github Codespaces
Google AI Studio
Frontend
Vanilla JavaScript
React + Tailwind CSS (pre-configured)
Backend
React + Tailwind CSS (pre-configured)
Managed by Google
Storage
localStorage (browser)
localStorage (browser)
Deployment (although we aren’t there yet)
Set up external deployment platform and auto-updates from Github repo
One-click to Google Cloud
AI Services
Gemini API, as specified in your prompt to Copilot
Gemini API (added automatically by AI Studio)
Can you find any other differences in the code?
5. Compare the AI integration code
Now let’s dive into the specific code differences, focusing on the AI integration code.
- Locate the specific files where the API calls are made in both platforms.
- Github repository: look for server.js
- Google AI Studio: look for something like services/geminiServices.ts
- Open both files and look at the API call structure.
Both platforms:
- define the prompt
- send the prompt and receive a response
- check for errors
- parse the response into JSON
The surrounding code looks different (JavaScript vs TypeScript), but the core AI integration pattern is the same.
Troubleshooting:
If you can’t find the API call in your code: Search for fetch or gemini in your JavaScript files or simply ask Copilot and Google AI Studio Code Assistant to help you find it.
If your app is not properly built in Google AI Studio: Ask the Code Assistant for help.
You’ve now seen two different platforms with AI-assisted coding. They each produce different tech stacks that essentially do the same thing.
The most important difference between these platforms isn’t the code syntax—it’s how they handle your Gemini API key.
Google AI Studio runs your API calls through THEIR servers, adding your API key securely on the backend.
Your Browser
↓ (sends request with user input)
AI Studio‘s Frontend (your React code)
↓ (forwards to AI Studio backend)
AI Studio‘s Server (Google’s infrastructure)
↓ (adds YOUR API key from Google‘s secure storage)
Gemini API
↓ (returns response)
AI Studio‘s Server
↓ (forwards response back)
Your Browser (displays result)
GitHub Codespaces uses Client-Server Architecture where you control everything
Your Browser (frontend)
↓ (sends request to YOUR backend)
Your Express Server (backend you create)
↓ (adds API key from .env file)
Gemini API
↓ (returns response)
Your Express Server
↓ (forwards response)
Your Browser (displays result)
Note: if you use AI Studio as your development platform, eventually you will have to replicate the client-server architecture of Codespaces to ensure the security of your Gemini API key. The AI Studio “magic” works only inside AI Studio and eventually you will move outside that platform, if only to deploy your MVP.
Consider some tradeoffs for each platform.
Control
Convenience
Learning
Speed
Flexibility
Simplicity
Choosing Your Tech Stack and AI Path
Now that you have a feeling for understanding tech stack layers, it is time to make two important decisions for your MVP:
- Tech Stack Decision: Which development approach fits your needs?
- AI Path Decision: Should you use LLM (Generative AI) or Predictive AI?
These decisions shape how you build your app. There is no single “right” answer and each approach has trade-offs.
The activity below will have you complete a worksheet, answering some questions that should direct you to the right tech stack and AI path for your project. Do not worry about making the wrong decision. You can always change tech stacks later. This is about building your MVP over the next several weeks and getting something working and in your users’ hands.
The MVP Mindset
Your goal is the simplest tech stack that lets you test your idea. You are not building a production app for millions of users yet. You are building something to learn from real users quickly.
Rule of thumb:
If you aren’t sure what you need, don’t worry because you can always change later. This happens in real apps where they change tech stacks as they move from idea to production and their needs change over time.
Decision Guide – Tech Stack
If your MVP needs to …
Consider
Why for an accelerator?
collect text, show results, basic layout
Vanilla JavaScript (what you have in GitHub)
Fastest “smoke test”
handle many screens or complex UI states
React/TypeScript (what you have in Google AI Studio)
Best for MVPs, works on Desktop & Mobile via browser
be built very quickly with minimal code
Google AI Studio Build Mode
Immediate validation of a prompt/logic
run as a mobile app
React Native / Flutter
One codebase that runs on both iOS and Android
For most MVPs your current vanilla JavaScript stack is sufficient.
Decision Guide – AI
If your MVP needs to …
Consider
generate text, summaries, or explanations
LLM
Have conversations
LLM
analyze unstructured text like documents or emails
LLM
classify items into categories (like whether a text is positive or negative)
Predictive AI Path with classification models
make predictions from data (used in marketing and segmentation)
Predictive AI Path
score or rank items
Predictive AI Path with recommendation systems
For most MVPs your current approach using pre-trained LLMs, like those in your Founder’s Toolkit, should be sufficient.
ACTIVITY 2
Select Tech Stack and AI Path for Your MVP
Estimated Time: 30 Minutes
Now that you understand your current tools and alternatives, fill out the MVP Tech Stack Decision Worksheet to determine your tech stack and AI approach.
Practice with AI Paths
The following activities will give you some practice with both types of AI paths.
You only need to complete one activity, depending on your AI Path decision in the worksheet.
- If your AI Path is LLM → complete Activity 3a
- If your AI Path is Predictive AI → complete Activity 3b
- If your AI Path is Predictive AI AND you plan to build your own model → compblete Activity 3c
Activity 3b calls an API using a pre-trained model, which is a good option for most projects, as long as a model exists that fits your needs. That should be the case for most projects.
We’ll also cover training your own model in Activity 3c for any projects that might need to follow that path.
AI LLM Settings and Costs
There are some configuration settings you can set when calling a LLM API that affect how the LLM generates output.
- Temperature: How creative vs consistent the AI is
- Tokens: Units of text (~3-4 characters in English); how AI measures input/output
- topK / topP: Controls vocabulary diversity (usually leave at defaults)
For most use cases, focus on temperature and maxOutputTokens.
Other settings like topK and topP are advanced options you can explore later.
Temperature
Temperature controls how “random” or “focused” the model’s word choices are. Think of it like a dial between “play it safe” and “take creative risks.” It can be considering one of the most important setting to understand:
- Low temperature (0.1-0.3): The model picks the most likely next word almost every time. Results are consistent and predictable.
- High temperature (0.7-1.0): The model is more willing to pick less obvious words. Results are more varied and creative.
Important note: Different models may use different scales. Gemini uses 0.0-2.0, while most other models use 0.0-1.0 so make sure to always check your model’s documentation.
Tokens
Tokens are how LLMs measure text. A token is roughly 3-4 characters in English, but this varies by language
~100 words equals:
- English: 75-100 tokens
- Spanish: 80-100 tokens
- Mandarin: 150-200 tokens
- Hindi: 120-150 tokens
Tokens are extremely important, especially because they’re often how AI Model Providers charge for API requests. So, ensuring that you’re using tokens effectively and efficiently is essential to control costs.
Different models also charge differently based on the tokens sent in the request (input tokens) and those sent in the output (output tokens).
- Input tokens: What you send to the model (your prompt + context)
- Output tokens: What the model generates back
- Pricing: Most APIs charge per 1,000 tokens (input and output separately)
- Limits: Models have maximum context windows (total number of tokens counting system prompt, input, output) and API requests (how many calls we can make per period, usually per minute).
Free tiers are usually generous enough for the Gemini models and they have very large context windows that are more than sufficient for even production-level apps, but should be enough for your MVP.
MVP Token Rule of Thumb
Short prompts → cheaper, faster, more reliable
Short outputs → easier to test and compare
Fewer API calls → simpler to debug
For your MVP, aim for:
- 1–2 AI calls per user action
- Outputs under ~300 words unless absolutely necessary
Example: Same Feature, Different Token Cost
High-cost prompt:
“Analyze all interview transcripts and generate a detailed 2-page report every time the user clicks submit.”
Lower-cost prompt:
“Analyze the feedback and return 3 key insights and 1 open question.”
The second version is cheaper, faster, easier to evaluate, and still useful to users.
Do not get too concerned about the AI API costs, as you can run a lot, even on the free tier.
Here is an example of cost with the Idea Evaluator in the Founder’s Toolkit.
Input tokens:
- System prompt: ~200 tokens
- 3 solutions with details: ~500 tokens each = 1,500 tokens
- Total input ~1,700 tokens
Output tokens:
- Analysis and recommendation: ~800 tokens
Total per analysis: ~2,500 tokens
Cost with Gemini Flash: ~$0.0009 (less than 1 cent)
Monthly with 100 users analyzing 3x each:
- – 300 analyses × 2,500 tokens = 750,000 tokens
- Cost: ~$0.27/month
This is well within free tier limits.
ACTIVITY 3a
AI Path - LLM
Estimated Time: 30 Minutes
Complete this activity if you chose LLM AI Path in your worksheet.
In your Founder’s Toolkit, you built a Feedback Analyzer that uses the Gemini API. In this activity, you will customize your Feedback Analyzer’s AI settings to improve output quality. You’ll learn how to control LLM behavior using temperature and token settings. Knowing how to configure both is essential knowledge for building production-quality AI features.
1. Set Up New Branch in Github Codespace
- Go to GitHub and open your Founder’s Toolkit repository.
- Create a new branch from main and name it: llm-customization
- Open your existing codespace from previous activities.
- Checkout the new branch in your existing codespace. This preserves the localStorage from previous executions of your app.
- In the Terminal window at the bottom of the screen, type (on separate lines):
git checkout main
git pull origin main
git checkout -b llm-customization
- In the Terminal window at the bottom of the screen, type (on separate lines):
2. Find AI Integration Code
- Find the JavaScript file that makes AI calls (likely server.js)
- Find the part in the code where you are making the API call to the Gemini LLM which should include a System Instruction (LLM instruction) and LLM Configuration Settings
You should find something like:
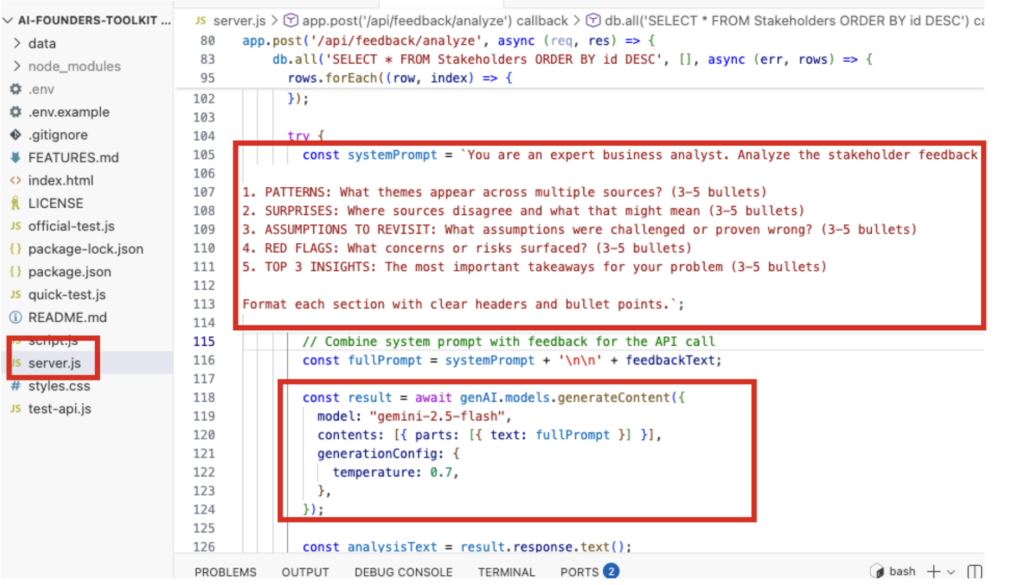
See the generationConfig setting in the const result code. In our case, temperature was the only setting configured automatically by Copilot. Many LLMs, like Gemini, have default settings used when configuration parameters are not provided. However, we recommend adding temperature and maxOutputTokens as good practice.
3. Add the LLM Configuration Code
- Update the code to set the configuration parameters as follows:
- temperature: 0.8
- maxOutputTokens: 1024
This is how our code looks:
					generationConfig: {
  temperature: 0.8,
  maxOutputTokens: 1024,
}
- Verify in server.js that the code looks correct.
4. Run Multiple Tests
Let’s do various tests to understand the impact.
- Run the Feedback Analyzer with the current settings.
- Copy and paste the results into a separate doc each time you run the analyzer so you can compare each output.
- Run it again with the same configuration settings.
- Compare outputs. They should look very similar
- Set temperature to 0.2 (creative) and run again.
- Compare the outputs. The outputs should be more varied.
- Try again, this time changing the maxOutputTokens to something smaller, like 300.
- Compare the outputs from the longer responses.
5. Find Your Ideal Temperature
Decide:
For your Feedback Analyzer, which temperature works best?
- If you want consistent, reliable analysis: use 0.3-0.4
- If you want more creative insights: use 0.6-0.7
Update your code to your preferred temperature.
6. Commit, Push, and Merge Your Changes
- Commit your changes in your codespace.
- Go to Github, create a pull request and merge the changes to the main branch.
- You can delete your branch, but keep your codespace.
You now understand the key settings that control LLM behavior. When you build your own full MVP, you’ll apply these concepts to design AI features that behave exactly how your users need.
If you are not doing any type of predictive AI in your app, you can skip to the Reflection section.
Pre-trained Machine Learning Models
A pre-trained model is a model that someone else has already trained on large amounts of data. You can use it without collecting your own training data. Using a model to make predictions on new data is called inference. So, making an API request to predict something is an inference.
Cost Considerations: Predictive AI Pricing
Predictive AI charges per API call or has a one-time training cost. Predictive AI is significantly cheaper than LLMs for classification tasks. Free tiers are generous enough for all MVPs in this accelerator.
Predictive AI has a different pricing model than LLMs:
Hugging Face, a platform we will be using in this activity, offers generous free API requests per day, 1000-2000 per day (depending on the model).
Training costs are one-time, and inference (making predictions) is cheaper at scale than with an LLM. While GPU (Graphic Processing Unit) costs are a big factor in AI training and prediction, pre-trained models do not require GPU costs. The cost came in the training, and was paid by someone else.
This table gives you an idea of the cost of classification/prediction using a pre-trained model vs. using a LLM to predict.
Aspect
Predictive AI
LLM (for comparison)
Pricing Model
Per API call OR flat monthly fee
Per token (input + output)
Training Cost
Free (Hugging Face, Teachable Machine)
~$0.0001 per classification
Inference cost
Free (1K/day) or $9/mo unlimited
N/A (pre-trained)
GPU needed?
No (provider handles it)
No (provider handles it)
At scale (10K/day)
$9/month (flat rate)
~$30-40/month (variable)
Sentiment Analysis Model
For Activity 3b, we will use (cardiffnlp/twitter-roberta-base-sentiment-latest), a model that was trained on 124 million tweets. It classifies text into three categories:
- Positive: happy, excited, satisfied
- Negative: angry, sad, frustrated
- Neutral: factual, neither positive nor negative
AI models based on Twitter texts very effective at sentiment analysis because it is based on real user language and is at a huge scale.
Many customer support businesses use sentiment analysis for analyzing customer sentiment to improve their apps such as Chatbots or even just to improve the customer experience. This should be a good model to analyze sentiment in your stakeholder feedback.
ACTIVITY 3b
AI Path - Predictive (Sentiment Analysis)
Estimated Time: 40 Minutes
Complete this activity if you chose the Predictive AI Path in your worksheet.
In this activity, we will add a sentiment analyzer to your Founder’s Toolkit using a pre-trained model, using a code pattern that is similar to how we’ve been making API calls using the Gemini models.
1. Create a Hugging Face Account and Create API Token
- Go to huggingface.co and create a free account (if you don’t already have one).
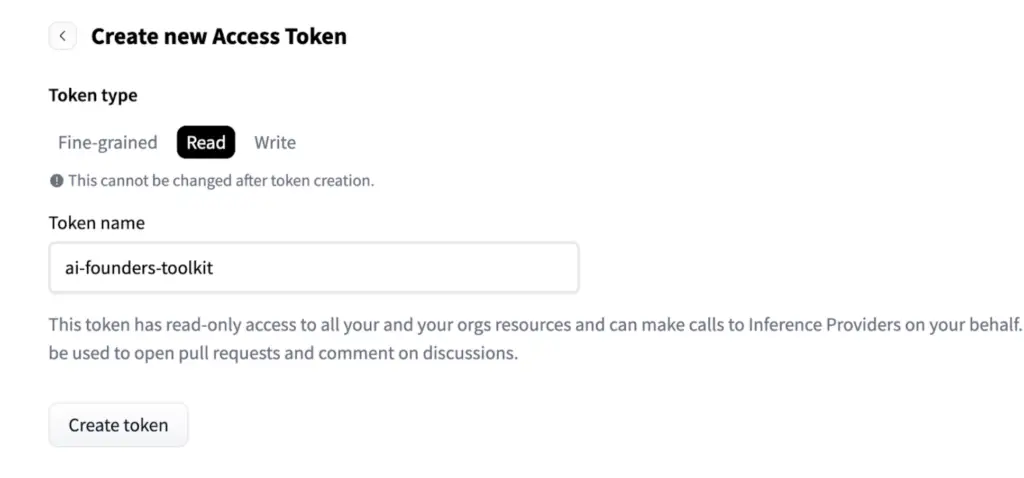
- Click your profile → Settings → Access Tokens
- Click to create a new token, select token type “Read”, and give it an appropriate name.
- Copy the token value and save the it securely.
2. Set Up New Branch in Github Codespace
- Go to GitHub and open your Founder’s Toolkit repository.
- Create a new branch from main and name it: sentiment-analysis
- Open your existing codespace from previous activities.
- Checkout the new branch in your existing codespace. This preserves the localStorage from previous executions of your app.
- In the Terminal window at the bottom of the screen, type (on separate lines):
git checkout main
git pull origin main
git checkout -b sentiment-analysis
- In the Terminal window at the bottom of the screen, type (on separate lines):
3. Add the Token to Your Project
In your Codespaces environment, add the token to your environment.
- In your .env file, add a line: HUGGINGFACE_API_KEY=your_token_here
- Paste your token in the above code.
Another method
Codespaces has a feature called Codespaces Secrets to add things like API keys to keep them secure during project development.
- Go to your repo in Github.
- Click on the gear icon to open Settings.
- In the left-side menu, click on Secrets and Variables, then Codespaces.
- Add a new secret for HUGGINGFACE_API_KEY with your token value.
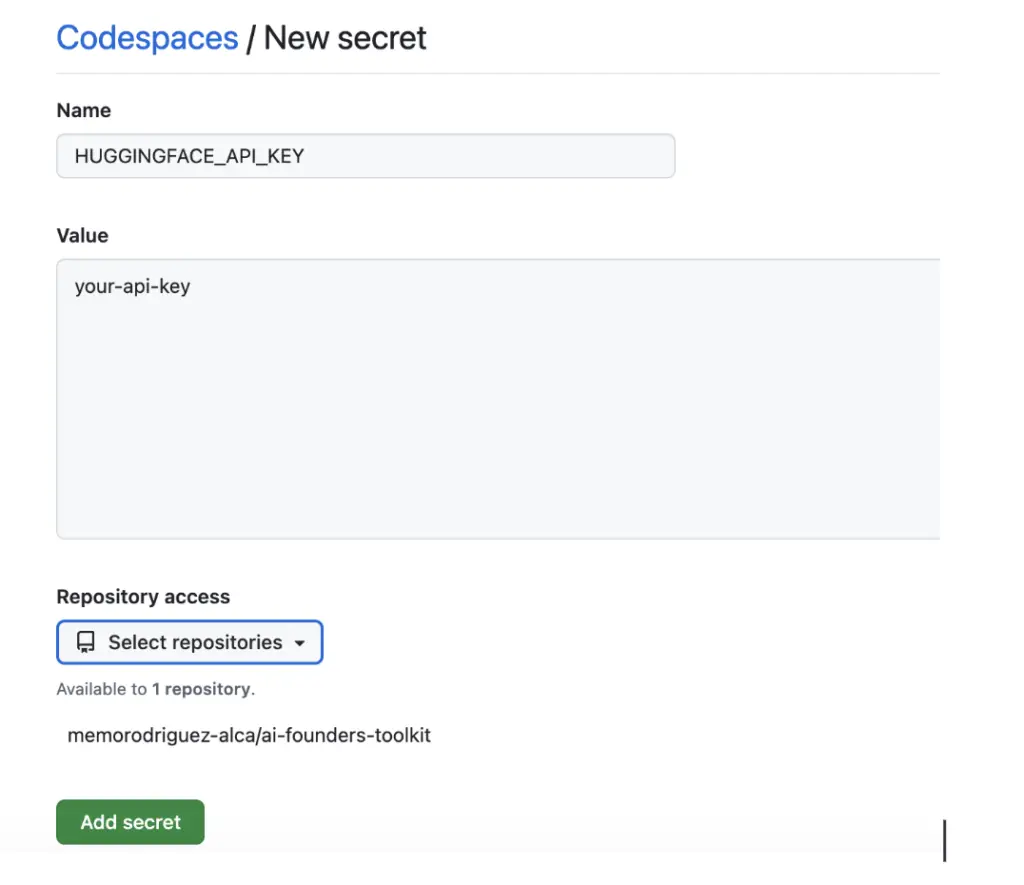
For this activity, we’ll stick to adding the key in the .env file. However, you will learn more about GitHub Secrets in later units to increase the security of your app.
4. Add Sentiment Analysis Code
Ask Copilot to add this feature by pasting in this prompt.
Add sentiment analysis using a pretrained sentiment analysis model for the stakeholder feedback
- Create a new tab called “Sentiment Analyzer”.
- Add a text input where users can type or paste feedback text.
- Add a button “Analyze Sentiment”
- When clicked, call the Hugging Face Inference API:
“https://router.huggingface.co/hf-inference/models/cardiffnlp/twitter-roberta-base-sentiment-latest“
- Display the result showing:
– Label (POSITIVE or NEGATIVE or NEUTRAL)
– Confidence score as percentage (multiply score by 100)
I have added HUGGINGFACE_API_KEY to my .env file.
5. Install Any Necessary Packages and Run
- Follow any instructions from Copilot to install packages.
- Type npm start in the terminal window to start your app.
6. Test with Stakeholder Feedback
Once Copilot finishes, you can test the output with real feedback from your stakeholder interviews.
- Copy a stakeholder’s response from your saved data,
- Run it through the Sentiment Analyzer ,
- Verity the sentiment matches what you expected,
The app should show you the API response as either “positive”, “negative”, or “neutral” with a confidence score.
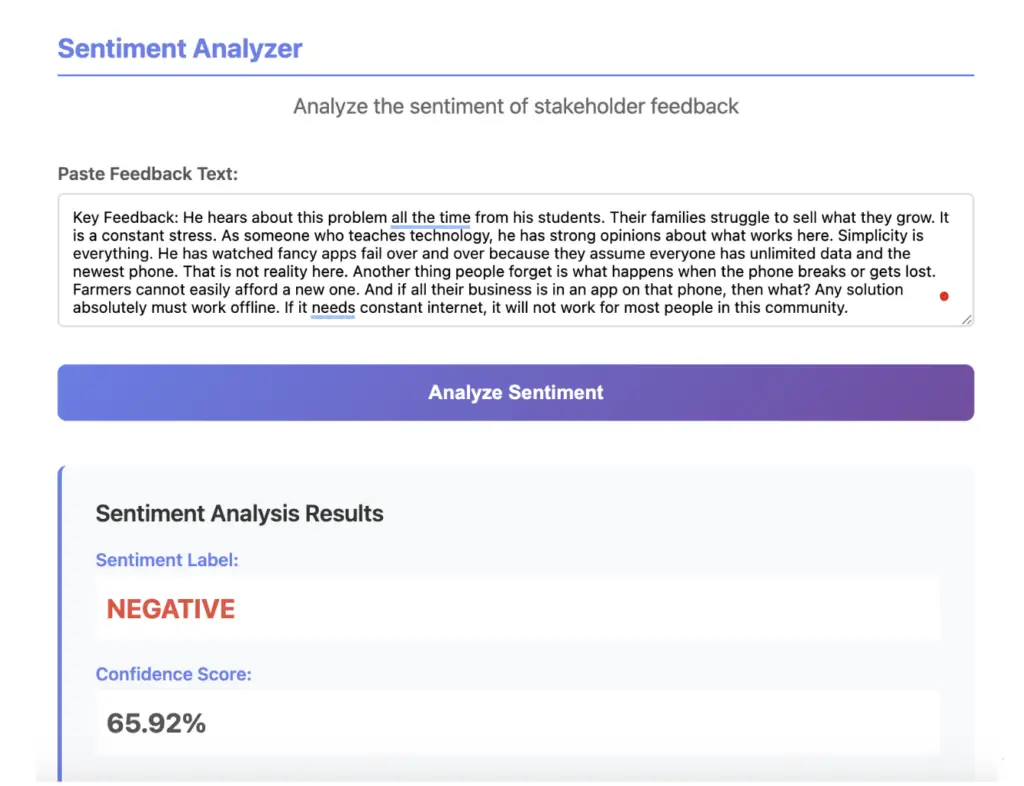
- If you run into errors, get help from Copilot or an external LLM (ChatGPT is good at diagnosing Hugging Face API problems). Here are some possible issues.
- API returns error: The model may be loading or you may have authentication issues. Wait 20-30 seconds and try again or check your API settings.
- Sentimental labels don’t seem to match: Neutral text is harder to classify. Try more opinionated examples.
For more info on how to use this model, their official documentation can be found here: https://huggingface.co/cardiffnlp/twitter-roberta-base-sentiment-latest
7. Commit, Push, and Merge Your Changes
- Commit your changes in your codespace.
- Go to Github, create a pull request and merge the changes to the main branch.
- You can delete your branch, but keep your codespace.
Training and Using Your Own Model
For most participants in this accelerator, you will not need to build your own model. There are many models that exist and are available, that can work for most solutions. However, if your solution relies on classification or prediction of something very particular to the problem you are solving – for example, identifying a particular plant that only exists in your locale – you might be required to gather a dataset and use it to train a machine learning model that you can implement in your solution.
In the challenge below, you will follow the full process in an example with the Founder’s Toolkit app.
- Clean a simple dataset
- Train a sentiment classifier using Hugging Face’s AutoTrain and a local dataset
- Use the model in your Founder’s Toolkit to classify sentiment on stakeholder feedback. This in itself is a multi-step process.
- Create a Hugging Face Gradio space
- Create a simple demo of your model (input -> output) in your space.
- The Space runs in Python and we use the @gradio/client SDK in our React app to bridge the two.
- Add the gradio client connection code in Founder’s Toolkit to access the model and display the prediction results.
This teaches the full machine learning workflow:
data → train → evaluate → deploy
ACTIVITY 3c
AI Path - Predictive - Training Your Own Model
Estimated Time: 60-90 Minutes
Complete this activity if you chose the Predictive AI Path in your worksheet AND you have your own data
In this challenge, we will train our own sentiment classifier using Hugging Face’s AutoTrain.
1. Create a Hugging Face Account and Create API Token
You may have already done this if you did Activity 3B. If not, follow the steps. below.
- Go to huggingface.co and create a free account (if you don’t already have one).
- Click your profile → Settings → Access Tokens
- Click to create a new token, select token type “Read”, and give it an appropriate name.
- Copy the token value and save the it securely.
2. Practice Cleaning a Dataset
For this activity, we will use an existing large dataset from HuggingFace. However, when you are working on your own project, you most likely will be using your own data. These steps will show you some basic steps to ensure “clean” data for a better model.
- Make a folder on your computer, naming it sentiment-analysis.
- Open this Google sheet and look at the data in it
- Can you see any issues?
- Check for empty or missing data, duplicate IDs, and inconsistent labels
- Download the file as a .csv (comma separated values) in the sentiment-analysis folder. Name it raw_data.csv.
- In that same folder, create a new file with (TextEdit on Mac, Notepad on Windows).
- Paste in the follow code and save the file as clean_data.py
					import pandas as pd

# ---------- CONFIG ----------
INPUT_FILE = "raw_data.csv"
OUTPUT_FILE = "clean_data.csv"

# ---------- LOAD DATA ----------
df = pd.read_csv(INPUT_FILE)

# ---------- CLEANING STEPS ----------

# 1. Remove rows with missing values
df = df.dropna()

# 2. Remove duplicates
df = df.drop_duplicates()

# 3. Remove irrelevant columns (optional)
# Example: keep only "text" and "label" columns
df = df[["text", "label"]]

# 4. Basic formatting
df["text"] = df["text"].str.strip()     # remove extra spaces
df["text"] = df["text"].str.replace("\n", " ", regex=False)  # remove newlines

# 5. Save cleaned file
df.to_csv(OUTPUT_FILE, index=False)
print(f"Cleaned data saved to {OUTPUT_FILE}")
- Look at the code and learn what each step is doing to clean the data.
- Open a Terminal window on your computer (not in Codespaces).
- Check to see if you have Python installed, by typing python –version
- If you don’t have python installed, go here and download and install it.
- Navigate to the sentiment-analysis folder in the terminal window using the cd command. Look online for help if you need it.
- Once you are in the sentiment-analysis folder, type pip install pandas (or pip3 install pandas if it doesn’t recognize pip). This installs the pandas library, the python data analysis library.
- Once that installs, type python clean_data.py or python3 clean_data.py (depending on which version of python you have installed). This executes the code in the python file you just created.
- Wait for the message, “Cleaned data saved to clean_data.csv” and then locate clean_data.csv and open it with either a text editor or if you have Excel.
- Note the changes in the file. Missing data, duplicates, and mislabels should be fixed.
This is just practice to show you the steps for cleaning your own data. For the remainder of the activity, we’ll use a much larger dataset we will download from HuggingFace.
3. Download a Text Dataset
To emulate using your own dataset, we will download a large dataset from Hugging Face as csv files that you will use to train a model using Hugging Face AutoTrain. AutoTrain is an automatic (and low/no-cost) way to train and deploy state-of-the-art Machine Learning models, seamlessly integrated with the Hugging Face ecosystem.
- Go to Hugging Face Datasets.
- Next to Datasets, where it says Filter by name, type in syedkhalid076/Sentiment-Analysis.
We’ll use this dataset because it is large, and it has the same labels we want for our Founder’s Toolkit, negative, neutral, and positive.
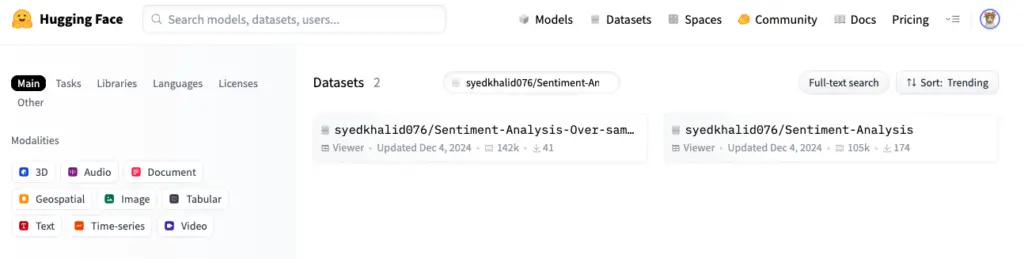
- You should see 2 datasets listed. Click on the second dataset, and look around at the dataset card to learn about the dataset and see some sample data.
- Click on Files and versions to see the files associated with the dataset.
- We will need training and validation data, so click to download train_data.csv and val_data.csv.
- Move both files to your sentiment-analysis folder. Open them to see what the data looks like.
- Autotrain requires particular names for the data files. Rename train_data.csv → train.csv and rename val_data.csv → valid.csv.
4. Set up a Google Colab to Train your Model
You can try to use the HuggingFace AutroTrain Spaces to train directly on their platform, but the platform can be finicky, especially if you are using the free tier. There is also an option to train it locally on your computer, by installing autotrain, but it requires a decent computer with good CPU power available. To avoid any issues locally, we’ll use the power of Google Colab, which allows you to create a Colab notebook, and to run Python code in the cloud, taking advantage of the power of Google GPUs.
- Go to this GIthub repo for Autotrain Advanced.
- Scroll down the README and find Text Classification under Supported Tasks.
- Click the Text Classification link to open in Colab.
- A Google Colab notebook will open. Click Copy to Drive to save a copy to your own Google Drive.
- At the top, rename the notebook to sentiment-analysis-model.ipynb
- Click the Runtime menu at the top and choose Change Runtime type.
- Choose T4 GPU and click Save. It might ask you to restart the notebook. Do so if asked. This gives you GPU power for training faster.
5. Copy Your Dataset to Your Colab Notebook
- On the left side icon menu, click on the folder icon to open the File Manager. You will see a folder called sample_data. Click on it and rename it data.
- Open the folder. You will see several csv and json files.
- Drag the train.csv and valid.csv files you downloaded from HuggingFace into the folder.
6. Set up your Colab Notebook to Train the Model
While you are given some sample code, you need to make some updates to configure for your data and model.
- Hover between the first 2 blocks of text/code, called cells. You should see +Code and +Text buttons. Click on +Code to make a blank code cell.
- Type !pip install autotrain-advanced in the cell.
This will install the autotrain-advanced package in your notebook. The ! in front of the command is like running a terminal command from within the notebook. - Click the arrow on the left side of the cell to run the commands inside the cell. Wait for it to install the autotrain-advanced package.
- Click arrow in the next cell below to import those libraries.
- In the next cell, we need to configure our username and password for HuggingFace. Replace your_huggingface_username with your actual HuggingFace username
- Rather than type our token directly in our notebook, let’s be more secure by hiding it. Replace the
HF_TOKEN = “your_huggingface_write_token” line with
HF_TOKEN = getpass(“Enter your HF token: “) - Run the cell code by clicking the arrow. It will prompt you to enter your Hugging Face token. Copy and paste the token when prompted.
The token remains hidden but will need to be re-entered if you close and re-open your notebook.
7. Update the Parameters for Training
Here is the code provided. Most of the defaults will work for us, but we need to change a few things.
					params = TextClassificationParams(
   model="google-bert/bert-base-uncased",
   data_path="stanfordnlp/imdb", # path to the dataset on huggingface hub
   text_column="text", # the column in the dataset that contains the text
   target_column="label", # the column in the dataset that contains the labels
   train_split="train",
   valid_split="test",
   epochs=3,
   batch_size=8,
   max_seq_length=512,
   lr=1e-5,
   optimizer="adamw_torch",
   scheduler="linear",
   gradient_accumulation=1,
   mixed_precision="fp16",
   project_name="autotrain-model",
   log="tensorboard",
   push_to_hub=True,
   username=HF_USERNAME,
   token=HF_TOKEN,
)
- data_path currently refers to a dataset on Hugging Face. We want to point to our “local” csv files. So, set the path to “data”.
- Add 2 lines below the data_path line.
train_split=”train”,
valid_split=”valid”,
This points to our 2 .csv files for the training and validation data. - text_column and target_column match what we have in our .csv files. So keep those as is.
- Change the project_name to an appropriate name, like sentiment-analysis-model.
- The rest of the parameters are fine as is. Click the arrow to run the cell.
- Skip the next cell. It is just informational.
- Run the cell containing this code:
project = AutoTrainProject(params=params, backend=”local”, process=True)
project.create().
This will start to train the model.
Be patient and keep the window open on your machine.
It could take 30 minutes to over an hour to train the model.
8. Locate your Model on Hugging Face
- Once the model finishes training, go to your Hugging Face account and click on your profile. You should have a new model with the name you gave it in the Colab notebook.
- Once you locate the model, click on the name to open it.
- Click on the Settings, and make it Public. This will make it easily available when you create a pipeline to your model.
9. Create a new Hugging Face Space
- At the top of the Hugging Space window, click on Spaces.
- Click the button + New Space.
- Give your space an appropriate name, like founders-toolkit-sentiment-analysis.
- For Space SDK, select Gradio, and for Space Hardware, select CPU Basic.
- Make sure your space is set to Public and create the space.
- Click on Files at the top of the screen. This shows you the files in your space. Note it looks a lot like a Github repository.
- You need to add the files to run your model. Click on Contribute and Create a New file.
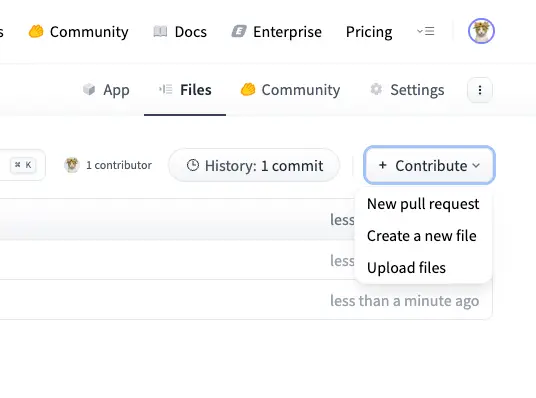
8. Paste in the following code:
					import gradio as gr
from transformers import pipeline


classifier = pipeline("text-classification",
 model="HF_USERNAME/HF_MODELNAME")


def predict(text):
   return classifier(text)


with gr.Blocks() as demo:
   text_input = gr.Textbox(label="Input Text")
   output = gr.JSON(label="Prediction")


   text_input.submit(predict, inputs=text_input, outputs=output)


demo.launch()
- In the line of code with model=, type in your Hugging Face username and model name.
You can get this string easily by clicking on your profile in Hugging Face, and then clicking on the model. You can copy your name/model at the top of the model page. - Name this file app.py
- Click back on the space name next to main branch to get back to the file list. Click Contribute and Create a new file again.
This will be your requirements.txt file, which tells python which libraries to load when running the space. - Paste:
transformers
torch
into the file. Name it requirements.txt.
10. Start your Space
- Click on App at the top of the screen, and it should start the app/space.
It might take several minutes for your app to run. Eventually, you should see a green Running button at the top of the screen. - You can test your model by typing something into the input text block and get the prediction back below.
Note when you run it, it gives you a label and a score. The label is 0, 1, or 2. 0=negative, 1=neutral, and 2=positive. The score is the confidence level for the prediction. It ranges from 0 to 1, with 1 being completely confident in the prediction.
11. Add to Founder’s Toolkit
This part can be tricky, but work with Copilot (or other LLMs) to implement it.
- Open a new branch on your Github repo.
- Open your Github Codespace.
- Checkout the new branch.
- Run this command in the terminal window to install the gradio library.
npm install @gradio/client
- Use the prompt below with Copilot, while changing MY_HF_USERNAME and MY_HF_SPACE to your username and space on Hugging Face (note they appear in 2 places).
Add a “My Sentiment Analyzer” tab to the app. It should contain a text field for user input, and a button, “Analyze Sentiment”.
Pressing the button should initiate a call to the Hugging Face Gradio Space MY_HF_USERNAME/MY_HF_SPACE (no backend).
Response from Gradio space should display Label and Score.
Constraints:
- Client-only integration; do not modify server.js or add new endpoints.
- Use @gradio/client via ESM from jsdelivr; ensure only one import path and expose window.GradioClient.
- Consolidate to a single CSP meta tag. Allow: connect-src ‘self’ https://generativelanguage.googleapis.com https://*.hf.space https://huggingface.co wss://*.hf.space; script-src ‘unsafe-inline’ https://cdn.jsdelivr.net; style-src ‘unsafe-inline’.
- Call the Space with Client.connect(‘MY_HF_USERNAME/MY_HF_SPACE’) and predict(‘/predict’, [text]).
Output Mapping:
- Map labels: 0 → negative, 1 → neutral, 2 → positive
- Score ranges from 0-1. Format as percentage with two decimals.
- Test the app once Copilot generates the appropriate code. Debug any issues that arise. Type in a random negative comment and see the result, then try a positive one.
12. Commit, Push, and Merge Your Changes
Once you are satisfied with the results:
- Commit your changes in your codespace.
- Go to Github, create a pull request and merge the changes to the main branch.
- You can delete your branch, but keep your codespace.
NOTE: This activity and use of Hugging Face Spaces is meant to show you a low or no-cost method you can use to integrate your own model into an app. We used the frontend and the client connection, and kept both our model and Hugging Face space public, to simplify testing. However, if you are training your own model using Hugging Face AutoTrain and spaces, be aware that you will need to be more secure by using a backend server (server.js) and to secure your token using .env.
Reflection
You learned about tech stacks and AI Paths and made some decisions related to your product. Here are some things to consider:

Tech Stack
AI Path
Trade-offs
Pitching
Key Terms
- Tech Stack: The combination of programming languages, frameworks, and services used to build your app
- Frontend: What users see and interact with (HTML, CSS, JavaScript, React)
- Backend: Server-side code that processes data and runs logic
- API (Application Programming Interface): A way for your code to communicate with external services
- LLM (Large Language Model): AI that generates text, has conversations, and analyzes documents
- Predictive AI: AI that finds patterns in data to make predictions or classifications
- Temperature (AI setting): Controls how creative vs consistent AI responses are (0 = predictable, 1 = creative)
- Inference: Using a trained model to make predictions on new data
- Training: Teaching a model to recognize patterns by showing it labeled examples
- Pre-trained Model: A model already trained on large datasets, ready to use
- AutoTrain: A platform that automatically trains ML models without coding
Additional Resources
- Google AI Studio – Build Mode for quick prototypes
- Classification | Machine Learning | Google for Developers
- Analyzing Sentiment | Cloud Natural Language API
- Understand and count tokens | Gemini API | Google AI for Developers
- Gradio JS Client Documentation
- Hugging Face AutoTrain – No-code model training
- Twitter Sentiment Dataset – Dataset used in Activity 3b
- Hugging Face Inference API – How to call models via API
- Sentiment Analysis on Twitter Tutorial – Extended tutorial with code examples