- कोड प्रबंधन और सहयोग के लिए GitHub Core Actions के बारे में जानें
- सुरक्षित और संरक्षित तरीके से बाहरी एआई सेवाओं से जुड़ें
- कई स्रोतों से प्राप्त फीडबैक को उपयोगी जानकारियों में बदलने के लिए एआई का उपयोग करें।
- स्टेकहोल्डर ट्रैकर: आपके स्टेकहोल्डर अनुसंधान को व्यवस्थित करने के लिए एक सरल प्रणाली
- फीडबैक एनालाइजर: एक एआई-संचालित टूल जो आपके द्वारा एकत्रित सभी फीडबैक में पैटर्न और प्राथमिकताओं का पता लगाता है।
- छात्रों के पास एक परिष्कृत समस्या विवरण है जिसमें हितधारकों से प्राप्त प्रतिक्रिया को शामिल किया गया है।
- छात्रों ने हितधारकों के साक्षात्कार पूरे कर लिए हैं और अपनी एआईवीए 3 हितधारक सत्यापन कार्यपत्रक भर ली है।
- छात्रों के पास GitHub खाता है और उन्होंने Vibe Coding Your Own Founder's Tookit की गतिविधियाँ पूरी कर ली हैं।
आपने दोस्तों और परिवार से प्रतिक्रिया एकत्र की है, अपनी सोच को चुनौती दी है और हितधारकों के साक्षात्कार आयोजित किए हैं।
वाइब कोडिंग योर ओन फाउंडर्स टूलकिट लेसन में आपने फीडबैक स्टोरेज मॉड्यूल के साथ अपना फाउंडर्स टूलकिट बनाया और पेज रिफ्रेश के बीच अपना डेटा सेव करने के लिए लोकल स्टोरेज का इस्तेमाल किया।
इस पाठ में, हम सीखेंगे कि हमारे फाउंडर्स टूलकिट में एआई फीडबैक कैसे जोड़ा जाए, ताकि हमें एकत्रित किए गए सभी फीडबैक को संश्लेषित करने में मदद मिल सके।
लेकिन सबसे पहले, आप GitHub कौशल को बेहतर बनाना सीखेंगे। पेशेवर डेवलपर सुरक्षित रूप से प्रयोग करने और दूसरों के साथ सहयोग करने के लिए ब्रांच और पुल रिक्वेस्ट का उपयोग करते हैं। ये कौशल आपके उद्यमी सफर में आपके काम आएंगे।
अपने GitHub कौशल को उन्नत करना
नई सुविधाएं जोड़ने से पहले, आप सीखेंगे कि पेशेवर डेवलपर कैसे काम करते हैं - सुरक्षित रूप से प्रयोग करने के लिए शाखाओं का उपयोग करना और प्रगति को सहेजने के लिए कोड कमिट करना और कोड को मर्ज करने के लिए पुल/पुश अनुरोध करना।
यह महत्वपूर्ण जानकारी है जो आपके बिजनेस ऐप के विकास के दौरान आपकी पूरी यात्रा में सहायक होगी। संभावना है कि आप इस प्रोजेक्ट के लिए और वास्तविक जीवन में भी अन्य छात्रों के साथ मिलकर काम करेंगे।
यह सब कुछ गिट के माध्यम से किया जाता है और इसे समझने के लिए, आइए कुछ अवधारणाओं पर गौर करें।
Git एक वर्ज़न कंट्रोल सिस्टम है जो आपके कोड में किए गए हर बदलाव को ट्रैक करता है। यह आपको कई काम करने की सुविधा देता है, जैसे:
- सुरक्षित रूप से प्रयोग करें : अपने मौजूदा कोड को जोखिम में डाले बिना नई सुविधाओं को आज़माएं
- गलतियों को पूर्ववत करें : यदि कुछ गड़बड़ हो जाए या आपका मन बदल जाए तो पिछले संस्करण पर वापस जाएं
- सहयोग करें : एक-दूसरे के बदलावों को ओवरराइट किए बिना दूसरों के साथ मिलकर काम करें।
शाखाओं
मान लीजिए आप कोई महत्वपूर्ण दस्तावेज़ लिख रहे हैं। अपने एकमात्र संस्करण को संपादित करने के बजाय, आप प्रयोग करने के लिए एक डुप्लिकेट दस्तावेज़ बनाने का निर्णय लेते हैं। यदि परिवर्तन सफल होते हैं, तो आप उन्हें मर्ज कर देते हैं। यदि नहीं, तो आपके पास मूल दस्तावेज़ और वह नया दस्तावेज़ दोनों मौजूद रहते हैं जिनमें वे परिवर्तन हैं जो सफल नहीं हुए।
GitHub में Git ब्रांच भी इसी तरह काम करती हैं। यह इस प्रकार काम करता है:
- मुख्य शाखा – आपका “आधिकारिक” कार्यशील संस्करण
- फीचर ब्रांच – यह मुख्य ब्रांच की एक कॉपी होती है जहाँ आप कोई नया फीचर बनाते हैं या कोई बदलाव करते हैं। आप इस ब्रांच को कोई भी नाम दे सकते हैं, लेकिन हम सुझाव देते हैं कि आप ऐसा नाम रखें जो स्पष्ट हो ताकि आपको इसका उद्देश्य याद रहे।
- मर्ज करना – आपकी फीचर ब्रांच और उसके बदलावों को वापस आधिकारिक मुख्य ब्रांच में मिलाना
मान लीजिए कि आपकी मुख्य शाखा ठीक से काम कर रही है और उसका पूरी तरह से परीक्षण हो चुका है। फिर आप कोई नया फ़ीचर बनाना चाहते हैं, जैसे कि पेज पर एक नया बटन या फिर टेक्स्ट में कोई साधारण बदलाव। आप अपनी मुख्य शाखा से "copy-change" नाम की एक नई शाखा बनाते हैं। परीक्षण के दौरान अगर कोई समस्या आती है, तो आपकी मुख्य शाखा सुरक्षित रहेगी और आप उससे दोबारा शुरुआत कर सकते हैं।
अगली गतिविधि में, आप GitHub में ब्रांचिंग और मर्जिंग प्रक्रिया का अभ्यास करने के लिए अपने ऐप में एक छोटा सा अपडेट करेंगे।
गतिविधि 1
GitHub वर्कफ़्लो का अभ्यास करें
अनुमानित समय: 20 मिनट
1. GitHub खोलें और अपनी रिपॉजिटरी पर जाएं।
GitHub.com पर जाएं , अपनी रिपॉजिटरी पर जाएं, और उस ब्रांच का चयन करें जिस पर आपने पिछली तकनीकी इकाई में काम किया था।
आपको एक संदेश दिखाई देगा जिसमें लिखा होगा कि यह शाखा "main" शाखा से 1 कमिट आगे है।
ऐसा इसलिए होता है क्योंकि हमने उस ब्रांच में कोड में बदलाव किए थे लेकिन उन बदलावों को मुख्य ब्रांच में पुश नहीं किया।
तो चलिए उस मैसेज लिंक पर क्लिक करके ऐसा करते हैं।

लिंक पर क्लिक करने से GitHub का पुल रिक्वेस्ट पेज खुल जाएगा, जहां हम बदलावों की तुलना कर सकते हैं और फिर एक पुल रिक्वेस्ट बना सकते हैं।
2. पुल रिक्वेस्ट बनाएं
- एक शीर्षक और विवरण जोड़ें। हो सकता है कि GitHub ने ब्रांच बनाते समय पहले से ही एक शीर्षक डाल दिया हो, लेकिन आप उसे संपादित कर सकते हैं और अपने द्वारा किए गए कार्य का विवरण जोड़ सकते हैं।

2. हरे रंग के "Create Pull Request " बटन पर क्लिक करें।
3. कोड को मर्ज करें और ब्रांच को डिलीट करें।
क्योंकि आप इस रिपॉजिटरी के एकमात्र मालिक हैं, इसलिए आप अपने पुल रिक्वेस्ट को स्वयं स्वीकृत कर सकते हैं। कई टीम सदस्यों वाले वास्तविक ऐप्स में, यह आम बात है कि कोई अन्य डेवलपर आपके अनुरोध की समीक्षा करे और किसी भी समस्या के मामले में आपके साथ सहयोग करे। इसे ही अक्सर कोड रिव्यू कहा जाता है।
- पुल रिक्वेस्ट को मर्ज करने और रिक्वेस्ट की पुष्टि करने के लिए क्लिक करें।
ध्यान दें कि यहाँ दो चरणों वाली प्रक्रिया है। यह एक महत्वपूर्ण कार्य है, इसलिए GitHub ने इसे दो चरणों वाली प्रक्रिया बनाया है ताकि गलतियाँ न हों।

- आपको कोड में बदलाव करने के लिए इस्तेमाल की गई ब्रांच को डिलीट करने का बटन दिखाई देगा। इससे आपकी रिपॉजिटरी साफ-सुथरी और व्यवस्थित रहेगी और फालतू ब्रांचों से भर नहीं जाएगी। ब्रांच को डिलीट करने के लिए बटन पर क्लिक करें।

5. एक नई शाखा बनाने के लिए अपने रिपॉजिटरी में जाएं।
- अपने रिपॉजिटरी पर वापस जाएं।
- उपलब्ध शाखाओं की सूची देखने के लिए अपने रिपॉजिटरी के ऊपरी बाएँ कोने में स्थित मुख्य "शाखा" का चयन करें।
- “शाखाएं देखें” चुनें और फिर एक नई शाखा बनाएं।
- इस स्टेकहोल्डर वैलिडेशन लेसन के लिए एक वर्णनात्मक नाम दीजिए।
- नया ब्रांच बनाएं पर क्लिक करें।

सुझाव: यह चरण वैकल्पिक है, लेकिन हम प्रमुख अपडेट करते समय हर बार नई शाखा बनाने की पुरजोर सलाह देते हैं। आप अपने उद्देश्य के अनुसार इस नई शाखा को "मुख्य" शाखा से या किसी अन्य शाखा से शुरू करना चुन सकते हैं। लेकिन आमतौर पर आधिकारिक मुख्य शाखा से शुरुआत की जाती है।
6. अपना कोडस्पेस खोलें
हम एक नई ब्रांच खोल रहे हैं, लेकिन पिछले पाठ में इस्तेमाल किए गए कोडस्पेस का ही उपयोग करते रहेंगे। याद रहे कि हमने परिवार और दोस्तों से मिली कुछ प्रतिक्रियाओं को Local Storage में सहेजा था, जो ब्राउज़र में संग्रहीत होती हैं, लेकिन एक विशिष्ट URL से जुड़ी होती हैं। प्रत्येक कोडस्पेस का अपना URL होता है। यदि हम एक नया कोडस्पेस खोलते हैं, तो हम वह localStorage खो देंगे।
इसलिए, हमारे फाउंडर्स टूलकिट के काम के लिए, आइए उसी कोडस्पेस का उपयोग करते रहें ताकि हम उस स्टोरेज को न खोएं और उसे बार-बार टाइप न करना पड़े।
- GitHub में, बाईं ओर स्थित हैमबर्गर मेनू से अपने कोडस्पेस पर जाएं।
- पिछली गतिविधि से अपना कोडस्पेस ढूंढें और उसे खोलें।
6. अपने कोडस्पेस को नई शाखा से कनेक्ट करें।
क्योंकि हमने अपनी पुरानी शाखा को हटा दिया है और एक नई शाखा खोली है, इसलिए हम यह सुनिश्चित करना चाहते हैं कि हमारा कोडस्पेस नई शाखा को अपडेट करे।
- स्क्रीन के निचले भाग में स्थित टर्मिनल विंडो में, (दो अलग-अलग पंक्तियों में) निम्नलिखित टाइप करें:
git checkout main
git pull origin mainयह आपके कोडस्पेस को आपकी मुख्य शाखा के साथ सिंक्रनाइज़ करता है।
- प्रकार
git checkout -b my-branch
जहां my-branch वह नाम है जो आपने चरण 5 में GitHub में अपनी नई शाखा को दिया था।
यह नई ब्रांच को चेकआउट करता है, इसलिए कोई भी अपडेट, कमिट और पुश करने पर, नई ब्रांच में जाएगा। साथ ही, आप ब्राउज़र में अपने कोडस्पेस और लोकल स्टोरेज को सुरक्षित रख रहे हैं।
7: एआई को फॉर्म अपडेट करने का निर्देश दें
- इस निर्देश को कॉपी करके कोपायलट चैट सेक्शन में पेस्ट करें, जो कि सबसे दाहिने पैनल में होना चाहिए।
फॉर्म के सभी प्रविष्टि फ़ील्ड की ऊंचाई को घटाकर केवल एक पंक्ति तक सीमित करें।
- नीचे के पैनल में टर्मिनल टैब में python3 -m http.server 8000 टाइप करके परिवर्तनों का परीक्षण करें।
- चल रहे ऐप को देखकर यह पता लगाएं कि फॉर्म की ऊंचाई अब कम हो गई है।
8. GitHub पर किए गए बदलावों को सेव करें।
पिछले पाठ में आपने कोडस्पेस में सोर्स कंट्रोल सुविधा का उपयोग करके उन परिवर्तनों को कमिट किया और उन्हें गिटहब पर पुश किया।
आप परिवर्तित फाइलों को देख पाए, एक कमिट स्टेटमेंट जोड़ा, और अपने रिपॉजिटरी ब्रांच में परिवर्तनों को कमिट करने के लिए कमिट पर क्लिक किया।

आप यहां भी ऐसा ही कर सकते हैं। हालांकि, टर्मिनल कमांड का उपयोग करके इसे करने का तरीका जानने के लिए, इन चरणों का पालन करें।
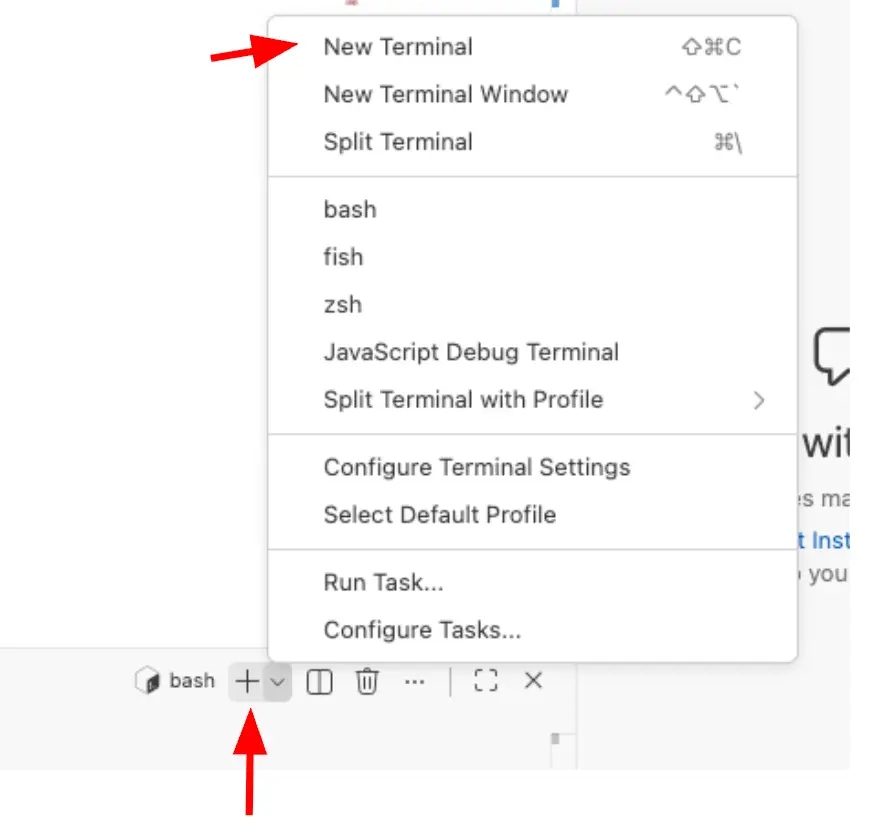
- नीचे के पैनल में टर्मिनल सब टैब खोलें।
- मेनू खोलने के लिए + आइकन पर क्लिक करें।
- नया टर्मिनल चुनें।
- ब्रांच के बारे में जानकारी देखने के लिए git status टाइप करें।
यह आपको उन सभी बदलावों के बारे में बताएगा जो आपने किए हैं और जो कोड प्रक्रिया में आगे बढ़ने के लिए तैयार हो सकते हैं। आपको कुछ इस तरह का दृश्य दिखाई देगा:
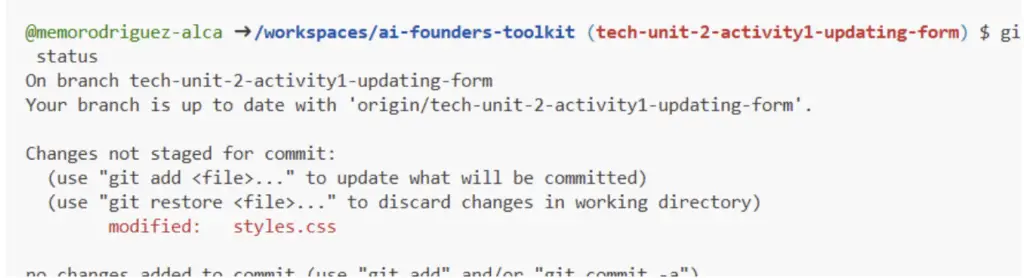
- किए गए बदलावों को देखने के लिए संदेश पढ़ें।
- अपने बदलावों को सहेजने के लिए git add . टाइप करें। "." का मतलब है कि आप फ़ाइल में किए गए सभी बदलावों को सहेज रहे हैं।
- यह सत्यापित करने के लिए कि आपके परिवर्तन स्टेज किए गए हैं और कमिट करने के लिए तैयार हैं, फिर से git status टाइप करें।
- git commit -m “Update form height” टाइप करके अपने बदलावों को सेव करें ।
"फॉर्म की ऊंचाई अपडेट करें" को कमिट मैसेज के रूप में जाना जाता है और यह महत्वपूर्ण है कि यह आपके और कमिट की समीक्षा करने वाले किसी भी व्यक्ति के लिए पर्याप्त रूप से वर्णनात्मक हो। अब git push origin tech-unit-2-activity1-updating-form (या जो भी नाम आपने origin के बाद अपनी ब्रांच का रखा है) टाइप करके GitHub पर पुश करें।
यह गिट को बताता है कि आपके कमिट्स को रिमोट गिटहब रिपॉजिटरी (ओरिजिन) में पुश करें और उन्हें निर्दिष्ट ब्रांच में रखें, इस मामले में, " tech-unit-2-activity1-updating-form"।
टिप: -u फ़्लैग का उपयोग करना, जैसे कि git push -u origin tech-unit-2-activity1-updating-form, आपके मूल और शाखा को डिफ़ॉल्ट पर सेट करता है, इसलिए भविष्य के कमांड के लिए केवल git push की आवश्यकता होती है।
9. GitHub पर सत्यापित करें
- ब्राउज़र में GitHub पर वापस जाएं और उस ब्रांच पर वापस जाएं जहां आपने वे बदलाव पुश किए थे।
आपको एक संदेश दिखाई देगा जिसमें बताया गया होगा कि उस ब्रांच पर हाल ही में एक पुश कमांड भेजा गया था। - कंपेयर और पुल रिक्वेस्ट पर क्लिक करें, इससे वह प्रक्रिया शुरू हो जाएगी जो आपने पिछले चरणों में सीखी थी।

- पुल रिक्वेस्ट बनाने और मुख्य शाखा में परिवर्तनों को मर्ज करने के लिए आवश्यक चरणों को पूरा करें।
इस स्थिति में, आप अपनी शाखा को हटाने के बजाय इस पाठ की शेष गतिविधियों के लिए उपयोग करने हेतु उसे रख सकते हैं।
पिछले तकनीकी पाठ में, आपने अपने संस्थापक टूलकिट में समस्या विवरण और मित्रों एवं परिवार से प्राप्त प्रतिक्रियाओं के लिए एक इनपुट फॉर्म बनाया था। इस अगली गतिविधि में, आप अपने संस्थापक टूलकिट में एक नया टैब जोड़ेंगे ताकि समस्या परिष्करण पाठ में एकत्रित की गई हितधारकों की जानकारी और प्रतिक्रियाओं को दर्ज किया जा सके।
गतिविधि 2
अपना स्टेकहोल्डर ट्रैकर बनाएं
अनुमानित समय: 30 मिनट
1. GitHub और Codespaces खोलें
GitHub.com पर जाएं , और अपने कोडस्पेस पर जाएं और पिछली गतिविधि से कोडस्पेस खोलें या हो सकता है कि यह पिछली गतिविधि से किसी टैब में पहले से ही खुला हो।
2. स्टेकहोल्डर ट्रैकर कार्यक्षमता जोड़ें
कोडस्पेस में, कोपायलट पैनल में, निम्नलिखित प्रॉम्प्ट जोड़ें।
एक स्टेकहोल्डर ट्रैकर टैब जोड़ें जहां मैं अपने स्टेकहोल्डर्स की प्रतिक्रिया को व्यवस्थित तरीके से देख सकूं।
स्टेकहोल्डर ट्रैकर टैब में निम्नलिखित होना चाहिए:
- शीर्षक: “हितधारक ट्रैकर”
- उपशीर्षक: “अपने साक्षात्कार अनुसंधान का प्रबंधन करें”
- निम्नलिखित फ़ील्ड वाला एक फ़ॉर्म:
- नाम (पाठ)
- प्रकार चुनें (ड्रॉपडाउन: साक्षात्कार, सर्वेक्षण, ईमेल, टेक्स्ट)
- मुख्य प्रतिक्रिया (अंतर्दृष्टि, उठाई गई चिंताएँ, जो बातें आपको पसंद आईं) (पाठ क्षेत्र)
बटन पर क्लिक करने पर:
- सभी जानकारी को लोकल स्टोरेज रिकॉर्ड में JSON फॉर्मेट में स्टोर करें।
- स्क्रीन के निचले भाग में एक तालिका में सभी हितधारकों की जानकारी प्रदर्शित करें।
- रिकॉर्ड सफलतापूर्वक जोड़ने के बाद सफलता संदेश दिखाएं
अन्य दिशा-निर्देश:
- यूजर इंटरफेस को साफ-सुथरा और सुसंगत रखें।
डेटा संग्रहण के बारे में नोट:
आपके स्टेकहोल्डर का डेटा आपके ब्राउज़र के लोकल स्टोरेज में सेव होता है, जिसके बारे में हमने टेक यूनिट 1 से सीखा था कि:
- आपका डेटा ब्राउज़र सेशन के बीच बना रह सकता है, लेकिन यह इस डिवाइस पर इस ब्राउज़र के लिए ही विशिष्ट है।
- इसके अलावा, यदि आप अपने ब्राउज़र का डेटा साफ़ करते हैं, किसी दूसरे कंप्यूटर का उपयोग करते हैं या कोई नया कोडस्पेस वातावरण शुरू करते हैं, तो आपको अपना डेटा दोबारा दर्ज करना होगा।
फिलहाल, यह आपके शोध को व्यवस्थित करने के लिए ठीक है। आगे की इकाइयों में, आप स्थायी डेटा के लिए क्लाउड स्टोरेज के बारे में जानेंगे।
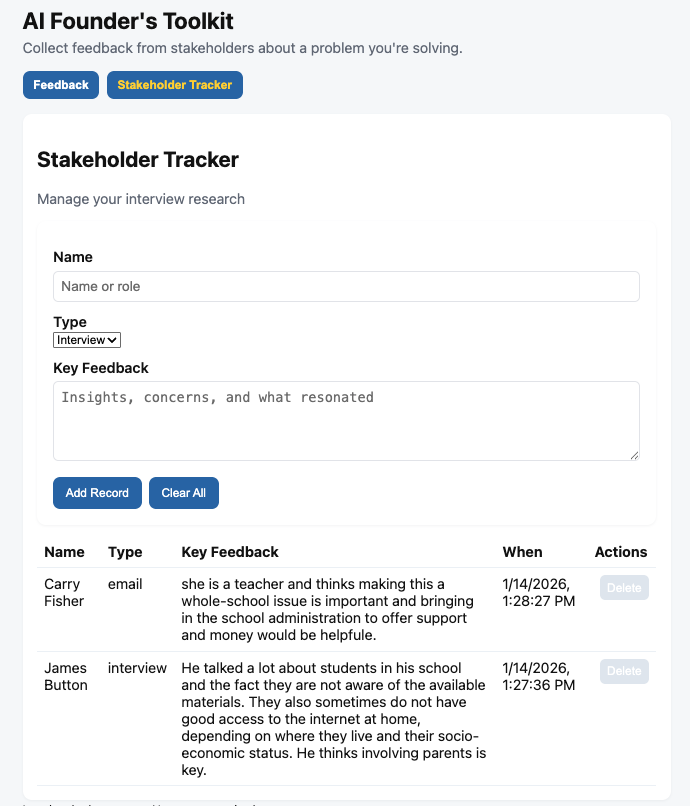
इस प्रॉम्प्ट का उपयोग करके हमारा फाउंडर्स टूलकिट कुछ इस तरह दिखता है। आपका ऐप इससे अलग दिख सकता है।

3. अपने हितधारकों के रिकॉर्ड फॉर्म में जोड़ें।
- अपने AIVA 3: स्टेकहोल्डर वैलिडेशन वर्कशीट से जानकारी फॉर्म में दर्ज करें।
ध्यान दें कि हमने फॉर्म को संक्षिप्त और खुला रखा है, इसलिए प्रत्येक हितधारक से एकत्रित की गई महत्वपूर्ण जानकारी दर्ज करने का प्रयास करें। - यह सुनिश्चित करें कि दर्ज की गई सभी जानकारी तालिका में दिखाई दे रही है।
- डेवलपर टूल्स का उपयोग करके localStorage की भी जांच करें ताकि यह सुनिश्चित हो सके कि सभी जानकारी JSON फॉर्मेट में ठीक से संग्रहीत है।
हम अगली गतिविधि में ऐप में और भी चीजें जोड़ते रहेंगे, इसलिए अभी अपने बदलावों को कमिट और पुश करने की कोई आवश्यकता नहीं है।
ध्यान दें: कोपायलट का निःशुल्क उपयोग सीमित है:
- 50 चैट संदेश/माह
- 2000 कोड पूर्णताएँ/माह (इनलाइन कोड)
इसलिए, कोडस्पेस में कोपायलट के साथ चैट शुरू करते समय सावधानी बरतें। यदि आपके क्रेडिट समाप्त हो जाते हैं, तो वे अगले महीने तक रीसेट नहीं होंगे। ऐसे में, आप अपने कोड में सहायता के लिए अन्य बाहरी एलएलएम (क्लाउड, जेमिनी, चैटजीपीटी) का उपयोग कर सकते हैं। हालांकि ये एम्बेडेड कोपायलट की तरह तुरंत काम नहीं करते, लेकिन ये सभी कोडिंग में आपकी सहायता करने की क्षमता रखते हैं। आपको बस कोड को कॉपी/पेस्ट करना होगा (दोनों दिशाओं में)।
एआई सेवाओं से जुड़ना
आपने इस टैब में अपने हितधारकों की प्रतिक्रिया को व्यवस्थित कर लिया है। और आपने एकत्रित की गई जानकारी का कुछ विश्लेषण भी कर लिया है।
अब एआई का उपयोग करके उन पैटर्न को पहचानने का बेहतरीन समय है जिन्हें आप शायद पहले नज़रअंदाज़ कर चुके हों। यह एक सहयोगी उपकरण है जो आपके द्वारा पहले से किए गए उत्कृष्ट कार्य को आगे बढ़ाने में सहायक होगा।
इस भाग में, आप अपने ऐप को एक वास्तविक एआई सेवा से जोड़ेंगे और एक फीडबैक एनालाइज़र बनाएंगे जो आपके स्टेकहोल्डर रिसर्च से प्राप्त जानकारियों को सामने लाएगा।
हम एलएलएम के रूप में गूगल के जेमिनी का उपयोग करेंगे क्योंकि इसमें शक्तिशाली एलएलएम मॉडल पर उदार मुफ्त सीमाएं हैं।
एआई-संचालित ऐप्स कैसे काम करते हैं
आपने शायद पहले ChatGPT, Claude या Gemini का इस्तेमाल किया होगा। लेकिन क्या आपने कभी सोचा है कि Notion, Grammarly या Duolingo जैसे अन्य एप्लिकेशन अपने उत्पादों में AI सुविधाओं को कैसे शामिल करते हैं?
वे अपने एआई मॉडल को शुरू से खुद नहीं बनाते। इसके बजाय, वे एपीआई के माध्यम से मौजूदा मॉडलों और एआई सेवाओं से जुड़ते हैं। हम आगे की इकाइयों में और अधिक विस्तार से चर्चा करेंगे, लेकिन यहाँ बुनियादी अवधारणाएँ दी गई हैं।
एपीआई (एप्लिकेशन प्रोग्रामिंग इंटरफ़ेस) सरल शब्दों में एक ऐसा माध्यम है जिसके द्वारा एक सॉफ़्टवेयर दूसरे सॉफ़्टवेयर से संवाद करता है। जब आपके एप्लिकेशन को एआई क्षमताओं की आवश्यकता होती है, तो यह एक एआई सेवा को संदेश भेजता है, और सेवा एक प्रतिक्रिया लौटाती है।
इस प्रक्रिया में आमतौर पर कुछ ही सेकंड लगते हैं। आपका ऐप एक AI API अनुरोध भेजता है, प्रतिक्रिया की प्रतीक्षा करता है, और फिर परिणाम प्रदर्शित करता है।
हर एआई ऐप इसी तरह काम करता है
एक बार जब आप इस पैटर्न को समझ लेते हैं, तो आप अपने द्वारा बनाए गए किसी भी ऐप में एआई जोड़ सकते हैं।
एआई प्रदाता का चयन करना
जिस प्रकार आप विभिन्न क्लाउड स्टोरेज प्रदाताओं (Google Drive, Dropbox, iCloud) में से चयन कर सकते हैं, उसी प्रकार आप विभिन्न AI प्रदाताओं में से भी चयन कर सकते हैं। यहाँ कुछ विकल्प दिए गए हैं:
प्रदाता
निःशुल्क स्तर
के लिए जाना जाता है
गूगल (Gemini)
शीर्ष मॉडलों की पेशकश में उदारता बरती जा रही है
ऐसे ऐप्स जिन्हें प्रदर्शन और लागत के सर्वोत्तम अनुपात पर कई मॉडलों की आवश्यकता होती है
Open AI (चैटजीपीटी)
सीमित (केवल ChatGPT ऐप के माध्यम से निःशुल्क सेवा)
सार्वजनिक एलएलएम मॉडल पेश करने वाली पहली कंपनी, और यह उद्योग का मानक है।
ग्रोक (Grok)
विकास के लिए उपयुक्त, 30 अनुरोध/मिनट और 1000 टोकन/मिनट, क्रेडिट कार्ड की आवश्यकता नहीं।
क्लाउड में एलएलएम मॉडल प्रदान करने वाला प्रदाता। यह उन ऐप्स के लिए सबसे उपयुक्त है जिन्हें अलग-अलग उपयोग के मामलों के लिए अलग-अलग मॉडल की आवश्यकता होती है, जिनमें ओपन-सोर्स मॉडल भी शामिल हैं।
Anthropic (Claude)
सीमित (उनके Claude ऐप के माध्यम से निःशुल्क संस्करण)
लंबे दस्तावेज़ों, तर्क और विवेक का विश्लेषण करने वाले ऐप्स
इस कोर्स के लिए, हम Google के जेमिनी मॉडल की अनुशंसा करते हैं क्योंकि:
- Google के AI API तक पहुँचने के लिए क्रेडिट कार्ड की आवश्यकता नहीं होती है।
- बेहतरीन फ्रंटियर मॉडल के साथ उदार फ्री टियर
- सेटअप करना बेहद आसान है : आप 5 मिनट से भी कम समय में API कुंजी प्राप्त कर सकते हैं।
- बेहतर दस्तावेज़ीकरण : समस्या होने पर उसका निवारण करना आसान है
यहां आप जो अवधारणाएं सीखेंगे, वे किसी भी एलएलएम प्रदाता पर लागू होंगी। यदि आप बाद में अपने प्रोडक्शन ऐप में OpenAI या Claude का उपयोग करना चाहते हैं, तो कोड और संरचना लगभग समान ही होगी। अक्सर इसके लिए केवल एक अलग एपीआई कुंजी की आवश्यकता होती है।
एपीआई कुंजी क्या हैं?
जब आप Google ड्राइव का उपयोग करते हैं, तो Google जानता है कि आप कौन हैं क्योंकि आप लॉग इन हैं। लेकिन जब आपका कोड Google की AI से बात करता है, तो Google को कैसे पता चलता है कि यह आप ही हैं?
एपीआई कुंजी का यही उद्देश्य है। यह एक सरल प्रमाणीकरण विधि है जो पासवर्ड की तरह ही काम करती है। अन्य प्रमाणीकरण विधियों के बारे में हम आगे की इकाइयों में चर्चा करेंगे।
API कुंजी आमतौर पर वर्णों की एक लंबी स्ट्रिंग होती है जो कुछ इस तरह दिखती है:
AIzaSyB1234567890abcdefghijklmnopqrstuvwx
जब आपका ऐप जेमिनी के एपीआई को कॉल करता है, तो उसमें यह कुंजी शामिल होती है। गूगल कुंजी की जांच करता है, पुष्टि करता है कि यह एक वैध खाते से संबंधित है, और आपके अनुरोध को संसाधित करता है।
एपीआई कुंजी को गुप्त क्यों रखना आवश्यक है?
एपीआई कुंजी पासवर्ड की तरह होती हैं, इसलिए उन्हें सुरक्षित रखना आवश्यक है।
अगर किसी को आपकी चाबी मिल जाती है, तो वे बहुत नुकसान पहुंचा सकते हैं, जैसे कि:
- अपने एपीआई कोटा का उपयोग करें, जिसके लिए सशुल्क खातों पर शुल्क बढ़ सकता है, या अपने निःशुल्क कोटा का उपयोग करें। यह बहुत महंगा पड़ सकता है।
- दुर्व्यवहार के लिए आपका खाता निलंबित कर दिया गया, जो कि वास्तव में बहुत बुरा है।
ऐसा आपकी सोच से कहीं ज्यादा बार होता है। डेवलपर कभी-कभी गलती से अपनी कुंजी GitHub पर अपलोड कर देते हैं , और स्वचालित बॉट उन्हें कुछ ही मिनटों में ढूंढ लेते हैं।
इस यूनिट के लिए, हम एक सरल और प्रभावी तरीका अपनाएंगे: हम कुंजी को एक स्थानीय फ़ाइल में संग्रहीत करेंगे जो रनटाइम पर केवल कोडस्पेस में ही उपलब्ध होगी। इसमें निम्नलिखित शामिल हैं:
- .env फ़ाइल : एक विशेष फ़ाइल जो कॉन्फ़िगरेशन को संग्रहीत करती है
- इस फ़ाइल को .gitignore फ़ाइल में जोड़ना आवश्यक है ताकि Git को पता रहे कि इसे कभी भी GitHub क्लाउड पर अपलोड नहीं करना है।
- “dotenv” नामक एक कोड पैकेज पर्यावरण से कुंजी को लोड करेगा।
इससे आपकी कुंजी आपके स्थानीय विकास वातावरण या स्थानीय कंप्यूटर पर ही रहती है, कभी भी आपके रिपॉजिटरी में नहीं।
आगे की इकाइयों में, आप प्रमाणीकरण के अधिक सुरक्षित तरीकों के बारे में जानेंगे, जैसे कि GitHub Secrets का उपयोग करना।
सुरक्षा संबंधी महत्वपूर्ण सूचना:
आपके Codespaces वातावरण में, आपकी API कुंजी सुरक्षित रहती है क्योंकि सर्वर API कॉल को संभालता है। प्रोडक्शन ऐप में, आपको अतिरिक्त सुरक्षा उपायों की आवश्यकता होगी, जिनके बारे में आप आगे की इकाइयों में जानेंगे। Codespaces के बारे में अधिक जानकारी के लिए, GitHub Codespaces में सुरक्षा पर जाएँ।
गतिविधि 3
एलएलएम एकीकरण स्थापित करें और अपना फ़ीडबैक विश्लेषक बनाएं
अनुमानित समय: 45 मिनट
1. Google AI Studio का उपयोग करके API कुंजी प्राप्त करें
- aistudio.google.com पर जाएं
- अपने Google खाते से लॉग इन करें (या नया खाता बनाएं)
- डैशबोर्ड -> एपीआई कुंजी पृष्ठ पर जाएं
- यदि आप AI Studio के लिए नए हैं , तो Google आपके लिए एक डिफ़ॉल्ट जेमिनी API कुंजी जनरेट करता है। फिर भी आपको " API कुंजी बनाएँ " पर क्लिक करना होगा और इसके लिए आपको एक क्लाउड प्रोजेक्ट बनाने की भी आवश्यकता हो सकती है।
यदि आपने पहले AI Studio का उपयोग किया है , तो इस स्क्रीन पर " डिफ़ॉल्ट जेमिनी एपीआई कुंजी " जैसा कुछ देखें।
इसके अलावा, यदि आपके पास Google Cloud में पहले से कोई प्रोजेक्ट मौजूद हैं, तो AI Studio को API कुंजी को अटैच करने के लिए आपको उन मौजूदा प्रोजेक्ट्स में से किसी एक को चुनने की आवश्यकता हो सकती है, या आप Google Cloud Console में एक नया प्रोजेक्ट बनाने और उस नए प्रोजेक्ट में नई API कुंजी को अटैच करने पर विचार कर सकते हैं।

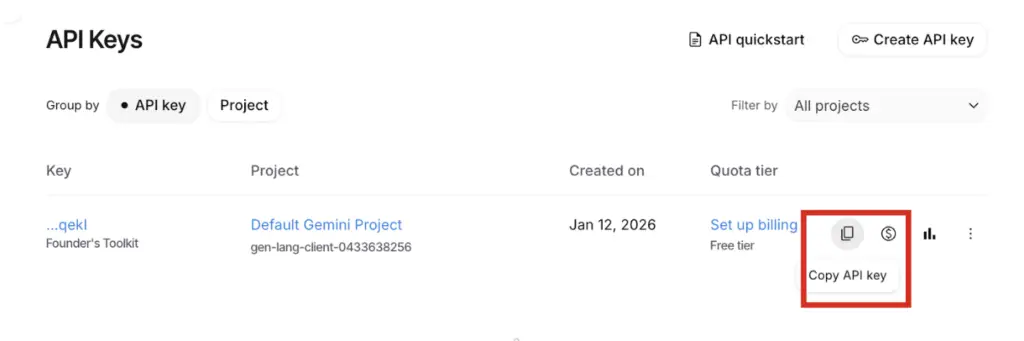
- एक ऐसा नाम जोड़ें जिससे आपको याद रहे कि कौन सा ऐप इस कुंजी का उपयोग कर रहा है। यदि आप डिफ़ॉल्ट कुंजी का उपयोग कर रहे हैं, तो कुंजी का नाम बदलने के लिए दाईं ओर स्थित तीन बिंदुओं पर क्लिक करें।
- आप कुंजी की प्रतिलिपि बनाकर उसे अस्थायी रूप से किसी सुरक्षित स्थान पर रख सकते हैं। हम इसका उपयोग बाद में करेंगे।
सुझाव: बेहतर प्रबंधन और नियंत्रण के लिए, हम सुझाव देते हैं कि आप प्रत्येक ऐप के लिए एक अलग API कुंजी रखें। आगे के अनुभागों में, आप कुछ अन्य उपयोगी कार्यप्रणालियों के बारे में भी जानेंगे, जैसे कि प्रत्येक वातावरण के लिए अलग-अलग API कुंजी रखना।
2. पिछली गतिविधि से अपना GitHub कोडस्पेस खोलें।
GitHub में अपने कोडस्पेस पर जाएं और Activity 2 से कोडस्पेस खोलें।
यदि आपने पहले ही अपने बदलावों को कमिट और मर्ज कर दिया है और ब्रांच को डिलीट कर दिया है, तो नई ब्रांच बनाने और अपने कोडस्पेस को मुख्य ब्रांच के साथ सिंक करने के लिए दिए गए चरणों का पालन करें और नई ब्रांच को चेकआउट करें।
3. API कुंजी को संग्रहित करने के लिए एक नई फ़ाइल बनाएँ।
ध्यान रखें कि API कुंजी पासवर्ड की तरह होती हैं। हमें इसे अपने कोड में एक विशेष तरीके से संग्रहित करना होगा ताकि Git इसे अनदेखा कर दे और इसे GitHub रिपॉजिटरी से दूर रखे, जहाँ कोई और इसे देख सकता है।
- बाएं पैनल में फ़ाइल मैनेजर पर जाएं: ऊपरी-बाएं साइडबार में दो दस्तावेज़ों के समान दिखने वाले आइकन पर क्लिक करें।
- एक नई फ़ाइल बनाएँ: अपने प्रोजेक्ट के नाम (रूट फ़ोल्डर) पर माउस ले जाएँ। "नई फ़ाइल" लेबल वाले छोटे प्लस आइकन (+) पर क्लिक करें।
- फाइल का नाम .env रखें (फाइल के नाम में डॉट पर ध्यान दें) और एडिटर के माध्यम से उस फाइल में यह टेक्स्ट जोड़ें और उसे सेव करें।
GEMINI_API_KEY=<paste your key here>
उदाहरण के लिए:
GEMINI_API_KEY= AIzaSyB1234567890abcdefghijklmnopqrstuvwx
4. सुनिश्चित करें कि फ़ाइल को अनदेखा करने के लिए सेट किया गया है
- फाइल मैनेजर में .gitignore फाइल ढूंढें और उसे खोलें।
- सुनिश्चित करें कि इसमें ये दो पंक्तियाँ शामिल हों:
- .पर्यावरण
- नोड_मॉड्यूल/
ये दो लाइनें गिट को निर्देश देती हैं कि वह सभी कमिट्स में इन फाइलों और फोल्डरों को अनदेखा करे, ताकि वे गिटहब सर्वर पर वापस स्टोर न हों।
पहली पंक्ति API कुंजी फ़ाइल (.env) के लिए है, और दूसरी पंक्ति उन सभी कोड पैकेजों के लिए है जिनकी हमारे ऐप को चलाने के लिए आवश्यकता होती है। कोड पैकेजों वाले फ़ोल्डरों को शामिल करने की सलाह दी जाती है, क्योंकि हम GitHub पर आवंटित सभी स्थान का उपयोग उनके लिए नहीं करना चाहते हैं। Copilot ने स्वचालित रूप से कई और फ़ाइलों और फ़ोल्डरों को अनदेखा करने के लिए जोड़ा हो सकता है, लेकिन यह सुनिश्चित करने के लिए जांच करें कि .env और node_modules/ फ़ाइलें मौजूद हैं।
यदि नहीं, तो उन्हें नई पंक्तियों में जोड़ें और फ़ाइल को सहेजें।
- टर्मिनल विंडो में git status टाइप करके सत्यापित करें कि .env फ़ाइल को अनदेखा किया जा रहा है।
- git status कमांड के परिणाम की जाँच करें और सुनिश्चित करें कि उसमें .env फ़ाइल सूचीबद्ध न हो। यदि यह सूचीबद्ध हो, तो सुनिश्चित करें कि आपकी .gitignore फ़ाइल सही ढंग से सहेजी गई है और उसमें हमारे द्वारा जोड़ी गई .env लाइन शामिल है।
5. "dotEnv" पैकेज इंस्टॉल करें।
आपका वर्तमान ऐप .env फ़ाइलों को स्वतः पढ़ने में सक्षम नहीं है । इसीलिए हमें " dotenv " नामक एक लोकप्रिय कोड पैकेज स्थापित करने की आवश्यकता है, जो आपके पर्यावरण चर को लोड करता है, ताकि आपका कोड सीधे कोड में लिखे बिना API कुंजी तक पहुंच सके।
इसके अन्य विकल्प भी हैं, लेकिन यह सबसे आम तरीकों में से एक है, और अधिकांश डेवलपर इससे परिचित हैं।
- टर्मिनल पैनल पर जाएं और npm install dotenv टाइप करें।
- पैकेज के इंस्टॉल होने का इंतजार करें (यह कुछ ही सेकंड में हो जाना चाहिए)।
6. एआई को अपना फीडबैक विश्लेषक बनाने का निर्देश दें
अब जबकि आपने एपीआई कुंजी को सुरक्षित तरीके से जोड़ दिया है और "dotenv" नामक कोड पैकेज स्थापित कर लिया है जो आपकी .env फ़ाइल (आपकी एपीआई कुंजी) में आपके पर्यावरण चर को लोड कर सकता है, तो आप फीडबैक एनालाइज़र मॉड्यूल जोड़ने के लिए कोपायलट का उपयोग करने के लिए तैयार हैं।
इस प्रॉम्प्ट को कॉपी और पेस्ट करें:
आपको निम्नलिखित बदलाव करने हैं:
- नीचे दिए गए निर्देशों का पालन करते हुए "फ़ीडबैक एनालाइज़र" नाम से एक नया टैब बनाएं।
फीडबैक एनालाइजर टैब के लिए:
- “अपनी सभी प्रतिक्रियाओं में पैटर्न ढूंढें” शीर्षक के साथ एक उपशीर्षक जोड़ें।
- उपयोगकर्ता द्वारा समस्या दर्ज करने के लिए एक फ़ील्ड।
- समस्या को "सेव" करने और उसे लोकल स्टोरेज में सेव करने के लिए एक बटन।
- एक बटन "सभी फीडबैक का विश्लेषण करें"
- परिणामों के लिए एक आउटपुट क्षेत्र
सेव बटन पर क्लिक करने पर, समस्या लोकल स्टोरेज में सेव हो जाती है।
जब एनालाइज़ बटन पर क्लिक किया जाता है:
- समस्या और localStorage में संग्रहीत सभी हितधारकों के रिकॉर्ड की क्वेरी करें।
- जेमिनी को एलएलएम एपीआई कॉल करके समस्या और हितधारकों की प्रतिक्रिया से संबंधित सभी जानकारी विश्लेषण के लिए एआई को भेजें।
- एलएलएम द्वारा प्राप्त एआई विश्लेषण परिणामों को प्रदर्शित करें।
एआई प्रॉम्प्ट:
निम्नलिखित सिस्टम निर्देश प्रॉम्प्ट का उपयोग करें:
आप एक कुशल व्यावसायिक विश्लेषक हैं। समस्या से संबंधित हितधारकों की प्रतिक्रिया का विश्लेषण करें और निम्नलिखित अनुभागों के आधार पर अपनी प्रतिक्रिया को संरचित करें:
- पैटर्न: कई स्रोतों में कौन से विषय बार-बार सामने आते हैं? (3-5 बुलेट पॉइंट)
- आश्चर्यजनक बातें: स्रोत कहाँ असहमत हैं और इसका क्या अर्थ हो सकता है (3-5 बुलेट पॉइंट)
- पुनर्विचार के लिए मान्यताएँ: किन मान्यताओं को चुनौती दी गई या कौन सी मान्यताएँ गलत साबित हुईं? (3-5 बुलेट पॉइंट)
- खतरे के संकेत: कौन-सी चिंताएँ या जोखिम सामने आए? (3-5 बुलेट पॉइंट)
- शीर्ष 3 अंतर्दृष्टियाँ: आपकी समस्या के लिए सबसे महत्वपूर्ण निष्कर्ष (3-5 बुलेट)
तकनीकी आवश्यकताएं:
- API कुंजी लोड करने के लिए स्थानीय वातावरण का उपयोग करें
- .env फ़ाइल से पढ़ने के लिए एक सरल बैकएंड Node.js/Express सर्वर जोड़ें।
- जेमिनी एपीआई कुंजी का उपयोग करके, उनके एपीआई विनिर्देश दिशानिर्देशों का पालन करते हुए एक एपीआई अनुरोध करें।
- जेमिनी मॉडल “gemini-2.5-flash” का उपयोग निम्नलिखित कॉन्फ़िगरेशन के साथ करें:
तापमान = 0.7
तकनीकी आवश्यकताओं पर ध्यान दें। API कुंजी को .env फ़ाइल से पढ़ना अधिक सुरक्षित है, इसलिए इसके लिए एक बैकएंड सर्वर की आवश्यकता है। यही कारण है कि हम Node.js/Express सर्वर का उपयोग करने का अनुरोध कर रहे हैं।
Copilot आपको express, node और @google/generative-ai पैकेज इंस्टॉल करने के लिए कह सकता है। आवश्यक पैकेज इंस्टॉल करने के लिए इसके निर्देशों का पालन करें।
सलाह: Google के सभी नवीनतम मॉडलों पर नज़र रखना असंभव है। 7 जनवरी, 2026 तक, "Gemini 3 Pro" Google का नवीनतम और सबसे शक्तिशाली AI मॉडल है, और यह कुछ सीमाओं के साथ Google AI Studio में मुफ़्त में उपलब्ध है। आमतौर पर, अपने AI व्यवसायिक विचार की प्रक्रिया के इस प्रारंभिक चरण में उपलब्ध सबसे उन्नत, मुफ़्त मॉडल का उपयोग करने की सलाह दी जाती है। लेकिन एक बार जब आप इसे लागू कर देते हैं, तो आपको यह सुनिश्चित करना होगा कि आप अपनी विशिष्ट आवश्यकताओं को पूरा करने वाला और लागत एवं प्रदर्शन के बीच संतुलन बनाए रखने वाला सही मॉडल चुनें। Gemini Pro 3 को लाइव प्रोडक्शन में चलाना बहुत महंगा है, इसलिए इसका उपयोग सोच-समझकर ही करना चाहिए।
7. विश्लेषक का परीक्षण करें
एक बार जब एआई मॉड्यूल का निर्माण पूरा कर ले, तो आप इसका परीक्षण कर सकते हैं।
- कोपायलट के निर्देशों के अनुसार आवश्यक सभी डिपेंडेंसी इंस्टॉल करें।
- अपना ऐप चलाने से पहले, यह सुनिश्चित कर लें कि कोपायलट ने जेमिनी का सही संस्करण (जनवरी 2026 के लिए!) जोड़ा है।
- server.js खोलें
- “generativelanguage.googleapis.com” स्ट्रिंग खोजें और जांचें कि क्या यह gemini-2.5-flash का उपयोग कर रहा है।

- टर्मिनल पैनल में npm start टाइप करके ऐप को चलाएं ।
यह एक अलग कमांड है क्योंकि अब आप एक बैकएंड सर्वर चला रहे हैं, इसलिए इसमें कुछ निर्भरताएं हैं। - npm start एक अलग पोर्ट (3000) खोलेगा ताकि इसका अपना लोकल स्टोरेज हो सके।
आपको हितधारकों और उनकी प्रतिक्रिया को ऐप में दोबारा दर्ज करना होगा। - फिर एनालाइजर टैब पर जाएं और अपनी समस्या का विवरण दर्ज करें और उसे सेव करें।
- जेमिनी एपीआई को कॉल करने के लिए एनालाइज़ ऑल फीडबैक बटन पर क्लिक करें।
- परिणामों की प्रतीक्षा करें। इसमें कुछ सेकंड लग सकते हैं।
आपको क्या देखना चाहिए:
- एआई विश्लेषण को आपके सभी हितधारकों से प्राप्त सभी प्रतिक्रियाओं का संश्लेषण करना चाहिए।
- आउटपुट को बताए गए अनुभागों में व्यवस्थित किया जाना चाहिए।
अगर यह काम न करे तो क्या होगा:
- सुनिश्चित करें कि आपकी API कुंजी सही है और .env फ़ाइल में संग्रहीत है।
- समस्या को डीबग करने में मदद के लिए कोपायलट (या किसी अन्य एलएलएम) से पूछें।
8. विश्लेषक आपको जो बताता है उसे नोट करें
जेमिनी एपीआई से प्राप्त आउटपुट को पढ़ने के लिए कुछ मिनट निकालें। आप चाहें तो आउटपुट को कॉपी करके भविष्य में उपयोग के लिए किसी दस्तावेज़ में सहेज सकते हैं।
यहां कुछ बातें विचार करने के लिए हैं:
- ऐसे कौन से पैटर्न हैं जिनके बारे में AI को पूरा भरोसा है कि उन्होंने उन्हें पहचान लिया है, जबकि आप उन्हें खुद नहीं पहचान पाते? और इसका उल्टा भी।
- क्या हितधारकों ने मित्रों और परिवार से अलग बात कही?
- आपको किन क्षेत्रों में और अधिक खोजबीन करने की आवश्यकता हो सकती है?
9. GitHub पर बदलावों को कमिट और पुश करें
- जब आप संतुष्ट हो जाएं कि एनालाइज़र ठीक से काम कर रहा है, तो अपने बदलावों को GitHub पर कमिट और पुश करें, या तो Codespaces में सोर्स कंट्रोल फीचर का उपयोग करके, या टर्मिनल विंडो में git कमांड टाइप करके ।
- एक नई विंडो में GitHub और अपनी रिपॉजिटरी खोलें, अपनी ब्रांच के लिए कमिट ढूंढें, एक पुल रिक्वेस्ट बनाएं और उसे मर्ज करें।
- चीजों को व्यवस्थित रखने के लिए, आप इस यूनिट के लिए बनाई गई शाखा को हटा सकते हैं।
- अपने कोडस्पेस क्रेडिट को सुरक्षित रखने के लिए कोडस्पेस टैब को बंद करें (नीचे दी गई सलाह देखें) लेकिन कोडस्पेस को डिलीट न करें।
सुझाव: आपके मुफ़्त GitHub खाते से आपको Codespaces में सीमित समय (साथ ही सीमित Copilot क्रेडिट) मिलते हैं। Codespaces के लिए, आपको ये सुविधाएं मिलती हैं:
- 120 कोर-घंटे/माह (एक सामान्य 2-कोर मशीन पर इसका मतलब लगभग 60 घंटे/माह होता है)
- 15 जीबी स्टोरेज
इस प्रोजेक्ट के लिए कोडस्पेस का इतना उपयोग पर्याप्त होना चाहिए।
कोडस्पेस में काम खत्म करने के बाद ब्राउज़र टैब बंद करना एक अच्छी आदत है, ताकि आपके मासिक कोटे में शामिल होने वाला कोई भी निष्क्रिय समय बर्बाद न हो। आप इसे अपने GitHub खाते से एक्सेस करके कभी भी दोबारा खोल सकते हैं।
30 दिनों तक उपयोग न होने पर कोडस्पेस अपने आप डिलीट हो जाएंगे। हालांकि, यदि आपने बदलाव कमिट और पुश कर दिए हैं, तो कोडस्पेस हटाए जाने पर भी आपका कोई कोड नष्ट नहीं होगा। आप GitHub पर हमेशा एक नया कोडस्पेस बना सकते हैं।
प्रतिबिंब
आपने विभिन्न प्रकार की सूचनाओं को संग्रहित और संश्लेषित करने के लिए एक फाउंडर्स टूलकिट ऐप बनाने में वाइब-कोडिंग पर काफी समय व्यतीत किया। विचार करने के लिए कुछ प्रश्न इस प्रकार हैं:

संगठन
पैटर्न्स
आपका एमवीपी
महत्वपूर्ण पदों
- गिट — एक वर्जन कंट्रोल सिस्टम जो समय के साथ आपके कोड में किए गए हर बदलाव को ट्रैक करता है, जिससे आप गलतियों को पूर्ववत कर सकते हैं, सुरक्षित रूप से प्रयोग कर सकते हैं और दूसरों के साथ सहयोग कर सकते हैं।
- ब्रांच — आपके कोडबेस की एक समानांतर प्रतिलिपि जहाँ आप स्थिर मुख्य संस्करण को प्रभावित किए बिना नई सुविधाएँ विकसित कर सकते हैं या परिवर्तन कर सकते हैं।
- कमिट — किसी विशिष्ट समय पर आपके कोड में किए गए परिवर्तनों का एक सहेजा गया स्नैपशॉट, जिसके साथ एक वर्णनात्मक संदेश होता है जो बताता है कि क्या बदला और क्यों।
- पुल रिक्वेस्ट (पीआर) — एक शाखा से दूसरी शाखा में परिवर्तनों को मर्ज करने का एक औपचारिक प्रस्ताव, जिसका उपयोग अक्सर परिवर्तनों के आधिकारिक होने से पहले कोड समीक्षा के अवसर के रूप में किया जाता है।
- पुश — अपने स्थानीय कमिट्स को GitHub पर स्थित रिमोट रिपॉजिटरी में अपलोड करना ताकि वे क्लाउड में सेव हो जाएं और सहयोगियों के लिए सुलभ हों।
- रिपॉजिटरी (रेपो) — वह केंद्रीय स्थान जहाँ आपके प्रोजेक्ट की सभी फाइलें, फोल्डर और वर्जन हिस्ट्री स्थानीय रूप से या GitHub पर संग्रहीत होती हैं।
- एपीआई (एप्लिकेशन प्रोग्रामिंग इंटरफ़ेस) — दो सॉफ़्टवेयर के बीच संचार का एक मानकीकृत तरीका। जब आपके ऐप को एआई क्षमताओं की आवश्यकता होती है, तो यह एआई सेवा के एपीआई को अनुरोध भेजता है और प्रतिक्रिया प्राप्त करता है।
- एपीआई कुंजी — एक अद्वितीय गुप्त स्ट्रिंग जो आपके ऐप को बाहरी सेवा से प्रमाणित करती है, यह एक पासवर्ड की तरह काम करती है जो यह पहचान करती है कि अनुरोध कौन कर रहा है।
- .env फ़ाइल — एक छिपी हुई कॉन्फ़िगरेशन फ़ाइल जिसका उपयोग API कुंजी जैसे संवेदनशील मानों को स्थानीय रूप से संग्रहीत करने के लिए किया जाता है, जिससे वे आपके स्रोत कोड से और संस्करण नियंत्रण से दूर रहते हैं।
- .gitignore — एक फ़ाइल जो Git को बताती है कि किन फ़ाइलों और फ़ोल्डरों को कमिट से बाहर रखा जाना चाहिए, जिससे संवेदनशील डेटा (जैसे .env) या अनावश्यक फ़ाइलें (जैसे node_modules) GitHub पर अपलोड होने से रोका जा सके।
- dotenv — एक कोड पैकेज जो आपकी .env फ़ाइल को पढ़ता है और आपके कोड में गुप्त जानकारी को हार्डकोड किए बिना, रनटाइम पर आपके एप्लिकेशन के लिए उसके मान उपलब्ध कराता है।
- एलएलएम (लार्ज लैंग्वेज मॉडल) - एक प्रकार का एआई मॉडल जिसे बड़ी मात्रा में पाठ पर प्रशिक्षित किया जाता है और जो मानवीय भाषा को समझकर उसे उत्पन्न कर सकता है, जिसका उपयोग यहां हितधारकों की प्रतिक्रिया का विश्लेषण और संश्लेषण करने के लिए किया जाता है।
- एलएलएम तापमान — एक पैरामीटर जो यह नियंत्रित करता है कि एआई मॉडल की प्रतिक्रियाएं कितनी रचनात्मक और कितनी पूर्वानुमानित हैं। कम मान अधिक सुसंगत परिणाम देते हैं; उच्च मान अधिक विविधता और रचनात्मकता लाते हैं।
- npm (नोड पैकेज मैनेजर) - एक ऐसा टूल जिसका उपयोग रियूजेबल कोड पैकेज (जैसे dotenv और Express) को इंस्टॉल और मैनेज करने के लिए किया जाता है, जो आपके प्रोजेक्ट में नई कार्यक्षमता जोड़ते हैं, बिना सब कुछ शुरू से लिखे।
अतिरिक्त संसाधन
- गूगल एआई स्टूडियो एपीआई क्विकस्टार्ट : गूगल एआई स्टूडियो एपीआई का आधिकारिक दस्तावेज
- जेमिनी एपीआई | डेवलपर्स के लिए गूगल एआई
- GitHub ब्रांच गाइड : ब्रांच के बारे में और अधिक जानकारी