- Explain how web applications upload data to cloud storage
- Differentiate between cloud file storage and cloud database storage
- Understand what Supabase is and how to set up your own cloud storage
- A Supabase project with a database to store stakeholder feedback
- Updated Founder’s Toolkit where stakeholder feedback is stored in Supabase database, with ability to add/edit/delete records
- Students have completed previous technical units working on Founder’s Toolkit
From Local Storage to Cloud Storage
Your Founder’s Toolkit has been growing with each unit. You’ve built modules for feedback collection, stakeholder tracking, and AI-powered analysis. These tools are helping you develop your business idea while at the same time, helping you understand how to adapt to your idea.
All your data currently lives in localStorage.
But there’s a limitation that becomes a problem as soon as you try to work with others or use your app outside your current GitHub codespace.
Successful apps that serve real users need data that:
Data Persists
Users can trust you with their information
Works across Devices
People switch between browsers, computers, phones, etc.
Enables Collaboration
Business and development teams like yours need to share information
Can Grow and Scale
What works for 1 user must work for 1,000
This unit is your first step into cloud storage. You’ll update your Founder’s Toolkit so data stored in localStorage will now be safely stored in the cloud, and accessible from anywhere. More importantly, you’ll learn patterns that apply to other situations for storing data in the cloud.
Cloud Storage
Cloud storage can be considered in two main ways, and understanding the difference helps you make the right choice for different types of data.
- File storage is great for files that users upload or download. All your project worksheets are perfect examples because they are documents you want to store and retrieve so you can collaborate with others from anywhere. Right now, you are likely using Google Drive as a method for storing files.
- Database Storage is used when you have structured information like your stakeholder records with names, types, and feedback fields.
For now, we will focus on database storage.
Choosing a Cloud Storage Service
There are many cloud storage options available. Here’s how the most popular ones to compare for someone starting to build their MVP.
Service
Setup Complexity
Free Tier
Pricing After Free Tier
Best For
Supabase
Simple
- 500MB database storage
- 1GB file storage
- Generous API limits
- Unlimited API requests*
$25/month
- Startups building MVPs
- Learning SQL
- Apps needing auth + database
Firebase
Simple
- 1GB file storage
- 1GB database storage
- Generous API limits
- Real-time sync included
Pay-as-you-go ($0.18/GB storage, $0.06/GB downloads)
- Google ecosystem
- Real-time apps
- Mobile apps
- Beginners (simpler than SQL)
MongoDB Atlas
Medium
- 512MB database storage
- Shared cluster
- Limited connections
$9/month (dedicated cluster)
- NoSQL databases
- Flexible data schemas
- Document-based storage
- Scaling large datasets
Amazon Web Services/ Google Cloud Platform
Complex
- Limited (varies by service)
- 12-month trials available
- Often requires credit card
Variable (highly depends on usage)
- Enterprise applications
- Need full infrastructure control
- Advanced scaling requirements
- Teams with DevOps expertise
For this lesson, we’re using Supabase storage.
Why Supabase?
- No complex setup or credit card required
- A generous free tier that actually works for MVPs. Some “free tiers” are so limited they’re essentially just trials. As of January 22, 2026 Supabase gives you 1GB of storage and unlimited API requests per month for free. That’s enough to build, test, and even soft-launch your MVP without worrying about surprise bills. As your startup grows, Supabase offers options that scale with your needs.
- One platform for your entire backend storage
- Supabase isn’t just for MVPs. Today, companies with millions of users run on Supabase, so your skills here will be directly transferable beyond.
You’ll need to create a Supabase account and project and get an API key, similar to Google AI Studio and Hugging Face. The concepts are the same: You’re setting up access to an external service that your app will communicate with.
The difference is that Supabase will become a more central part of your infrastructure. While Gemini handles one specific task, which is the aII analysis, Supabase can handle your storage, database, and potentially user authentication. It’s basically setting the entire foundation for your app.
Security
It is important to consider security when creating and using cloud storage. Supabase allows you to set up levels of security for different roles in your app. At a basic level, turning on RLS (Row Level Security) is like locking the front door. Without it, your database is an open book. Once locked, we have to create specific ‘digital keys’ for different groups. For our Founder’s Toolkit, we want to let stakeholders to enter their own feedback directly. But we don’t want to give them (and anyone who opens our app) the ability to view, edit, or delete records in the database. But we do need team members to have full access. So we will set up 2 levels of permissions for our database.
We are implementing two distinct roles:
- Stakeholders (Anonymous): Public access to Insert records. They can contribute, but they cannot change history.
- The Team (Authenticated): Secure access via email and password. This ‘Admin’ level grants full power to Create, Read, Update, and Delete (CRUD) records to keep the toolkit organized.
ACTIVITY 1
Create Your Supabase Account and Project
Estimated Time: 15 minutes
You will create a Supabase account and project, set up your Stakeholders table, and get an API key to access the table from your app.
1. Create your Supabase Account
- Go to supabase.com to create an account
- Click to sign up. We recommend signing up with your GitHub account to keep things organized.
2. Create a New Project
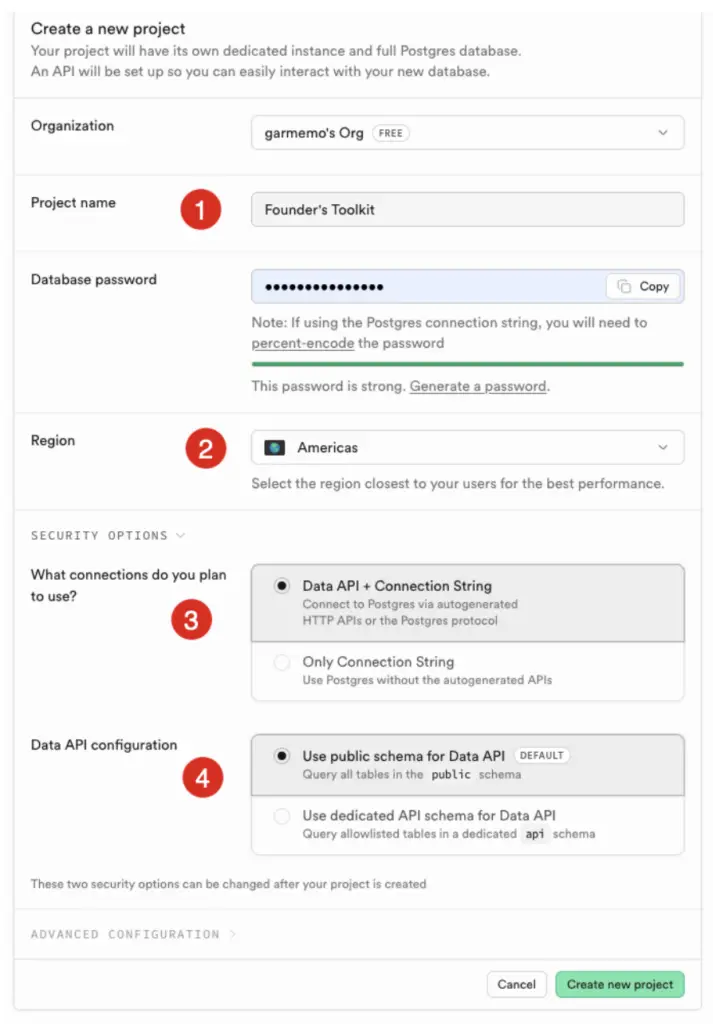
- Once signed up, click to create a New Project .
- Enter your project name.
- Create a strong password or click “generate a password to create one automatically”.
- Store this password in a safe place as you will need it for direct database access.
- Select your organization (the free version may only allow one organization and will show you a default organization).
- Select a Region that’s closest to you and your users. This affects performance since data stored closer to them will load faster.
- Under Security Options:
- Keep the default “Data API + Connection String” because it gives you more flexibility and simplicity when using their API or connecting directly to the database
- Keep the default “Use public schema for Data API”. This is a standard setup that works for most apps. The “dedicated API schema” option is for advanced security needs that you do not need right now.
- Click to create a new project and wait for it to complete (1-2 minutes)
3. Create a database table
We are going to create a table in our database for our stakeholder feedback.
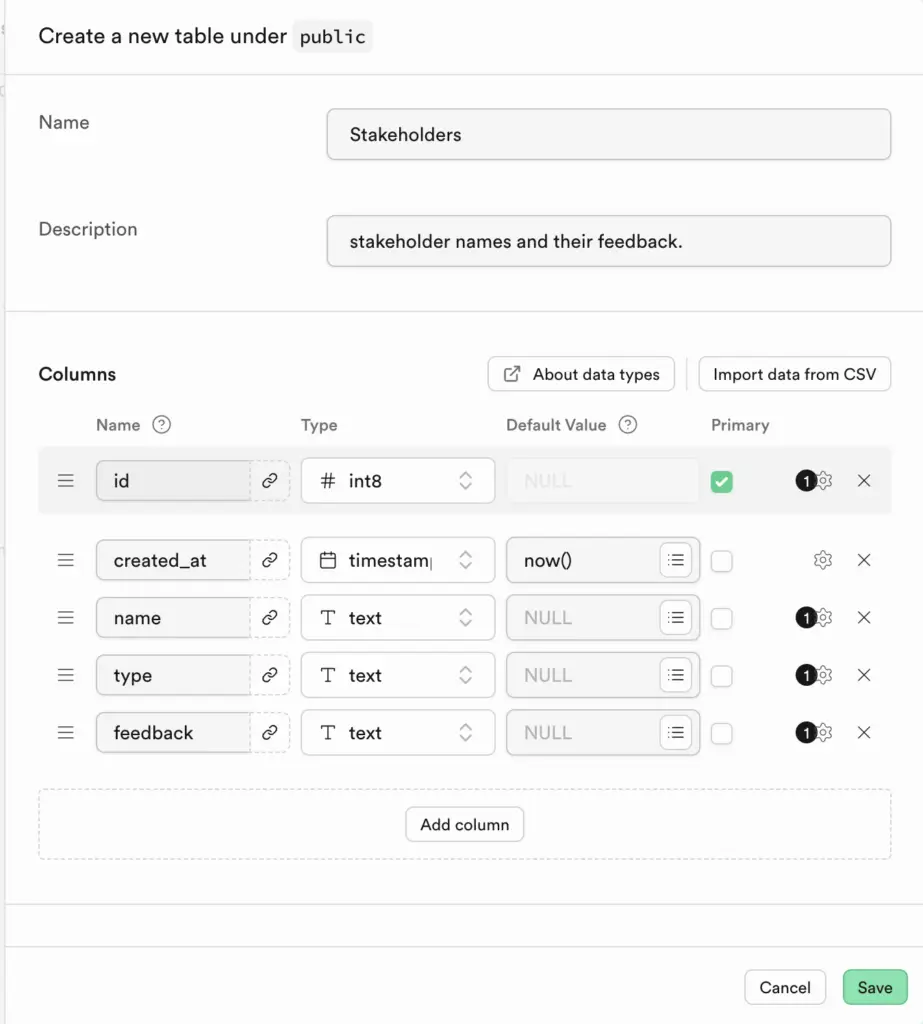
- Under Build out your database, click the Table Editor button.
- Click Create a table.
- Name the table Stakeholders, and give it a description.
- Supabase starts the table with an id and a timestamp, called created_at. Keep those columns as it is useful to have an id for each row in the table, and could be helpful to know when those rows are added to the table.
- What else do we need to add? Look back at your Stakeholder Tracker tab in your Founder’s Toolkit. The form includes, name, type, and key feedback. Add those 3 columns, and set the type to text.
- Click to save the table.
4. Set up Security Policy for Database Access
- In the Table Editor, click on the 3 dots next to your Stakeholder table and click on View Policies.
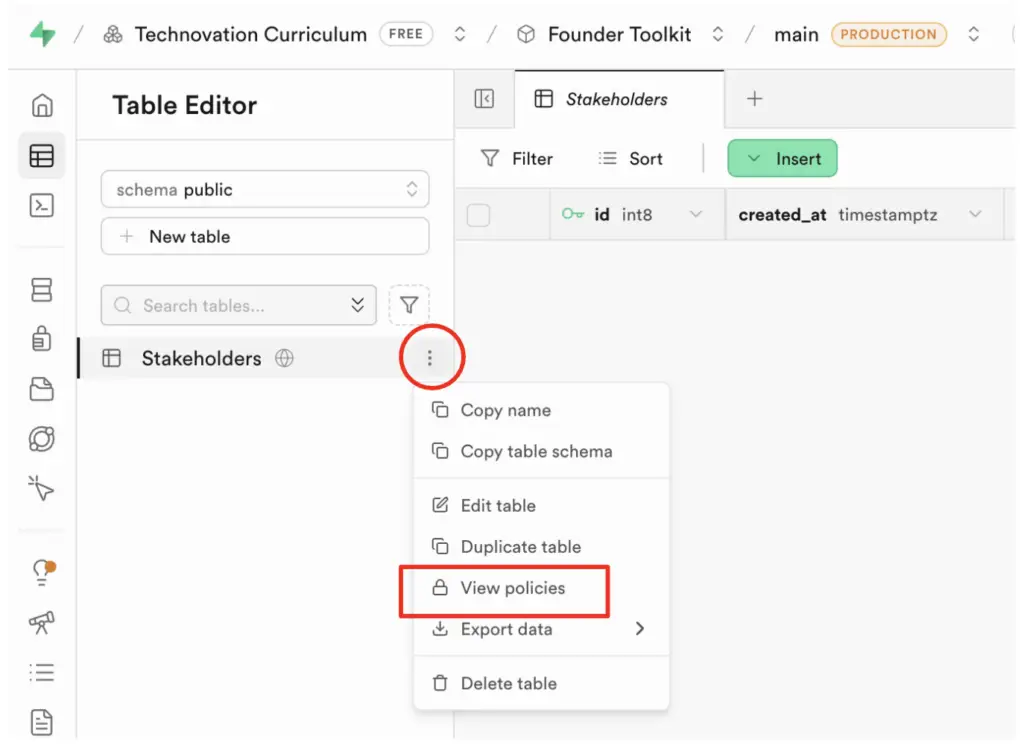
- RLS should be enabled. If it isn’t, Enable RLS (Row Level Security). This allows you to set exactly who has access to tables in your database and app.
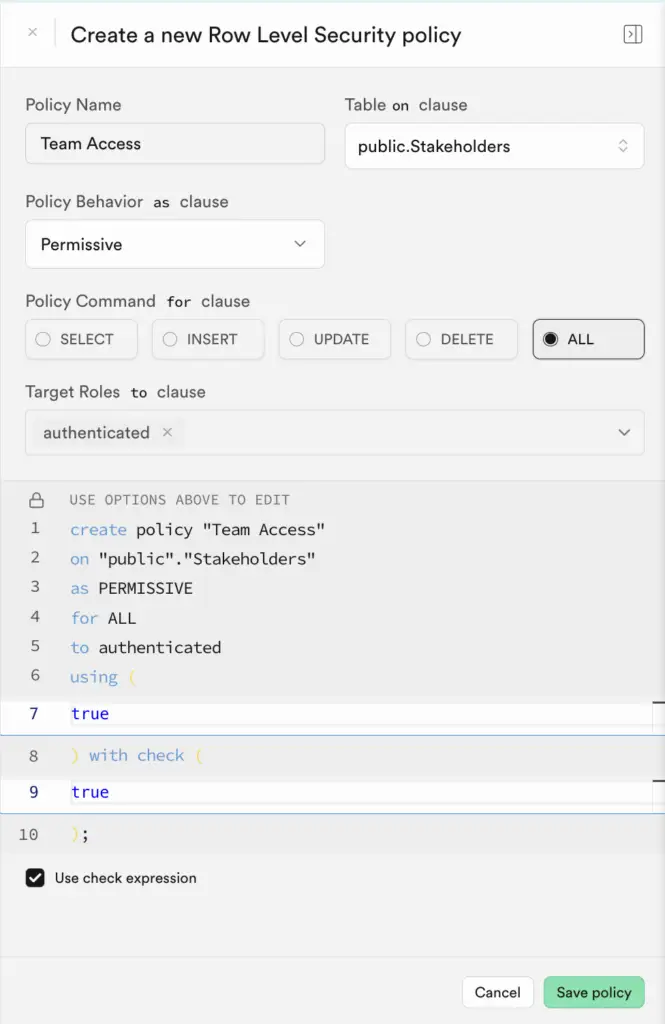
- Click Create Policy to configure a RLS policy for your team.
- In the next window,
- Type Team Access for Policy Name.
- Select ALL for Policy Command.
- For Target Roles, in the dropdown, choose authenticated.
- After using, type true.
- After with check, type true.
- Click Save Policy.
This allows authenticated users (the team) full read/write/delete access to the table.
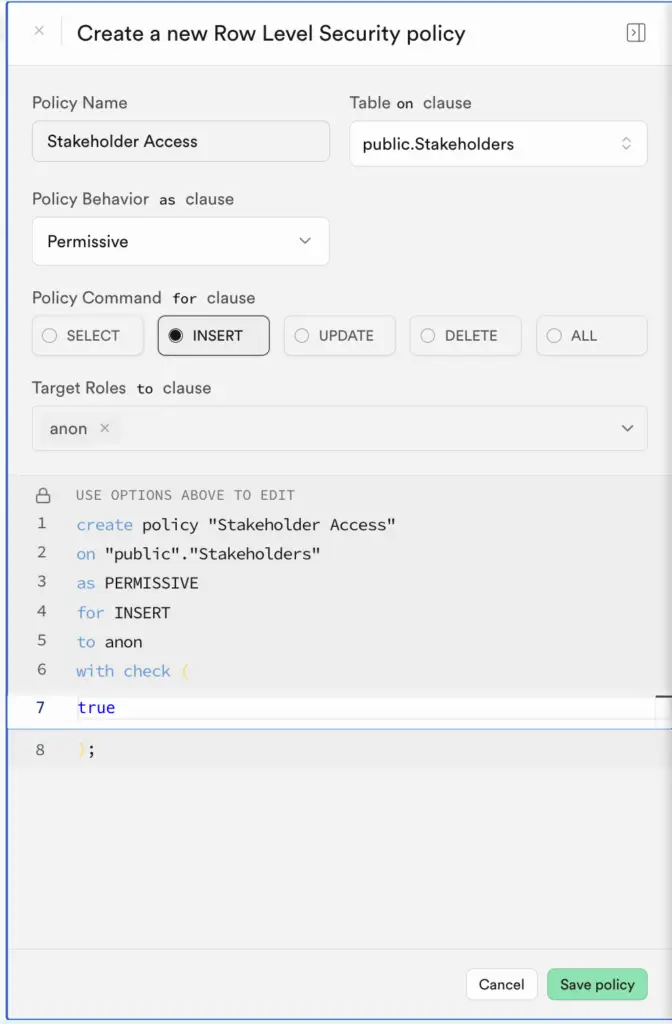
- Add another policy (Create Policy again), this time for the Stakeholders.
This will allow stakeholders to directly add feedback through the app. This time: - Type Stakeholder Access for Policy Name.
- Select INSERT for Policy Command.
- For Target Roles, in the dropdown, choose anon.
- After using, type true
- After with check, type true.
- Click Save Policy.
5. Add Users
You now need to add authenticated users to your database. This could be your entire team, but for now, just add yourself as a user so you can run and test the app.
- On the left side of the screen, under Authentication, click on Users.
- Click Add user.
- Type your email address, a password that you will remember (or save somewhere), leave Auto Confirm checked, and click Create user.
Currently, our Founder’s Toolkit stores everything in local storage. We could start fresh with our Supabase database, but since we already have significant stakeholder feedback from previous executions of the Toolkit, let’s move the data we already have into our Stakeholders table on Supabase. We could do this manually, by copying and pasting, and we could even ask a LLM to do the work for us.
But, since our data is in JSON, we can use the SQL editor on Supabase to insert the records to the table, using SQL. SQL, or Structured Query Language, is a domain-specific language used to manage data, especially in a relational database management system.
ACTIVITY 2
Move LocalStorage to Cloud Storage
Estimated Time: 15 minutes
You will extract your stakeholder information from local storage in the browser and then import it into your Supabase table.
1. Extract JSON from LocalStorage
- Go back to your Codespace and spin up your Founder’s Toolkit.
- Open the Developer Tools in the browser, and click on Application in the developer tools window to view the localStorage.
- Find your stakeholder feedback information in the localStorage, and right click on the first JSON line. You will see a popup menu where you can Copy Value.
- Open a text editor (TextEdit or Notepad) and paste the JSON into a blank document.
- View the file and note the names of each key is in the JSON, as it may differ slightly from columns in the Supabase table.
This is our sample JSON below
					[
  {
    "name": "Jill Stein",
    "type": "interview",
    "feedback": "She is a teacher and knows many students this is a problem for. She thinks bringing in the parents and family to give them some education on the issue is helpful. Also bringing in the school admin to see how they can support. Also, many students do not have good internet access, especially in rural areas.",
    "timestamp": "2026-01-14T03:47:10.531Z"
  },
  {
    "name": "Phil Green",
    "type": "email",
    "feedback": "He is a student and has this issue. He does not have good internet access and he does not have transportation to get to a library either. He would need a way to get access during the school day or a means to access it otherwise. ",
    "timestamp": "2026-01-14T03:48:13.193Z"
  },
  {
    "name": "Billy Bob",
    "type": "interview",
    "feedback": "I absolutely love this idea. We need it!",
    "timestamp": "2026-01-16T01:43:12.027Z"
  },
  {
    "name": "Anna Banana",
    "type": "email",
    "feedback": "This is really a bad idea. I don't like it.",
    "timestamp": "2026-01-16T01:46:33.361Z"
  },
  {
    "name": "Millicent Penny",
    "type": "interview",
    "feedback": "I Love it! Best idea ever.",
    "timestamp": "2026-01-16T01:50:46.785Z"
  },
  {
    "name": "Fred Flintston",
    "type": "interview",
    "feedback": "This is probably the worst idea I have ever heard. Do not like it.",
    "timestamp": "2026-01-16T01:52:06.319Z"
  },
  {
    "name": "Betty White",
    "type": "email",
    "feedback": "Do not do it. It is a bad idea.",
    "timestamp": "2026-01-16T01:53:19.377Z"
  },
  {
    "name": "Mary Contrary",
    "type": "email",
    "feedback": "This is absolutely the most amazing idea I have ever heard. I absolutely love it.",
    "sentiment": "positive",
    "timestamp": "2026-01-16T02:05:42.541Z"
  }
]
2. Transfer the Data to Supabase
- Open your Supabase project, and in the icon menu on the left, click on SQL Editor.
- Paste the following code into the SQL Editor.
					INSERT INTO "Stakeholders" (name, type, feedback, created_at)
SELECT
  value->>'name',
  value->>'type',
  value->>'feedback',
  (value->>'timestamp')::timestamp
FROM json_array_elements('YOUR JSON HERE'::json) AS value;
- Look at the code to understand how it works.
The first INSERT INTO line specifies that you want to insert data into the Stakeholders table, specifically into these 4 columns.
Edit this line to match the table and column names of your Supabase table exactly. - The SELECT line specifies what fields/keys you want to extract from your JSON.
Edit to change any of the fields listed to match exactly the keys in your JSON.- value->>’name’ means “get the ‘name’ field from the JSON”
- ::timestamp means “convert the string to a timestamp format”
- The FROM line specifies that the JSON array is a set of rows you want to loop through. Each record or row is called value. Paste your JSON in between the quotes ‘ ‘ in the FROM line.
- Click the Run button to run the SQL command.
- If you get any errors, see if you can debug the problem, or get assistance from a LLM. Otherwise, you should see a Success message.
- Go back to the Table Editor. You should see your records added to the table.
ACTIVITY 3
Update Founder’s Toolkit to Store to the Cloud
Estimated Time: 15 minutes
You’ll now add insert capabilities for stakeholders to add feedback themselves, and read/write/delete access to the Stakeholder database for team members.
1. Open your GitHub repository and codespace
Since we will be making many changes in the code, we suggest following the full Git workflow from the previous units.
- Go to GitHub and open your Founder’s Toolkit repository
- Create a new branch from main and name it supabase-cloud-storage
- Open your previous Codespace and checkout the new branch there.
- Wait for the environment to load.
2. Add credentials to your “.env” file
You will need your Supabase Project URL and publishable key, which is essentially your API to your database.
- In Supabase, click on the home gear icon on the left to access the project settings.
- Click on Data API to find the Project URL.
- Click on API Keys on the left, and you will find your publishable key there.
- In Codespaces, open your “.env” file and add these 2 lines:
SUPABASE_URL=YOUR_SUPABASE_PROJECT_URL
SUPABASE_ANON_KEY=YOUR_SUPABASE_PUBLISHABLE_KEY
- Copy/paste the text above and replace with your project URL and publishable key from Supabase.
3. Instruct Copilot to Add Supabase Storage Feature
We will do this in a few steps, as there is a lot involved here, so adding a bit at a time helps with debugging and issues that arise.
Start with a prompt like the following:
Update the Stakeholder Tracker tab to do the following.
- Remove display of table of stakeholders and just leave the form.
- Instead of saving information to local storage, it will now be saved on Supabase. Table name is Stakeholders. Use anonymous role.
- .env file already includes SUPABASE_URL and SUPABASE_ANON_KEY.
- Make sure to update Content Security Policy to allow Supabase endpoints.
- Insert for anonymous users should not try to read the data back after the insert, as that will fail because they only have INSERT permissions.
- Provide a success message when record has been added to Supabase.
4. Run and test the app
Follow any installation instructions Copilot gives you to install packages.
- Run the app and try adding a new stakeholder with some feedback. You should receive a confirmation message that you succeeded.
- Go to your Table Editor on Supabase and see if the table updated with the new record. You may have to refresh the browser to see the new record.
- Troubleshoot with the help of LLMs to ensure the app works correctly.
5. Add Admin Login
- Ask Copilot to add the ability to login as an administrator, to be able to view all the Stakeholder records.
This is a sample prompt:
- Add “Admin Login” button to the Stakeholder Tracker screen.
- Show email/password form.
- Use Supabase auth.signIn() to authenticate user.
- If logged in, display the stakeholder table on the screen, below the form.
- Also display a logout button for users logged in.
- If not logged in, just show the form, not the table.
- Run your app again and log in as admin, using the email/password you set up in Supabase. Once you log in, you should be able to see the Stakeholder table in the Stakeholder Tracker tab.
- Log out. Table should not appear.
- Troubleshoot with the help of LLMs to ensure the app works correctly.
6. Add Edit and Delete Capabilities
- Ask Copilot to add edit and delete capabilities for admin users who are logged in.
This is a sample prompt:
For admin users only, add edit and delete buttons for each row of the stakeholder table.
Those buttons should work for editing and deleting those rows in the Supabase table.
- Run the app again. Try adding, editing, and deleting a record and check that the table in Supabase updates correctly.
- Log out and check that you can still add a record, but nothing more.
- Troubleshoot with the help of LLMs to ensure the app works correctly.
7. Test on Multiple Devices
In addition to the stakeholder data being safe and secure, storing the data in the cloud means that the data is accessible to your app users, wherever they may be. This can open up possibilities, like having stakeholders add their own feedback directly, and multiple team members accessing the data from their phones.
This is the real power of cloud storage. To test it while your app is still in development in Codespaces, can do the following.
- Start your app in Codespaces by typing npm start.
- Find the Ports tab in the bottom panel, next to Terminal.
- You should see your running port (e.g. 3000).
- Right-click on the port, go to Port Visibility, and select Public. The Visibility will change to Public in the window.
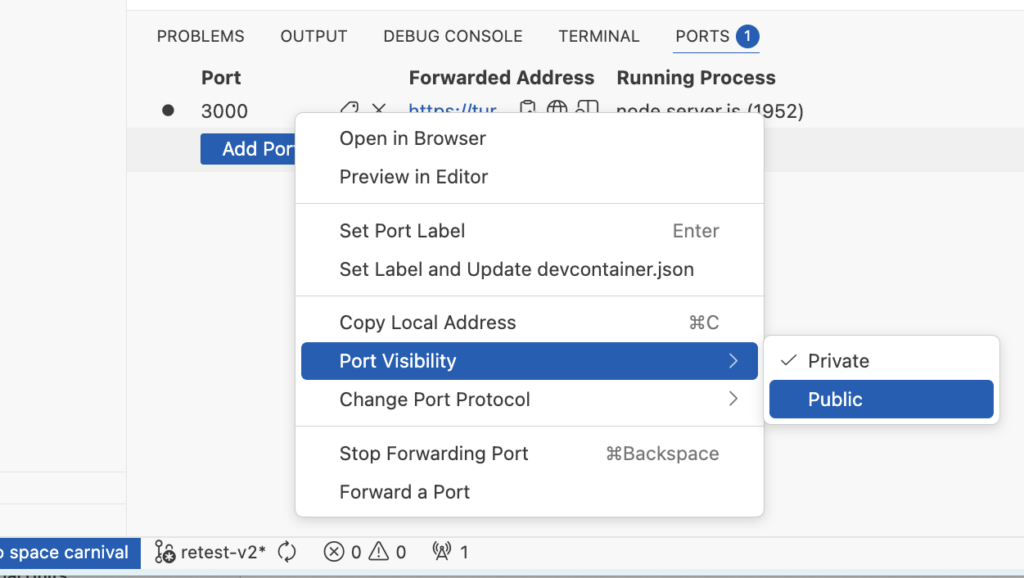
- Right-click again on the port, and click Copy Local Address. This is the app URL.
- Paste the URL somewhere where you can access it from your phone. You should see your app running there. Test adding a new stakeholder, logging in as admin, etc.
- Once you have properly tested, make sure to set your Port Visibility back to Private, or just stop your app. Otherwise, your app is wide-open and unsecured.
8. Verify that the ENV file is Being Ignored
Once you are satisfied that your Stakeholder Tracker works to store, update, and delete records on Supabase, and it works on more than one device, it’s time to commit and push.
But first, open your .gitignore file and make sure it contains the .env file because, as you learned before, this prevents your Supabase credentials from being committed to GitHub and they remain safe and secure.
9. Commit and Push Changes to Github
- Once you are satisfied and verified everything works, commit and push your changes to Github, either using the Source Control feature in Codespaces, or typing the git commands in a terminal window.
- Go to GIthub and merge the pull request, and delete the branch.
Reflection
You have moved your locally stored stakeholder feedback to the cloud, where it is now available to users of the app. Cloud storage is a common feature of most apps, and knowing how to implement it is important.

Migration
Possibilities
Planning
Key Terms
- Cloud File Storage: Storing files (PDFs, images, documents) on remote servers that can be accessed via the internet from any device.
- Cloud Database: Storing structured data (rows and columns) on remote servers
- Supabase: A platform that provides storage, database, and authentication services with a generous free tier, designed for startups and MVPs.
- Persistence: Data that remains saved even after closing the browser, restarting the device, or switching devices
CRUD Operations: The four basic functions of data storage:
- Create – Add new records (INSERT)
- Read – Retrieve and display data (SELECT)
- Update – Modify existing records (UPDATE)
- Delete – Remove records (DELETE)
- SQL (Structured Query Language): Programming language used to manage and query relational databases
- Row Level Security (RLS) – Security feature that controls which users can access which rows in a database table
Additional Resources
- Supabase Javascript Documentation – Official guide Supabase integration using Javascript
- W3Schools SQL Tutorial