- Start to build a working AI-powered app using a no-code tool
- Learn how web apps save data using browser storage
- Understand how AI can be a thinking partner, not a replacement for thinking
- Learn how to connect your project to GitHub so your code is never lost
- A working Founder’s Toolkit app built in Github Codespaces that includes:
- Feedback Storage module to organize initial stakeholder input
- Contrarian module that provides a “third voice” and challenges your problem definition
- A GitHub repository with your Founder’s Toolkit project where your code will be saved
- Students understand basic AI concepts and have explored AI tools in Entrepreneurial Units (AI Awareness and Entrepreneurial Mindset)
- No prior coding or prompt engineering experience required
From Exploration to Action
So far in this curriculum, you have explored what AI is and how it’s changing the world. You have also applied the entrepreneurial mindset when you shared your initial problem with friends and family and asked them:
- Does this problem resonate with them?
- What aspects do they think matter most?
- What questions or concerns come to mind?
- What are you missing about this problem?
You encouraged them to play contrarian and took notes on their feedback.
Now it’s time to put AI to work. You have valuable input, but it’s probably scattered across notes, messages, and memory. And while friends and family can be honest, they might still hold back on the toughest questions.
AI as Your Thinking Partner
A thinking partner helps you explore ideas, ask better questions, and spot what you might miss. AI can do this surprisingly well, and many successful companies already use it this way. But to use AI effectively, you need to understand its strengths and limitations.
In the first two technical units, you’ll learn to use AI as a thinking partner by using vibe coding. Vibe coding is where you describe what you want in plain language, and AI generates the features for you. For this lesson, we’ll vibe code using Github Copilot to build a Founder’s Toolkit app, a potentially useful app to strengthen your own project.

Important: The AI tools you build are meant to augment human feedback, not replace it. You’ve already talked to real people, which is essential. AI adds a third perspective and helps you make sense of what you’ve heard.
Getting Started with Github
For this entire program, you’ll use GitHub and we will take advantage of many of its capabilities including its storage capabilities.
In addition to their main use case of code management, Github also features the AI Agent Github Copilot and cloud coding platform Codespaces. We will be using Codespaces, which is a development environment that runs in your browser. You will be able to instruct Copilot in natural language what you want to build and see the code built in Codespaces to understand it, test it, and ultimately deploy it.
We can describe them here:
- GitHub => Your project’s home like Google Drive for code
- Codespaces => Your workspace like Google Docs, but for building apps
- Copilot => Your AI coding partner that turns your ideas into working code
GitHub solves many problems in the context of product development. It’s a platform where developers store and share code primarily but recently, it has evolved into an AI coding partner and part of their mission is to democratize software creation for everyone. That’s why they have invested in more AI capabilities to empower everyone and it has free tiers with generous limits.
To get started:
- If you already have a Github account, you can skip these steps. Otherwise, navigate to github.com
- Click “Sign up” and follow the steps (it’s free and takes about 2 minutes)
- Use an email you check regularly and we advise you to choose a professional username since this username will be how you appear with other developers when you eventually collaborate
If you are a registered student in a school or university, sign up for a Github Education student account. With the Student Developer Pack, you will get a free Github Pro account, unlimited repositories, and more Copilot credits. There are also third-party free developer tools you will gain access.
Storing your Feedback
Have your Unit 2: Entrepreneurial Mindset worksheet and interview notes ready.
In these activities, you’ll set up your development environment and build a Feedback Collector to organize the input you gathered.
ACTIVITY 1
Start your Development Environment
Estimated Time: 15 Minutes
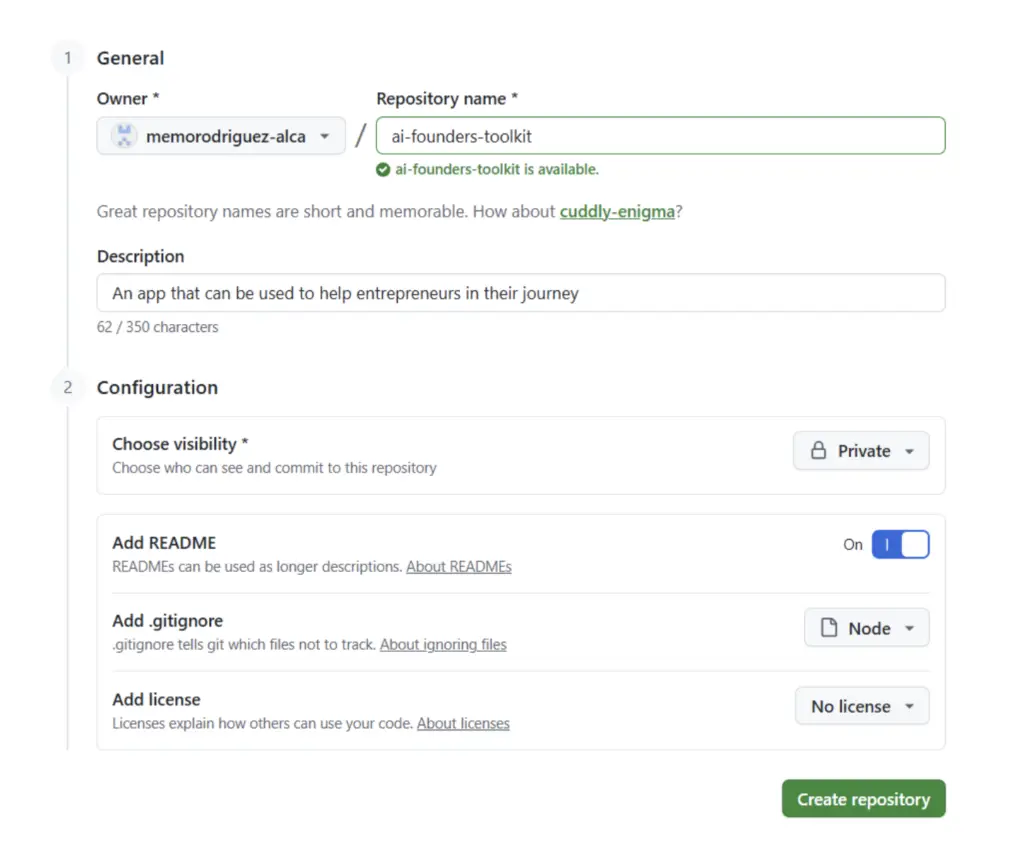
1. Open Github and create your first repository
A repository (or “repo”) is a central place for your project on GitHub.
- Let’s create one by clicking on “Create repository” or “New”.
- Add a repo name and description.
- For a name you can give it something like AIVA Founders Toolkit, but it must be unique, so add an identifier for yourself
- For a description, AIVA Founder’s Toolkit app will suffice.
- Select the following in the Configuration:
- Visibility = Private to ensure you’re the only one that can view the repository
- Readme = True for Github to automatically create a default file that will be used for documentation
- Add .gitignore file = Node
- Add licence = MIT License
We will get into what these details mean in later units. If you missed any of these, no worries as we can manually add them later.
2. Create a new branch
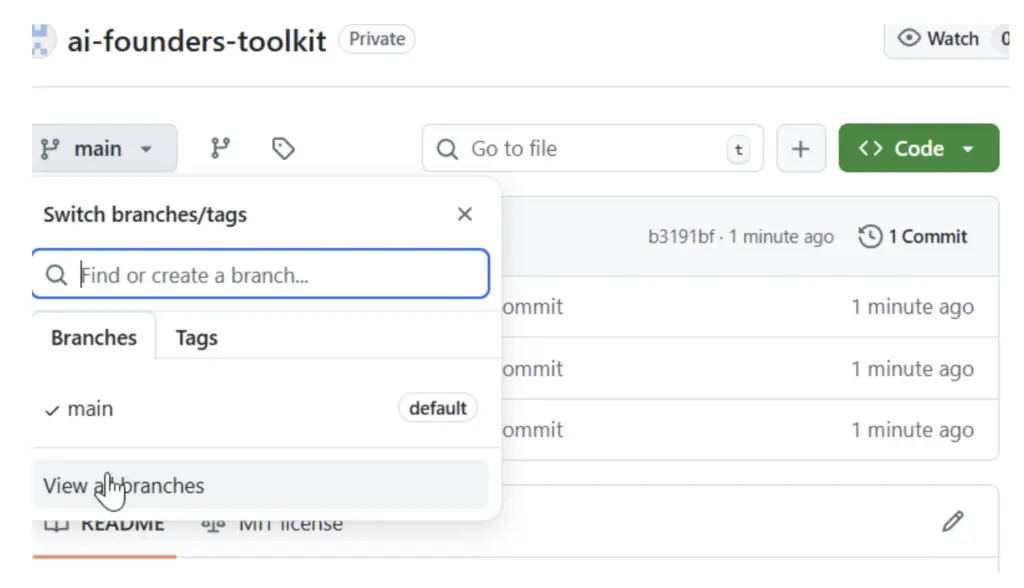
- Click on the “ main” branch on the top left of your repo to show the list of available branches.
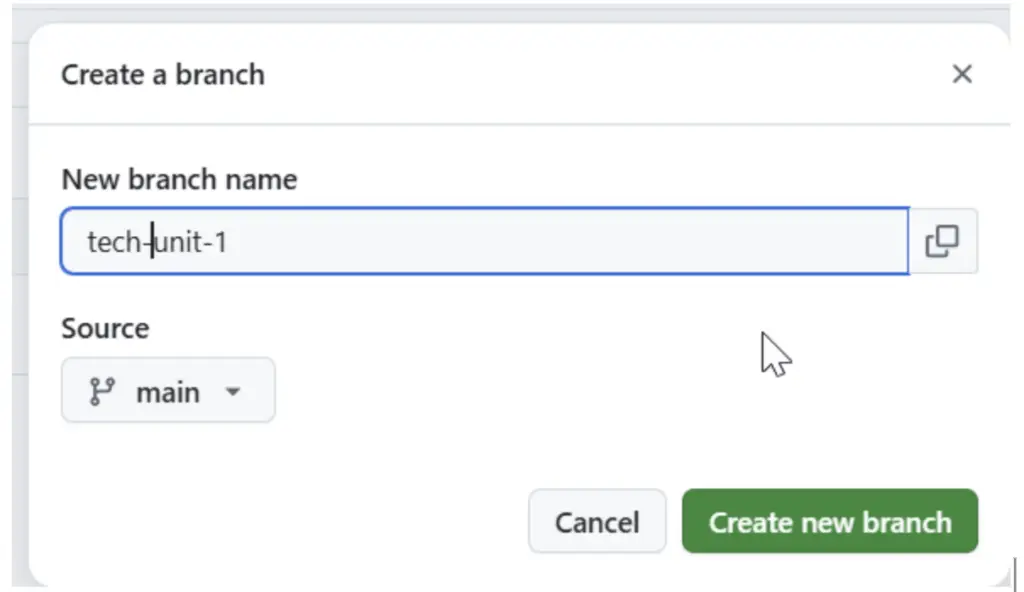
- Select “View Branches” and then create a New Branch.
- Give the new branch a name. This is purely for your use, so you can name it anything, but it is helpful to give it an identifiable name, like tech-unit-1.
This step is optional but we highly recommend working on new branches every time you’re doing major updates. In later units we will get into details on best practices.
3. Select the branch and open Codespaces
We have created a branch where a version of the code will be stored and saved. Now we want to start coding in a development environment using Codespaces.
- Navigate to the branch you just created. You can do this by clicking on the branch name in the View all Branches window.
- Click on the green “Code” button and select to Create a new codespace.
- Wait until Github creates the development environment
You’ll see that your browser open a window that is a coding development tool that looks and acts like Visual Studio Code. This is your development workspace where we will start coding.
4. Explore the Interface
Once Codespaces loads, you’ll notice has many panels:
- File Explorer: your project files
- Editor: where you preview and edit files
- Terminal: where you run commands
- Github Copilot: where you will instruct AI to help you build
- Top Panel: with a Menu bar and search

Things to note:
- Your code is already being saved to Codespaces: Unlike other tools where you might lose work, everything you create in Codespaces is automatically saved. At some point, you will have to commit your changes to your repository branch on Github itself, but you can close and re-open Codespaces and your code will be there.
- Codespaces that are not active for 30 days are deleted.
- More functionality exists: No need to get into these tabs and panels for now. They represent other workflows on the development process that we will address in later units.
Now that you’re set up with your development environment in Codespaces, you’re ready to start building a working app in under 10 minutes.
Prompt Engineering Fundamentals
You will use AI to help you build this working app.
Here’s the key insight: AI is only as good as the instructions you give it.
If you give vague instructions, you get vague output. If you give specific, well-structured instructions, you get useful, targeted output.
Prompt Engineering is the practice of writing instructions that prompt AI to produce useful, specific outputs. When you improve your instructions, you improve your app. There are many techniques out there to improve AI instructions. There are countless books written about it.
But in essence, most of the techniques involve:
Context Setting
For instance
"Give me feedback on my idea."
With context:
"I'm a first-time entrepreneur exploring a problem about food waste in school cafeterias. I've interviewed two students who experience this daily. Give me feedback on my idea."
Output Structure
For instance
"List some challenges."
With context:
"List exactly 3 challenges, each as a single sentence under 20 words."
Tone Control
For instance
"Tell me what's wrong with my idea."
With context:
"Act as a supportive business mentor. Point out weaknesses in my idea while suggesting how I might address them."
Want more on Prompt Engineering? Check out the Appendix and also the links in the Additional Resources.
ACTIVITY 2
Build a Feedback Storage Capability
Estimated Time: 30 Minutes
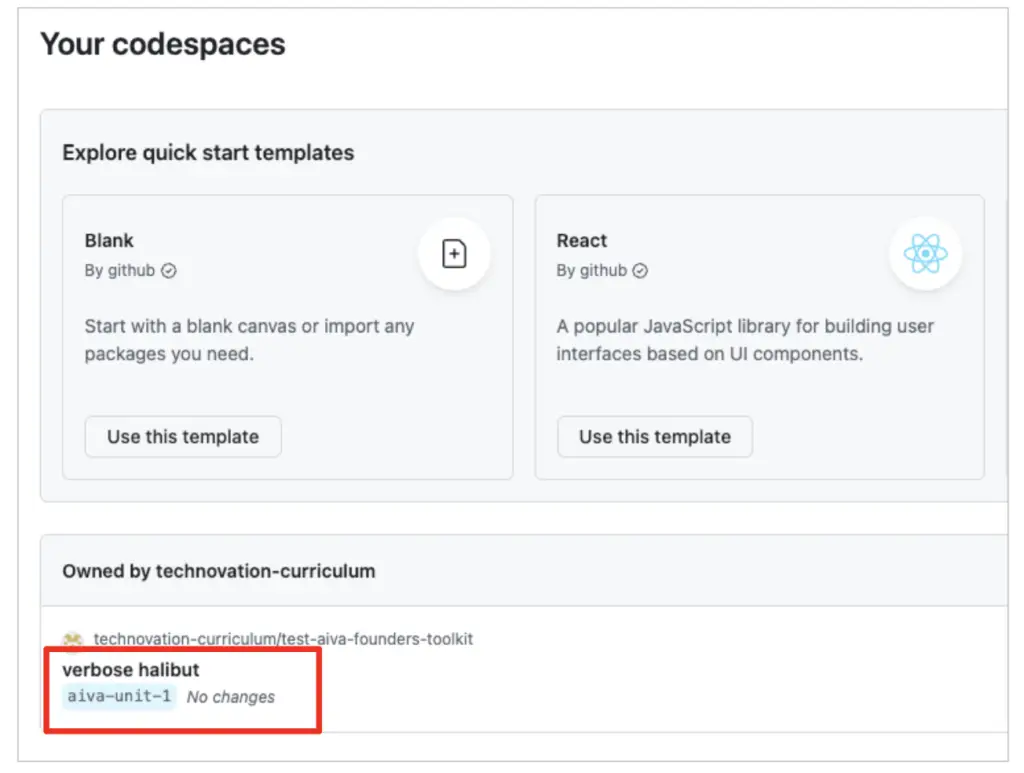
1. Open Github and open your Codespace from Activity 1
If you already have it open, you can skip this step. Otherwise,
- Login to Github.
- Click on the hamburger menu in the top left and select “Codespaces” from the dropdown menu.
- When the Codespaces window opens, click on the random name Github has given your codespace to reopen it.

2. Instruct the AI to build your “Feedback Storage”
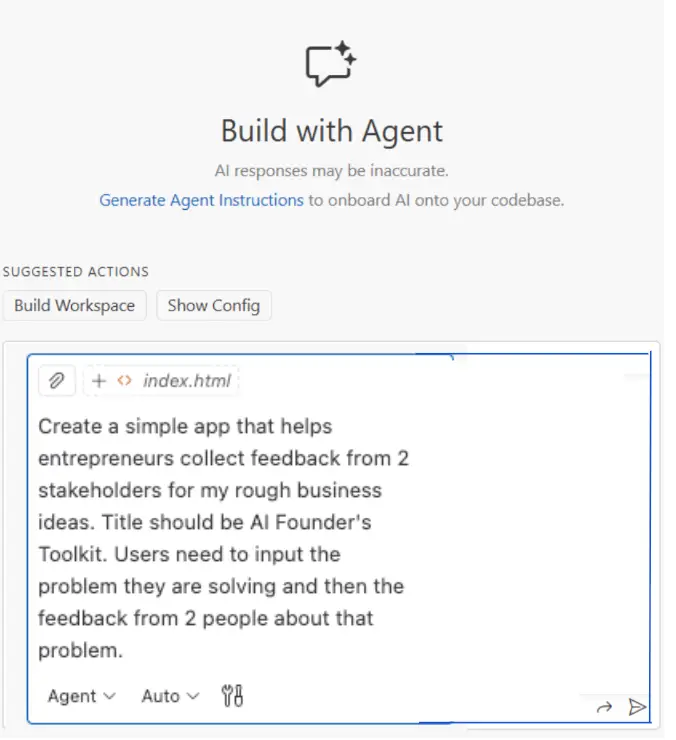
Start with this basic text instruction below in the chat prompt.
This is a prompt you’ll give to Github Copilot; it will take your instructions and make additional assumptions to help fill in any blanks.
Copy and paste it exactly as shown in the chat prompt in the Github Copilot panel on the right-hand side.
Create a simple app that helps entrepreneurs collect feedback from 2 stakeholders for my rough business ideas.
– Title should be AI Founder’s Toolkit.
– Users need to input the problem they are solving and then the feedback from 2 people about that problem.
Tip:
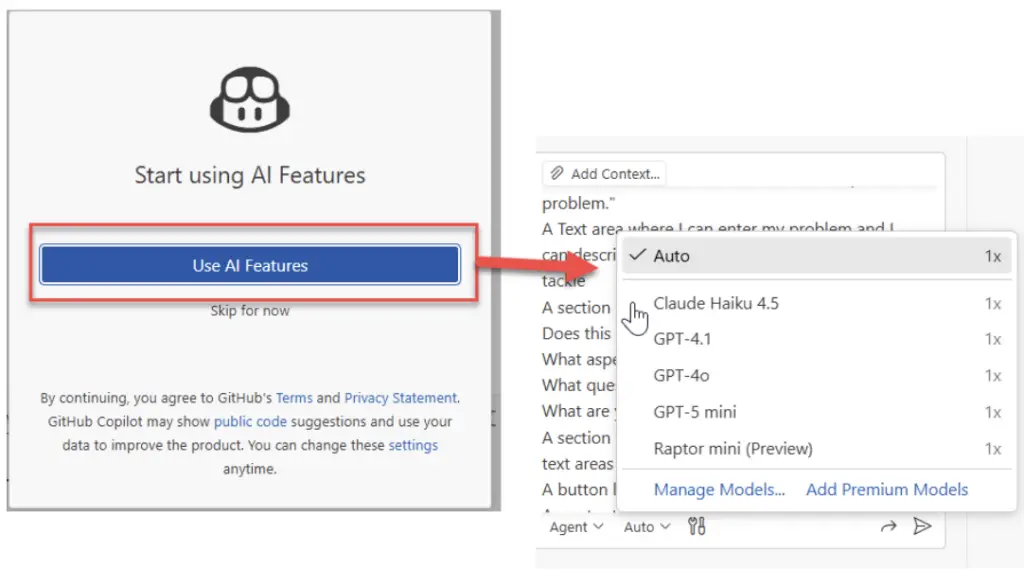
It is impossible to keep track of all the latest models and capabilities available in GitHub Copilot. As of January 7th, 2025, GitHub has various LLM models but it defaults the model selection to “Auto”. This gives them the flexibility to select a model that is the most convenient for them and perhaps the most suited for the specific task at hand. We recommend that you enable model selection to have a choice and select the model you prefer. You will need to accept their terms by clicking on “Use AI Features” which would enable the model selection. While this is not required (despite the confusing button text”) to use their AI features, it is required to allow model selection.
3. Wait for Your App to be built by AI
Copilot will generate your app and show progress along the way.
This may take approximately 1-2 minutes, depending on our instructions. You’ll see the code being written in real time, which lets you learn how the AI model thinks like a Software Engineer/Entrepreneur.
You’re telling the AI model what you want in plain language. The AI model reads your description and generates the code automatically. This is called “no-code development” because you describe the app rather than code it.
The AI makes various assumptions, such as choosing to build a web application using a common framework, such as HTML, CSS, and Javascript. It will also fill in stylistic details you didn’t specify, like choosing colors, fonts, and layout. You don’t need to understand the code; just watch it work, and start getting ideas of what else you can add later.
If doing this for the first time, it may ask for you to allow certain permissions like creating, editing, removing files OR even running certain commands on your behalf.
Important tip:
In the future as you progress in your development journey, you may find that you’d want additional controls over what it does to reduce any risk of it running wild. So you can play around with the setting you feel the most comfortable with. Professional developers often allow simple commands like edit that can be easily reversible, but have more granular controls on bash commands since that may cost more to run in API costs. In later units we will cover this.
4. Test Your App
Since this is a web app, it may have asked you for permission to trust opening a web app (see screenshot below) which we should have enabled in previous steps.
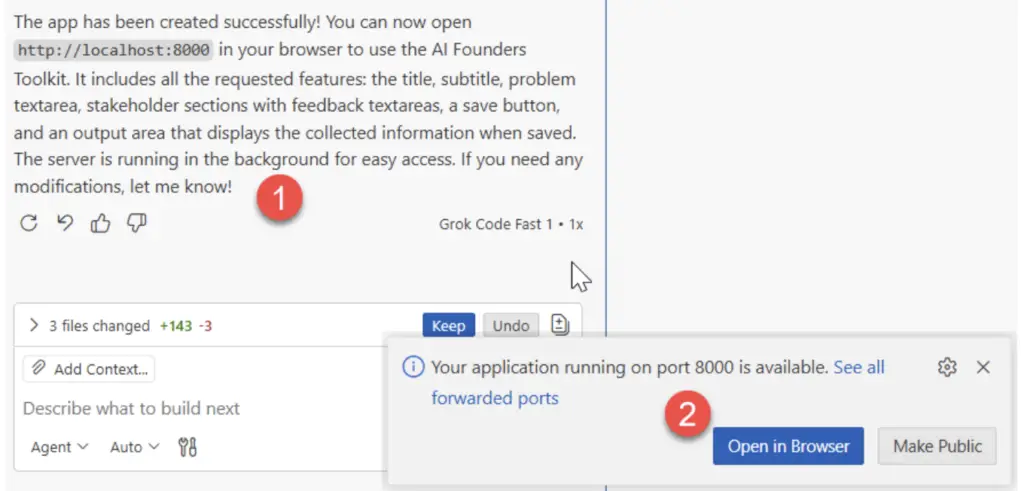
Once Copilot finishes coding the app, you can start testing it by:
- Run the app by typing “python3 -m http.server 8000” in the terminal panel at the bottom of the screen. This is the simplest way to run your starter app.

- A new browser tab will open with your app running.
- You can enter your problem statement.
- Add feedback from all your initial friends and family from the Entrepreneurial Mindset worksheet.
- Click to save the feedback.
- Verify that the info appears in the output area.
Troubleshooting:
If your app is not appearing:
- You can ask Copilot: “How do I run my app?” or “Help me debug why I can’t see the form and find any identified issues”This is what we call AI-assisted debugging which you will learn in later units.
If your app won’t load:
- Try refreshing the page. If that doesn’t work, then start from scratch.
If the output doesn’t match what you expected:
- That’s fine. You will learn how to make adjustments later.
5. Refine Your Prompt
The AI model we used to build our app is powerful. The assumptions it made may produce something you did not want, but the process it took and the output it produced could inform further refinement of the app to improve the output.
For us, AI made the assumption to save the information and give the user the option to save is as a csv file after entering it. It may have produced something different for you. But we need to be more detailed and exact with our instructions to get what we want.
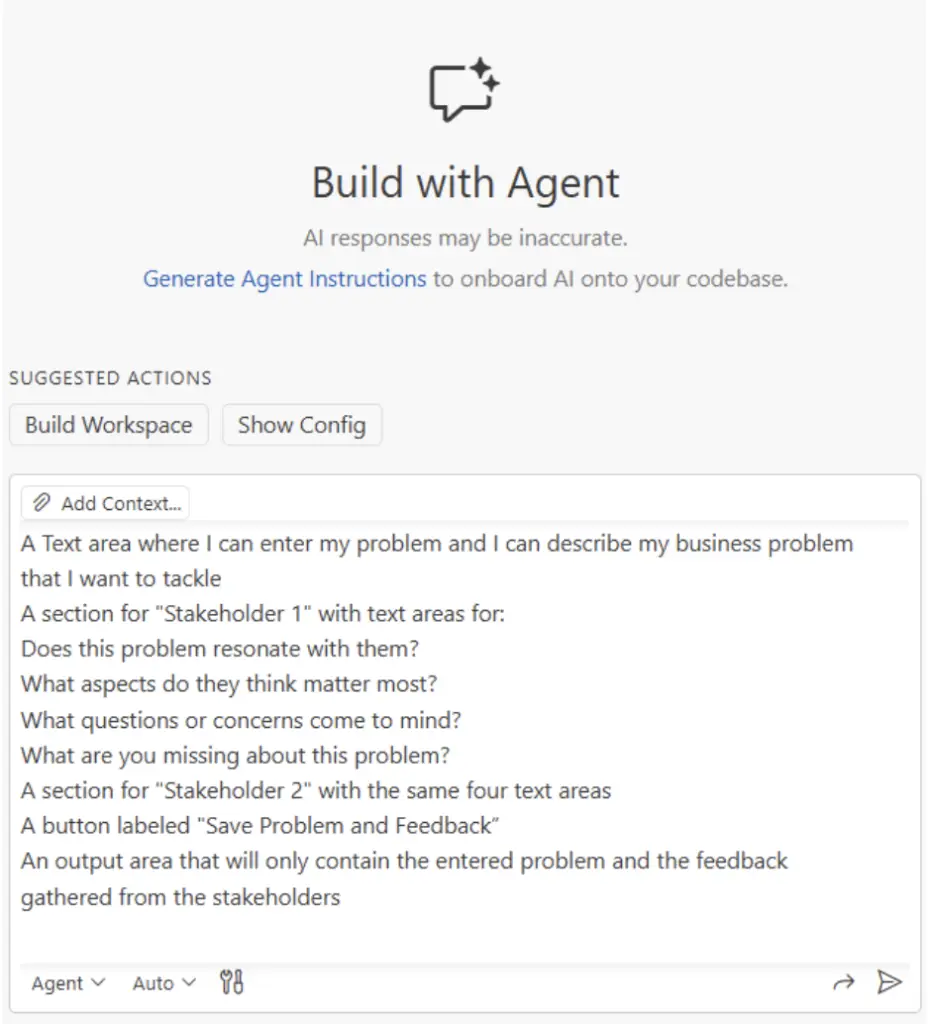
Copy and paste the prompt shown below in the chat prompt in the Github Copilot panel on the right-hand side of your Codespaces screen.
Add one more line to the prompt to make the instructions even clearer, and to make your app even better!
Refine this app that will help entrepreneurs collect feedback from 2 stakeholders for my rough business ideas
The app should have:
– A title at the top: “AI Founders Toolkit”
– A subtitle: “Start to collect feedback on my problem.”
– A Text area where I can enter my problem and I can describe my business problem that I want to tackle
– A section for “Stakeholder 1” with text areas for:
- Does this problem resonate with them?
- What aspects do they think matter most?
- What questions or concerns come to mind?
- What are you missing about this problem?
– A section for “Stakeholder 2” with the same four text areas
– A button labeled “Save Problem and Feedback”
– An output area that will only contain the entered problem and the feedback gathered from the stakeholders
4. Test Your App Again
Once Copilot finishes updating the app, you can refresh the browser tab running the app to see the changes.
Remember, if you run into issues running the app or the output does not look right, ask Copilot to help you figure it out.
6. Commit Your Changes
Run and test your app until you are satisfied with the output.
Even though Codespaces saves your code, we still need to commit any changes to the branch in our Github repository. Committing and the pushing uploads the code changes your repository. Once pushed, they are permanently saved and tracked in Github.
To commit and push:
- In the left-side panel and click on Source Control icon.
- Under the Changes tab, add a commit message manually or use AI to create one for you
For us, AI created a good commit message:
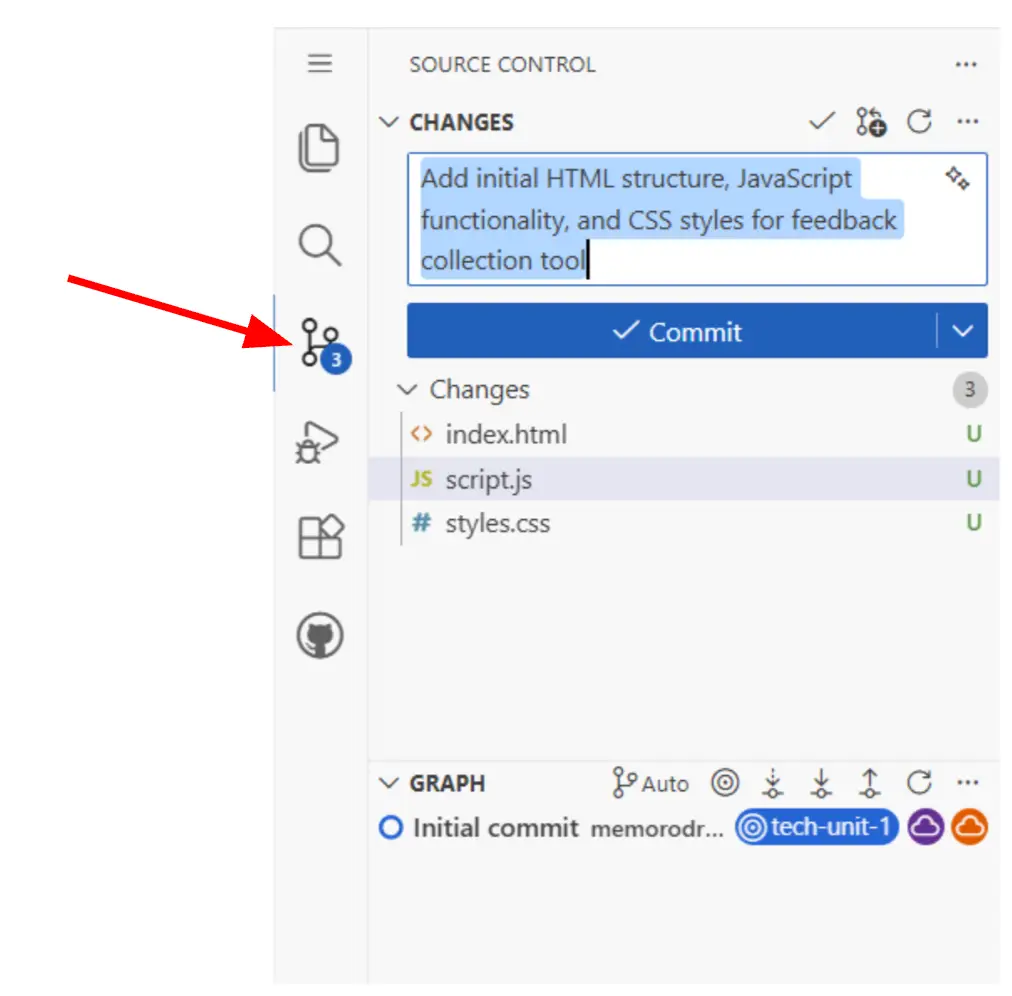
3. You may get a message, There are no staged changes to commit. If So, click Yes to commit.
4. Click Sync Changes to sync the Codepace platform with Github.
5. Go back to Github and your repository and branch to check that the files appear there. It should show every file that has been created, changed, or deleted. There are some exceptions here (hint: files listed in the gitignore file).
This step ensures your changes are saved to the branch and reduces any risk of losing any work done if something happens with your Codespace environment. On later units, you will learn what these “Git” commands are.
You Just Built an App!
Take a moment to appreciate what you just did.
This Feedback Storage gives you a structured place to store all the input you’re gathering, and you’ll keep adding to it throughout this program.
Things to note:
- You didn’t write any code. You just described what you wanted
- The AI made assumptions to fill in details you didn’t specify (colors, layout, placeholder text, etc.)
In our case, it added a few things that we didn’t specify in our instructions, such as:
- “Placeholder texts” for each text entry
- An Edit Feedback button
- A success message after the feedback was submitted
Your output might look different from your friends and may even look different if you’re creating new apps and adding the same prompts, and that’s okay. The AI interprets your instructions and makes design choices, and if you’re not fine with them, you can always ask to change or do those changes yourself in the code.
Storing Data
Right now, every time you refresh your app, all your data disappears. That’s not useful for a real tool.
In the next activity, you’ll add local storage to your app so it can save more complex data from your app.
Local Storage protects any submitted data while you work in the browser Your code is already safe on GitHub if you’ve been using Codespaces, but now your entered data will be safely stored in the browser so you can access it.
How Web Apps Store Data
When you build a web app (such as the one Google AI Studio creates), you can’t save files directly to a user’s computer for security reasons. Instead, web applications use browser storage, a built-in feature that allows websites to save data locally in your browser.
To add memory to your app, we need to understand a few high-level things:
- The WHAT: Types of browser storage
- The HOW: How is the data written for storage
- The WHERE: Where the data is kept
WHAT is Local Browser Storage?
There are two main types of browser storage:
- Local Storage: Data stays saved even after you close the browser
- Session Storage: Data disappears when you close the browser tab
For our Founder’s Toolkit, we’ll use both options, so your feedback persists between sessions.
HOW Does It Work?
Browser storage stores data as key-value pairs, similar to a dictionary, where each piece of data has a name (the key) and a value.
For example:
- Key => Problem
- Value => “Farmers can’t sell their goods”
Both the key and value must be text (strings) and are stored as JSON. JSON (JavaScript Object Notation) is a standard format for representing data that is easy for both humans and computers to read.
The entire JSON structure gets stored as a single string value in localStorage, with further nesting if there are more key-value pairs.
For example, storing a problem and feedback from 2 people, might produce this JSON string:
					{
    "problem": "Farmers from local rural communities can't sell their farming goods",
    "feedback": [
        {"person": "J Smith", "resonates": "Yes, sees it daily"},
        {"person": "M Jones", "resonates": "Note sure it's a big issue"}
    ]
}
WHERE is the data stored?
Local Storage lives inside your browser, which is different from local files on a computer.
You can actually see it in the browser. Here’s how you can see it using Chrome as the browser.
- Right-click anywhere in any site and select “Inspect” (or press F12)
- Click on the “Application” tab (in Chrome)
- Look for “Local Storage” in the sidebar
- Click on it to see your saved data (you may not have anything saved yet so it may be empty)
Limitation:
Browser storage doesn’t sync across devices. If you change computers or clear your browser data, your information is gone. In later units, you’ll learn about cloud storage to solve this.
This means if you change computers, use a different browser, or clear your browsing data by refreshing the page, your saved information will be gone. In later units, we’ll learn about more permanent storage options like databases and cloud storage.
JSON is how most apps store and share data. LLMs also read and interpret JSON files really well. By learning this now, you’re building a foundation for many capabilities, such as:
- Saving user preferences
- Storing work-in-progress so users don’t lose data
- Syncing data between devices (in later units)
- Connecting to external services and APIs
ACTIVITY 3
Add Local Storage
Estimated Time: 20 Minutes
1. Open Github Codespaces
Go to Github.com, navigate to your Codespaces and open up the Codespaces for your Founder’s Toolkit app.
2. Instruct AI to add Local Storage
Copy and paste this prompt in the Copilot chat section, which should be in the right-most pane.
After submitting the problem and feedback, create a new record and store all data in the browser’s local storage.
– Include fields for the problem and each feedback response in a structured manner.
– after the user saves the information, the entered record(s) should appear below the entry form
3. Test Data Persistence
Once the AI has finished adding the code, you can begin testing by submitting your problem and feedback.
- Enter your problem and feedback for each stakeholder
- Click to Save Problem and Feedback
- Refresh the page (by pressing F5, clicking your browser’s refresh button, or clicking on the reload app button in Codespaces in the top-right on top of the Preview Panel)
- Confirm that your submitted data appears
- If it does not appear, use Copilot to help you figure out the issue and get it working
You should be able to see what Copilot implemented after it’s done.
For us, the AI added code that did the following:
- Updated the script.js file
- Converted the form inputs to a JSON-formatted string with the respective keys and added a timestamp
- Stored JSON in your browser’s local storage
- Retrieves the data when the app loads
To verify this, follow the steps above (WHERE is the data stored) to open the Developer Tools in your browser and inspect the Local Storage. Below is what it looks like to us in Local Storage with the key “feedback_records”.
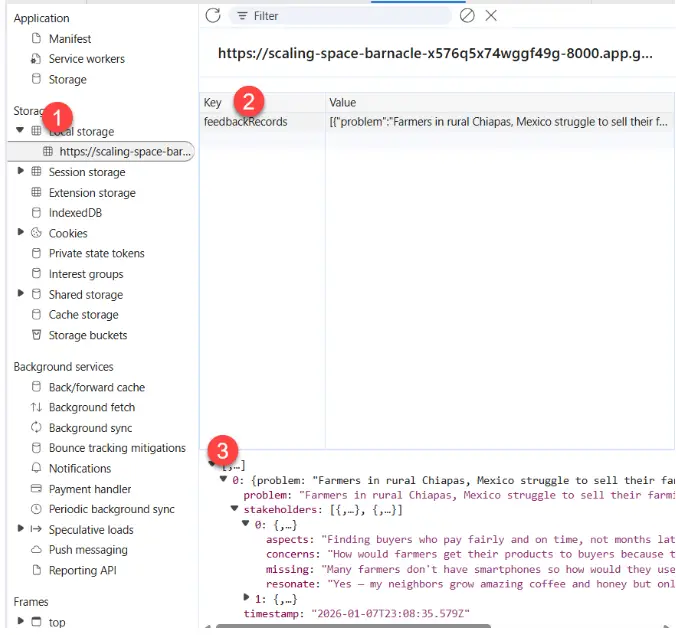
Here is a cleaner view of the JSON created.
					[
    {
    "problem": "Farmers in rural Chiapas, Mexico struggle to sell their farming products at fair prices",
    "stakeholder1": {
        "resonate": "Yes — my neighbors grow amazing coffee and honey but only sell to the same buyer who pays very little.",
        "aspects": "Finding buyers who pay fairly and on time, not months later.",
        "concerns": "How would farmers get their products to buyers because the roads here are difficult.",
        "missing": "Many farmers don't have smartphones so how would they use an app?"
      },
      "stakeholder2": {
        "resonate": "Absolutely. I see farmers walk hours to the market and come back with unsold vegetables.",
        "aspects": "Knowing ahead of time if someone will actually buy, so the trip isn't wasted.",
        "concerns": "Internet is unreliable here — sometimes no signal for days. Would an app still work?",
        "missing": "Trust and safety is everything. Here carrying cash can be dangerous."
      },
      "timestamp": "2026-01-07T23:08:35.579Z"
    },
    {
        "problemStatement": "farmers selling their products",
        "stakeholder1": {
            "resonance": "Yes — my neighbors grow amazing coffee and honey but only sell to the same buyer who pays very little.",
            "importantAspects": "Finding buyers who pay fairly and on time, not months later.",
            "questionsConcerns": "How would farmers get their products to buyers because the roads here are difficult.",
            "missingPoints": "Many farmers don’t have smartphones so how would they use an app?"
        },
        "stakeholder2": {
            "resonance": "Absolutely. I see farmers walk hours to the market and come back with unsold vegetables.",
            "importantAspects": "Knowing ahead of time if someone will actually buy, so the trip isn't wasted.",
            "questionsConcerns": "Internet is unreliable here — sometimes no signal for days. Would an app still work?",
            "missingPoints": "Trust and safety is everything. Here carrying cash can be dangerous."
        },
        "timestamp": "2026-01-03T19:27:37.272Z"
    }
]
4. Commit Your Changes
- Go to Source Control on the left panel.
- Type in a description of the changes and press the Commit button to commit these changes to your repository.
- Sync changes.
You now have a way to input and store user feedback for your project. This will be helpful as you move forward with your project. We will continue to build out this Founder’s Toolkit app in later lessons to gain more skills in building with AI.
Browser Storage Limitations
There are important things to understand about browser local storage:
What It Does Well
- Saves data between page refreshes
- Fast and simple
- Works offline
- No account/login needed
What it doesn’t do
- Doesn’t back up to the cloud or sync across devices
- Can be cleared if you clear the browser data
- Only works in the same browser
Reflection
You spent a good amount of time vibe-coding to create a Founder’s Toolkit app to store and synthesize various pieces of information. Here are some questions to think about:

AI Coding Partner
Codespaces
Control
Key Terms
- GitHub: A platform that started for storing and sharing code.
- Codespaces: A GitHub platform capability that allows a development environment that runs VS Code in your browser to run your code.
- GitHub Copilot: An AI coding assistant that generates code based on natural language descriptions that is powered by LLMs
- Repository (Repo): A folder for your project on GitHub that contains all your code files and is organized in different branches where you can collaborate with other developers.
- Founder’s Toolkit: the app that will progress as students build throughout the technical units
- Vibe-Coding: Describing what you want in plain language and letting AI generate the code. Also called “no-code development”
- Browser Storage: A built-in feature that lets web apps save data locally in your browser, without needing a server
- localStorage: A type of browser storage that persists even after you close the browser. Your data stays until you clear it
- sessionStorage: A type of browser storage that persists for the duration of a single page session. The data is cleared when the tab or browser window is closed.
- JSON (JavaScript Object Notation): A standard format for organizing data that’s readable by both humans and computers. Pronounced “Jason”
- Key-Value Pair: A way of storing data where each piece has a name (the key) and a value. Like a label on a folder
- Prompt Engineering: The practice of writing clear, specific instructions that help AI produce useful outputs
- Non-deterministic: AI doesn’t produce identical outputs for the same inputs. Each response may vary slightly
Additional Resources
- Learn Prompting: Free comprehensive course
- Google’s Prompt Design Guide: Official tips from Google
- GitHub Copilot: Learn more about Copilot’s capabilities, including best practices on how to become a power user
- Git Guides: documentation for using Github and running git commands to maintain projects
Appendix
Prompt Engineering
Prompt Engineering is the process of crafting effective prompts to guide AI models in generating accurate and relevant responses.
It is mainly used in text-based AI and Natural Language Processing (NLP) tasks.
The goal is to write prompts intelligently so the model can produce outputs that meet specific user needs.
What are Prompts?
- Prompts are short pieces of text that give context and direction to an AI model.
- They help the model generate responses that match the user’s intent.
Good Prompts Should
- Provide clear guidance without too much information.
- Avoid being too general or too detailed.
- Make the user’s goal and context clear.
Why is Prompt Engineering Important?
- Specific prompts improve the model’s understanding of task requirements.
- Leads to outputs that closely match desired results.
- Better prompts mean more effective NLP tasks and better-trained models for future tasks.
Like instructing a talented but inexperienced assistant, you provide clear, precise instructions to get the desired outcome.
Techniques
Prompt engineering is more than drafting prompts — it’s a playground of tools to adjust how you work with LLMs for specific goals.
Level 1: Essential
- Be specific
- Provide context
- Give examples
- One-shot prompting – give an example of input/output.
- Example:
“Text: Jane Smith, 45, is a software developer in London.
JSON: ‘name’: ‘Jane Smith’, ‘age’: 45, ‘role’: ‘Web Developer’, ‘city’: ‘London’
Text: John Doe, 29, is a student in Paris.
JSON: [New Input here]
- Example:
- Few-Shot Prompting – give a few examples to help LLM learn the pattern
- Useful for more complex tasks where multiple examples could help
- One-shot prompting – give an example of input/output.
- Specify format
- Refine iteratively
Level 2: Intermediate (Use when needed)
- Chain-of-thought – ask the LLM to show its reasoning and/or steps
- Role assignment – e.g. “You are an expert…”
- Negative prompting – e.g. “Don’t include…”
- Temperature control – e.g. creativity vs consistency
Level 3: Advanced (Optional, for later)
- Self-consistency – ask for multiple outputs, and then ask the LLM to choose the “best” output
- Tree of thoughts – asks LLM to explore multiple branches of reasoning to decide on its final response
- Retrieval augmented generation (RAG) – asks LLM to use external information to give it better context
Here is a full list of prompting techniques: https://www.ibm.com/think/topics/prompt-engineering-techniques